SpringBoot 拦截器截获 RestTemplate 请求与响应?一文详解底层机制
声明
本文所有案例代码、配置仅供参考,需严格测试评估后再使用。因参照本文导致的任何直接或间接损失,作者概不负责。欢迎技术交流、指正。
1. 引言
•痛点:线上调用第三方接口偶发超时,却苦于缺少统一日志、鉴权、重试手段,只能到处“打补丁”。
•共鸣:90% 的 SpringBoot 项目直接用 RestTemplate 发 HTTP,却鲜有人知道“只要实现一个 ClientHttpRequestInterceptor 就能低成本统一治理”。
•方向:本文带你拆解 SpringBoot 2.x 的底层装配链,看懂“拦截器生效”的完整闭环,并给出可直接落地的日志、重试、灰度示例。
2. 背景知识
2.1 三层拦截概念
|
层级 |
典型接口 |
作用域 |
本文是否涉及 |
|
Servlet 层 |
HandlerInterceptor |
进入 Controller 之前 |
❌ |
|
HTTP 客户端层 |
ClientHttpRequestInterceptor |
RestTemplate / WebClient |
✅ |
|
网络层 |
OkHttp / HttpClient 原生 interceptor |
纯网络库 |
❌ |
2.2 RestTemplate 的“可插拔”架构
•请求工厂 ClientHttpRequestFactory → 真正打开 JDK HttpURLConnection 或 Apache HttpClient
•消息转换器 HttpMessageConverter → 把 Java 对象 ⇄ JSON/XML
•拦截器链 List<ClientHttpRequestInterceptor> → 本文主角,Spring 在“真正发包前”统一回调
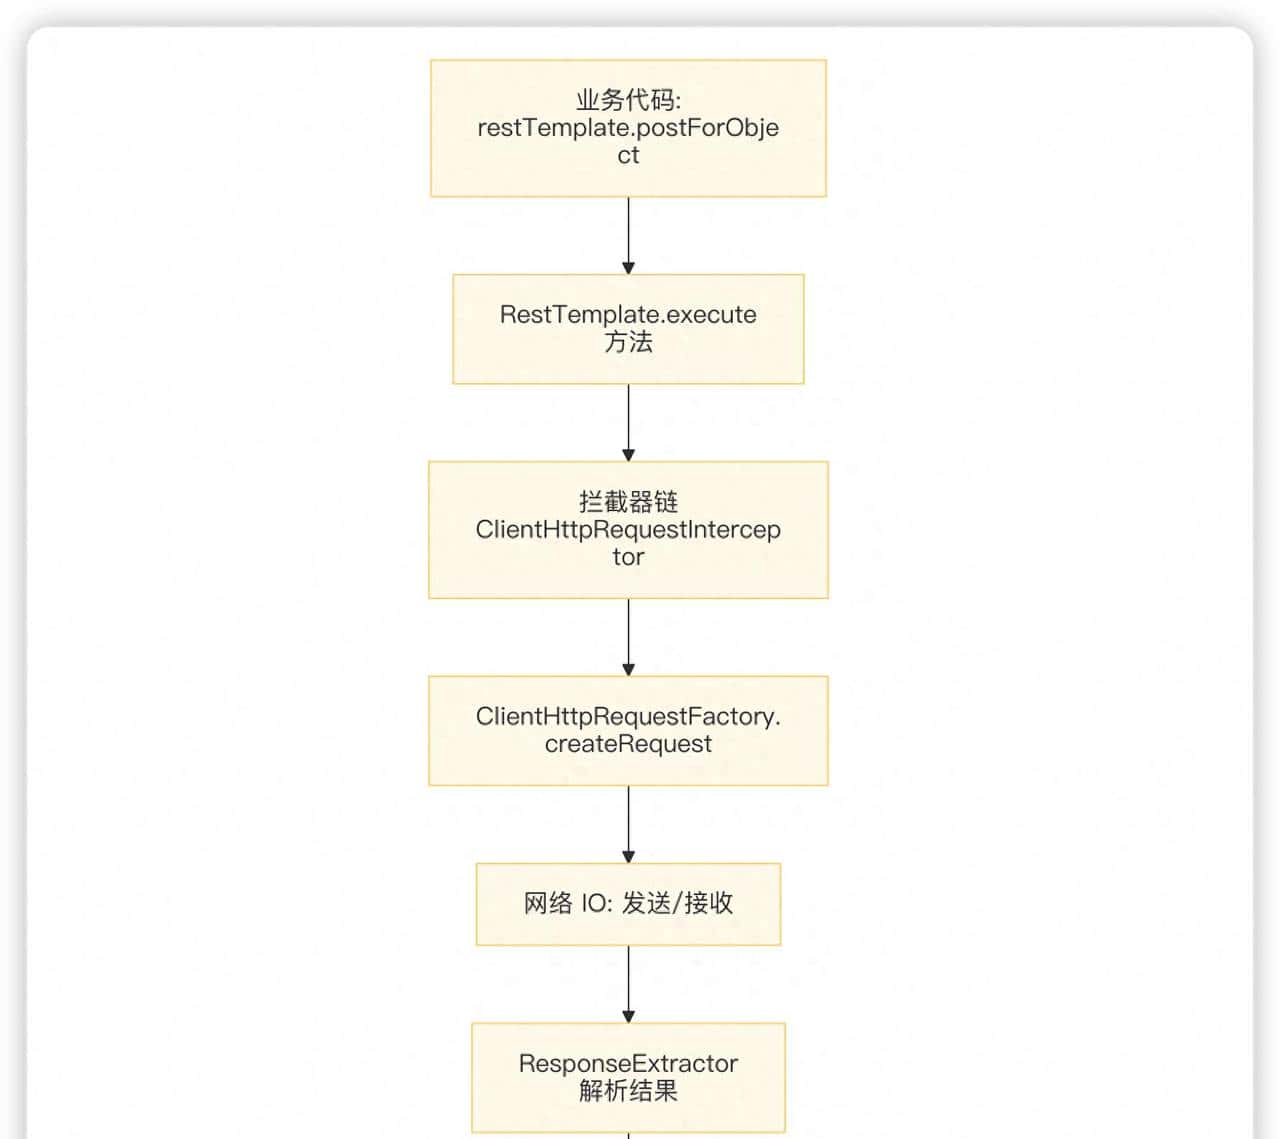
图1 解释:业务代码一旦调用 RestTemplate,Spring 会先把请求封装成 HttpRequest+body 数组,再交给已注册的拦截器链顺序执行;最后一个拦截器负责“真正发包”。因此只要实现 ClientHttpRequestInterceptor 并注册,就能在“发包前/后”横插逻辑。
3. 问题分析
3.1 技术难点
1.拦截器到底被谁、在何时调用?
2.多个拦截器如何形成链条?
3.拦截器如何读取/修改响应体且“只读一次”?(默认流只能读一次)
3.2 常见方案对比
|
方案 |
优点 |
痛点 |
|
每个接口手动封装工具类 |
简单 |
重复代码、易遗漏 |
|
AOP 切面拦截所有 RestTemplate 方法 |
无侵入 |
只能拿到方法参数,拿不到原始字节流 |
|
ClientHttpRequestInterceptor |
官方钩子、读写一体、可链式 |
需要理解 Spring 内部回调时机 |
3.3 关键本质(流程图)

图2 解释:RestTemplate 把“真正发包动作”包装成 ClientHttpRequestExecution 传给拦截器;拦截器既能改请求,也能 execution.execute() 继续向下传递,从而天然形成“责任链”。
4. 解决方案详解
4.1 整体架构

图3 解释:把拦截器做成一个 SpringBoot starter,利用 RestTemplateCustomizer 在全局统一注入,业务方“零感知”即可拥有日志、鉴权、重试能力。
4.2 核心组件说明
|
组件 |
作用 |
|
BufferingClientHttpRequestFactory |
包装原工厂,让响应流可重复读,解决“只能读一次”问题 |
|
ClientHttpRequestExecution |
表明“继续向下走”的句柄,最后一个 execution 会真正发请求 |
|
RestTemplateCustomizer |
SpringBoot 提供的回调接口,用来统一给所有 RestTemplate 加拦截器 |
4.3 关键实现
package 「包名称,请自行替换」.interceptor;


import org.springframework.http.HttpRequest;
import org.springframework.http.client.ClientHttpRequestExecution;
import org.springframework.http.client.ClientHttpRequestInterceptor;
import org.springframework.http.client.ClientHttpResponse;
import org.springframework.util.StreamUtils;


import java.io.IOException;
import java.nio.charset.StandardCharsets;


/**
 * 日志 + 耗时拦截器示例
 * 安全提示:生产环境请过滤敏感字段,避免打印密码、Token 明文
 */
public class LoggingInterceptor implements ClientHttpRequestInterceptor {


    @Override
    public ClientHttpResponse intercept(HttpRequest request,
                                        byte[] body,
                                        ClientHttpRequestExecution execution) throws IOException {
        // 1. 请求侧日志
        String req = new String(body, StandardCharsets.UTF_8);
        System.out.println("==> " + request.getMethod() + " " + request.getURI());
        System.out.println("==> body=" + req);


        long start = System.currentTimeMillis();
        // 2. 继续执行(可能经过下一个拦截器)
        ClientHttpResponse response = execution.execute(request, body);


        // 3. 响应侧日志(利用 BufferingClientHttpResponseWrapper 多次读)
        byte[] respBytes = StreamUtils.copyToByteArray(response.getBody());
        System.out.println("<== status=" + response.getStatusCode() + " cost=" + (System.currentTimeMillis() - start) + "ms");
        System.out.println("<== body=" + new String(respBytes, StandardCharsets.UTF_8));


        // 4. 重新包装,让上层还能再读
        return new BufferingClientHttpResponseWrapper(response, respBytes);
    }
}
package 「包名称,请自行替换」.config;
import org.springframework.boot.web.client.RestTemplateBuilder;
import org.springframework.context.annotation.Bean;
import org.springframework.context.annotation.Configuration;
import org.springframework.http.client.BufferingClientHttpRequestFactory;
import org.springframework.http.client.SimpleClientHttpRequestFactory;
import org.springframework.web.client.RestTemplate;
import java.util.Collections;
@Configuration
public class RestTemplateConfig {
@Bean
public RestTemplate restTemplate(RestTemplateBuilder builder) {
RestTemplate rest = builder
.requestFactory(() -> new BufferingClientHttpRequestFactory(new SimpleClientHttpRequestFactory()))
.additionalInterceptors(Collections.singletonList(new LoggingInterceptor()))
.build();
return rest;
}
}4.4 最佳实践
•拦截器顺序:日志 → 鉴权 → 重试,避免重试后日志缺失
•响应体可重复读:必须套 BufferingClientHttpRequestFactory,否则 getBody() 二次读取抛异常
•线程安全:拦截器内部不要写共享可变状态;若必须,用 ThreadLocal
•异常处理:拦截器里抛异常会中断整个流程,请区分“业务异常”与“网络异常”
5. 实践案例
5.1 完整目录结构
demo-springboot-rest-interceptor
├── pom.xml
└── src
    ├── main
    │   ├── java
    │   │   └── com
    │   │       └── example
    │   │           ├── DemoApplication.java
    │   │           ├── config
    │   │           │   └── RestTemplateConfig.java
    │   │           ├── interceptor
    │   │           │   └── LoggingInterceptor.java
    │   │           └── service
    │   │               └── HelloService.java
    └── test
        └── java
            └── com
                └── example
                    └── HelloServiceTest.java
5.2 运行步骤
1.环境要求:JDK 8+、Maven 3.6+
2.启动 DemoApplication
3.访问 http://localhost:8080/hello
•控制台会打印:
==> GET http://域名/api
==> body=
<== status=200 cost=89ms
<== body={"msg":"hello"}
5.3 效果对比
•无拦截器:需在每个方法硬编码 System.out.println(…),遗漏风险高
•有拦截器:一次开发,全链路生效;后续加鉴权、重试只需再插一个拦截器,满足开闭原则
6. 进阶优化
|
方向 |
策略 |
|
性能 |
使用 |
|
重试 |
结合 Spring Retry 或自定义拦截器,对 5xx + 网络抖动异常做指数退避 |
|
灰度 |
在拦截器里读取配置中心开关,动态路由到不同版本实例 |
|
监控 |
将 cost 写入 Micrometer,对接 Prometheus,实现接口级 P99 告警 |
|
局限 |
仅对 RestTemplate 生效;若项目已切 WebClient,请用 ExchangeFilterFunction |
7. 总结与展望
•回顾:RestTemplate 通过“责任链+工厂”把拦截器插在“发请求前”这一黄金位置,只要实现 ClientHttpRequestInterceptor 并注册,就能统一治理日志、鉴权、重试、灰度。
•学习资源:Spring Framework 官方文档 “RestTemplate” 章节
© 版权声明
文章版权归作者所有,未经允许请勿转载。
相关文章


暂无评论...