

前后端分离
前端只需要独立编写客户端代码
后端只需独立编写服务端代码提供数据接口
前端通过Ajax请求来访问后端的数据接口,将Model展示到View中即可
前端HTML — Ajax — RESTful 后端数据接口
1.创建vue工程
下载Node.js
$ npm install -g @vue/cli  //全局安装vue-cli

下载太慢的话
可以修改npm映射:$npm config set registry https://registry.npm.taobao.org/
改回来:npm config set registry https://registry.npmjs.org/

cmd中:
>vue ui    //vue 3.0以上支持的图形界面创建Vue
进入视图创建界面 localhost:8000
选择手动配置
勾选Router、Vuex,去掉Linter/Formatter
$npm run serve //启动vue工程
2.新建SpringBoot应用
组件选择
- Lombok
- Spring web
- Spring Data JPA
- MySQL Driver
resources中application.properties文件改为application.yml
spring:
  datasource:
    url: jdbc:mysql://localhost:3306/database?useUnicode=true&characterEncoding=utf-8&useSSL=true&serverTimezone=UTC
    username: root
    password: 123456
    driver-class-name: com.mysql.jdbc.Driver
  jpa:
    show-sql: true  # 打印SQL
    properties:
      hibernate:
        format_sql: true # 格式化SQL
server:
  port: 8181
不设置端口默认也是8080和vue工程端口冲突
3.前端展示数据
可以先使用假数据完成页面
创建Book.vue
<template>
  <div>
      <table>
          <th>{{msg}}</th>
          <tr>
              <td>编号</td>
              <td>书名</td>
              <td>作者</td>
          </tr>
          <tr v-for="book in books" :key="book.id">
              <td>{{book.id}}</td>
              <td>{{book.name}}</td>
              <td>{{book.author}}</td>
          </tr>
      </table>
  </div>
</template>

<script>
export default {
    name:"Book",
    data(){
        return{
            msg: 图书展示 ,
            books:[
                {id:1,name: Java学习 ,author: Java老师 },
                {id:2,name: Vue学习 ,author: Vue老师 },
                {id:3,name: Spring学习 ,author: Java老师 }
            ]
        }
    }
}
</script>
在路由(router>index.js)添加 Book.vue
const routes = [
  { path:  / ,name:  Home ,component: Home},
  { path:  /about ,name:  About ,component: () => import( ../views/About.vue )},
  { path: /book ,name: Book ,component:()=>import( ../views/Book.vue )}
]
4.继续完成后端
绑定数据表信息,测试端口
4.1 在entity包,创建Book类
package com.xin.entity;

import lombok.Data;

import javax.persistence.Entity;
import javax.persistence.Id;

@Entity
@Data   //Lombok
public class Book {
    @Id  //主键
    @GeneratedValue(strategy = GenerationType.IDENTITY)  //自增
    private Integer id;
    private String name;
    private String author;
}
4.2 在repository包,创建BookRepository 类
JpaRepository<实体类类型,主键类型> 中 集成了许多方法 省的自己写了
package com.xin.repository;

import com.xin.entity.Book;
import org.springframework.data.jpa.repository.JpaRepository;

public interface BookRepository extends JpaRepository<Book,Integer>{
}
在Test中,测试repository接口
@SpringBootTest
class SpringbootApplicationTests {

    @Autowired
    private BookRepository bookRepository;
    @Test
    void findAll() {
        System.out.println(bookRepository.findAll());
    }

}
4.3 在controller包,创建BookController 类
package com.xin.controller;

import com.xin.entity.Book;
import com.xin.repository.BookRepository;
import org.springframework.beans.factory.annotation.Autowired;
import org.springframework.web.bind.annotation.GetMapping;
import org.springframework.web.bind.annotation.RequestMapping;
import org.springframework.web.bind.annotation.RestController;

import java.util.List;

@RestController
@RequestMapping("/book")
public class BookController {
    @Autowired
    private BookRepository bookRepository;

    @GetMapping("/findAll")
    public List<Book> findAll(){
        return bookRepository.findAll();
    }
}
测试controller接口
http://localhost:8181/book/findAll

5.前后端对接
axios实现前端调用后端接口
vue中安装axios

> vue add axios
前端调用,在book.vue中添加

created(){
    const _this =this

    axios.get( http://localhost:8181/book/findAll )
    .then(function(res) {
        _this.books=res.data
    })

}
※跨域问题的解决
在config包,创建CrosConfig类
package com.xin.config;

import org.springframework.context.annotation.Configuration;
import org.springframework.web.servlet.config.annotation.CorsRegistry;
import org.springframework.web.servlet.config.annotation.WebMvcConfigurer;

@Configuration
public class CrosConfig implements WebMvcConfigurer {
    @Override
    public void  addCorsMappings(CorsRegistry registry){
        registry.addMapping("/**")
                .allowedOriginPatterns("*")
                .allowedMethods("GET","HEAD","POST","PUT","DELETE","POTIONS")
                .allowCredentials(true)
                .maxAge(3600)
                .allowedHeaders("*");
    }
}
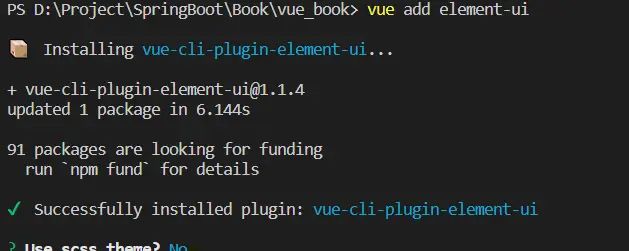
6.使用ElementUI
6.1 Vue集成ElementUI
ElementUI https://element.faas.ele.me/#/zh-CN/component/installation
> vue add element-ui
6.1.1 运行时出现了问题

不能解析sass-loader,需要引入
npm install sass-loader -D
npm install node-sass -D
6.1.2 但又出现了新的问题
经查 node版本和 node-sass版本 不匹配
参考网址
可能用到的命令:
查看 node 版本命令:node -v
查看 node-sass 等版本信息:npm list
卸载 sass-loader 命令:npm uninstall --save sass-loader
卸载 ode-sass 命令:npm uninstall --save node-sass
安装低版本 sass-loader  的命令:npm i -D sass-loader@10.x
安装低版本 node-sass  的命令:npm i node-sass@4.14.1
运行 Vue 命令:npm run serve
6.1.3 或者一开始安装elementui不要使用scss也可以解决
6.2 使用ElementUI布局
任选一个组件布局 | Element
改写App.vue
主要标签
el-container 构建整个页面框架 类似div
el-aside 构建左侧菜单
el-menu  构建左侧菜单内容,常用属性:
    :default-openeds="[ 1 ]"  默认展开的菜单,通过菜单index值来关联
    :default-active=" 1-1 "   默认选中的菜单,通过菜单index值来关联
el-submenu 可展开的菜单栏,常用属性:
    index="1"  菜单的下标,文本类型,不能是数值类型
template 对应el-submenu 菜单名
i  设置菜单图标,通过class属性实现
    "el-icon-message"
    "el-icon-menu"
    "el-icon-setting"
el-menu-item-group 设置分组,不常用
el-menu-item 设置菜单子节点,不可再展开,常用属性:
     index="1-1"  菜单的下标
6.3 通过Vue router动态构建左侧菜单
6.3.1 创建 Page1.vue ~ Page4.vue
6.3.2 改写 App.vue页面
<!-- 侧边栏 -->
    <el-aside width="200px" style="background-color: rgb(238, 241, 246)">
      <el-menu>
        <el-submenu v-for="(item, index) in $router.options.routes" :key="index" :index="index +   ">
          <template slot="title"><i class="el-icon-menu"></i>{{ item.name }}</template>
          <el-menu-item v-for="(item2, index2) in item.children" :key="index2" :index="index +  -  + index2">
            {{ item2.name }}</el-menu-item>
        </el-submenu>
      </el-menu>
    </el-aside>
<!-- 展示 -->
    <el-main>
        <router-view></router-view>
    </el-main>
6.3.3 改写 router > index.js路由
const routes = [
{ path:  / ,
  name:  导航一 ,
  component: App,
  children:[
    {path: /page1 ,name: 页面一 ,component:page1},
    {path: /page2 ,name: 页面二 ,component:page2}
  ]
},
{ path:  /navigation ,
  name:  导航二 ,
  component:App,
  children:[
    {path: /page3 ,name: 页面三 ,component:page3},
    {path: /page4 ,name: 页面四 ,component:page4}
  ]
}
]
6.3.4 按上述写法发现页面会发生嵌套,迁移App.vue中代码至新建的index.vue,并修改路由
把路由 中 component:App 改为 component:Index
6.3.5 menu与router的绑定
-
<el-menu>标签添加router属性
<el-menu router> -
页面中添加<router-view></router-view>,动态渲染选择的router
-
<el-menu-item>标签index的值就是要跳转的router
<el-menu router>
     <el-submenu v-for="(item, index) in $router.options.routes" :key="index" :index="index +   ">
       <template slot="title"><i class="el-icon-menu"></i>{{ item.name }}</template>
       <el-menu-item v-for="(item2, index2) in item.children" :key="index2" :index="item2.path">
         {{ item2.name }}</el-menu-item>
     </el-submenu>
   </el-menu>
6.3.6 初始化时默认加载Page1
路由加一个redirect属性
const routes = [
  { path:  / ,
    name:  导航一 ,
    component: Index,
    redirect:"/page1",
    children:[
      {path: /page1 ,name: 页面一 ,component:()=>import( ../views/Page1.vue )},
      {path: /page2 ,name: 页面二 ,component:()=>import( ../views/Page2.vue )}
    ]
  },
左侧样式菜单绑定 $route.path==item2.path? is-active :
    <el-menu router :default-openeds="[ 0 , 1 ]">
        <el-submenu v-for="(item, index) in $router.options.routes"
                    :key="index" :index="index +   ">
          <template slot="title"><i class="el-icon-menu"></i>{{ item.name }}</template>
          <el-menu-item v-for="(item2, index2) in item.children"
                        :key="index2"
                        :index="item2.path"
                        :class="$route.path==item2.path? is-active :  ">
            {{ item2.name }}</el-menu-item>
        </el-submenu>
      </el-menu>
6.4 实现分页
使用 Vue ElementUI Table组件
分页组件 | Element
修改后端findAll方法
package com.xin.controller;

@RestController
@RequestMapping("/book")
public class BookController {
    @Autowired
    private BookRepository bookRepository;

    @GetMapping("/findAll/{page}/{size}")//获取前端传来的数据
    public Page<Book> findAll(@PathVariable("page") Integer page,@PathVariable("size") Integer size){
        Pageable pageable= PageRequest.of(page-1,size);
        return bookRepository.findAll(pageable);
    }
}
修改page页面
<template>
    <div>
        <el-table :data="book" border style="width: 100%">
            <el-table-column fixed prop="id" label="编号" width="150"></el-table-column>
            <el-table-column prop="name" label="书名" width="120"></el-table-column>
            <el-table-column prop="author" label="作者" width="120"></el-table-column>
            <el-table-column fixed="right" label="操作"  width="100">
                <template slot-scope="scope">
                    <el-button @click="handleClick(scope.row)" type="text" size="small">查看</el-button>
                    <el-button type="text" size="small">编辑</el-button>
                </template>
            </el-table-column>
        </el-table>
        <el-pagination
            background
            layout="prev, pager, next"
            :page-size="pageSize"
            :total="total"
            @current-change="page">
        </el-pagination>
    </div>
</template>
export default {
    methods: {
      handleClick(row) {
        console.log(row);
      },
      page(currentPage){
          const _this=this
          axios.get( http://localhost:8181/book/findAll/ +currentPage+ / +_this.pageSize)
            .then(function(res){
                _this.book=res.data.content
                _this.total=res.data.totalElements
            })
      }
    },
    created(){
        const _this=this
        axios.get( http://localhost:8181/book/findAll/1/ +_this.pageSize)
            .then(function(res){
                _this.book=res.data.content
                _this.total=res.data.totalElements
            })
    },
    data() {
      return {
        total:null,
        pageSize:5,
        book: null
      }
    }
  }
7. 增
Vue ElementUI 提供表单校验功能
Form组件 | Element
定义rules对象,在rules对象中设置表单各个选项的校验规则
- :model=”ruleForm” 数据绑定
- :rules=”rules” 校验绑定
AddBook.vue中
  <el-form :model="ruleForm" :rules="rules" ref="ruleForm" label-width="100px" class="demo-ruleForm">

    <el-form-item label="书名" prop="name">
      <el-input v-model="ruleForm.name"></el-input>
    </el-form-item>

    <el-form-item label="作者" prop="author">
      <el-input v-model="ruleForm.author"></el-input>
    </el-form-item>

    <el-form-item>
      <el-button type="primary" @click="submitForm( ruleForm )">立即创建</el-button>
      <el-button @click="resetForm( ruleForm )">重置</el-button>
    </el-form-item>

 </el-form>
  export default {
    data() {
      return {
        ruleForm: {
          name:   ,
          author:
        },
        rules: {
          name: [
            { required: true, message:  请输入书名 , trigger:  blur  }
          ],
          author: [
            { required: true, message:  请输入作者 , trigger:  blur  },
            { min: 2, max: 8, message:  长度在 2 到 8 个字符 , trigger:  blur  }
          ]
        }
      };
    }
  }

- required: true 是否为必填项
- message: "提示信息"
- trigger: "blur"  触发事件
修改后台代码
在bookController中添加

@PostMapping("/save")
    public String save(@RequestBody Book book){
        Book result = bookRepository.save(book);
        if (result!=null){
            return "success";
        }else {
            return "error";
        }
    }
前后对接
methods: {
      submitForm(formName) {
        const _this=this;
        this.$refs[formName].validate((valid) => {
          if (valid) {
            axios.post( http://localhost:8181/book/save ,_this.ruleForm).then(function(res){
              if(res.data=="success"){
                  _this.$alert( 《 +_this.ruleForm.name+ 》 + 添加成功! , 消息 ,{
                    confirmButtonText: 确定 ,
                    callback:action=>{
                      _this.$router.push( /bookManage )
                    }
                  });
              }else{
                  _this.$message.error();( 添加失败 );
              }
            })

          } else {
            console.log( error submit!! );
            return false;
          }
        });
      },
      resetForm(formName) {
        this.$refs[formName].resetFields();
      }
    }
8. 删
后端编写接口
//  delete
    @DeleteMapping("/deleteById/{id}")
    public void deleteById(@PathVariable("id") Integer id){
        bookRepository.deleteById(id);
    }
为删除按钮绑定方法
<!-- 删除 -->
<el-button @click="deleteBook(scope.row)" type="text" size="small">删除</el-button>
// delete
      deleteBook(row){
        const _this=this;
        axios.delete( http://localhost:8181/book/deleteById/ +row.id).then(function(res){
          _this.$alert( 《 +row.name+ 》 + 删除成功! , 消息 ,{
                    confirmButtonText: 确定 ,
                    callback:action=>{
                      window.location.reload();
                    }
          });
        })
      },
9. 改
后端编写接口
//  findById
    @GetMapping("/findById/{id}")
    public Book findById(@PathVariable("id") Integer id){
        return bookRepository.findById(id).get();
    }
//  update
    @PutMapping("/update")
    public String update(@RequestBody Book book){
        Book result=bookRepository.save(book);
        if (result!=null){
            return "success";
        }else {
            return "error";
        }
    }
新建update页面
<template>
    <el-form :model="ruleForm" :rules="rules" ref="ruleForm" label-width="100px" class="demo-ruleForm" style="width:50%">

      <el-form-item label="编号">
        <el-input v-model="ruleForm.id" readonly></el-input>
      </el-form-item>

      <el-form-item label="书名" prop="name">
        <el-input v-model="ruleForm.name"></el-input>
      </el-form-item>

      <el-form-item label="作者" prop="author">
        <el-input v-model="ruleForm.author"></el-input>
      </el-form-item>

      <el-form-item>
        <el-button type="primary" @click="submitForm( ruleForm )">修改</el-button>
        <el-button @click="resetForm( ruleForm )">重置</el-button>
      </el-form-item>
    </el-form>
</template>

<script>
export default {
    data() {
      return {
        ruleForm: {
          id:  ,
          name:   ,
          author:
        },
        rules: {
          name: [
            { required: true, message:  请输入书名 , trigger:  blur  }
          ],
          author: [
            { required: true, message:  请输入作者 , trigger:  blur  },
            { min: 2, max: 8, message:  长度在 2 到 8 个字符 , trigger:  blur  }
          ]
        }
      };
    },
    methods: {
      submitForm(formName) {
        const _this=this;
        this.$refs[formName].validate((valid) => {
          if (valid) {
            axios.put( http://localhost:8181/book/update ,_this.ruleForm).then(function(res){
              if(res.data=="success"){
                  _this.$alert( 《 +_this.ruleForm.name+ 》 + 修改成功! , 消息 ,{
                    confirmButtonText: 确定 ,
                    callback:action=>{
                      _this.$router.push( /bookManage )
                    }
                  });
              }else{
                  _this.$message.error();( 添加失败 );
              }
            })

          } else {
            console.log( error submit!! );
            return false;
          }
        });
      },
      resetForm(formName) {
        this.$refs[formName].resetFields();
      }
    },
    created(){
        const _this=this;
        axios.get( http://localhost:8181/book/findById/ +this.$route.query.id).then(function(res){
            _this.ruleForm=res.data;
        })
    }
  }
</script>
页面间交互:
发送
this.$router.push({
          path: /update ,
          query:{
            id:row.id
          }
        })
接收
this.$route.query.id
将新建的update页面添加进路由
{ path:  / ,
   name:  图书管理 ,
   component: Index,
   redirect:"/bookManage",
   children:[
     {path: /bookManage ,name: 查询图书 ,component:()=>import( ../views/BookManage.vue )},
     {path: /addBook ,name: 添加图书 ,component:()=>import( ../views/AddBook.vue )}
   ]
 },
 {path: /update ,component:UpdateBook}
为修改按钮绑定方法
<!-- 修改 -->
<el-button @click="edit(scope.row)" type="text" size="small">修改</el-button>
// edit
      edit(row) {
        this.$router.push({
          path: /update ,
          query:{
            id:row.id
          }
        })
      },
※将新建的update页面添加进路由后左侧导航显示会多出一个空白项
给路由添加一个show属性
{ path:  / ,
    name:  图书管理 ,
    component: Index,
    show:true,
    redirect:"/bookManage",
    children:[
      {path: /bookManage ,name: 查询图书 ,component:()=>import( ../views/BookManage.vue )},
      {path: /addBook ,name: 添加图书 ,component:()=>import( ../views/AddBook.vue )}
    ]
  },
  {path: /update ,component:UpdateBook,show:false}
改左侧导航栏导航代码,通过v-show隐藏多出来的导航项
<el-submenu v-for="(item, index) in $router.options.routes"
                    :key="index" :index="index +   "
                    v-show="item.show">
          <template slot="title"><i class="el-icon-menu"></i>{{ item.name }}</template>
          <el-menu-item v-for="(item2, index2) in item.children"
                        :key="index2"
                        :index="item2.path"
                        :class="$route.path==item2.path? is-active :  ">
            {{ item2.name }}</el-menu-item>
        </el-submenu>
至此,一个基于SpringBoot、Vue 的 前后端分离 练习 就完成了
© 版权声明
文章版权归作者所有,未经允许请勿转载。
相关文章

您必须登录才能参与评论!
立即登录


学到了
鉴权用什么?jwt?
这个项目没做这个,最近做的项目用的session发现有一些bug不是很稳定,我也在学,回答不了呢真是抱歉,如果你学会了回来教教我喲