


1.set up best practices
Entering the correct setup values from the start is important to the success of any new business software.
Whether you use Rapid Start to implement setup values or you manually enter them in the new company, you can support your setup decisions with some general recommendations for selected setup fields that are known to potentially cause the solution to be inefficient if defined incorrectly.
Help in Business Central includes best-practice information about how to set up key fields in the following application areas:
Setup Best Practices: Supply Planning
Setup Best Practices: Costing Method
Related information
Design Details: Supply Planning
Design Details: Costing Methods
Work with Business Central
2.get business centerak on your desktop
f you have a Windows (PC) or macOS computer, you can install a Business Central app on your desktop. The app works with Business Central online and on-premises.
Why use the app?
The Business Central app resembles the web client, but it provides a few benefits like:
The app is readily available from the Start menu, you can easily pin it to the task bar, or have it launch by default when you start your computer.
In general, the app also is a faster and smoother to render on screen, with no performance differences, compared to running Business Central in the browser.
The app opens in its own window, independent of any browser windows. This feature makes it easier to find when running a large number many apps or browser tabs.
If there's more than one Business Central environment (online only), you can install the app separately for each environment.
When you open the app for specific environment, the environment name is included in the window title. When working across multiple Business Central environments, each app window is displayed separately. The name makes it easier for you to see which window is associated with each environment.
Install the app for Business Central online
There are two ways to install the app for Business Central online. You can install it directly from the browser or from Microsoft Store. Whichever approach you use, it's the same app. The difference is that installing from the browser lets you install the app for each environment when there's more than one.
From Microsoft Store
Go to Microsoft Store.Choose Get > Install.When the app has been installed, choose Open, then sign in to Business Central.
The next time you want to open the app, look for it in Start menu.
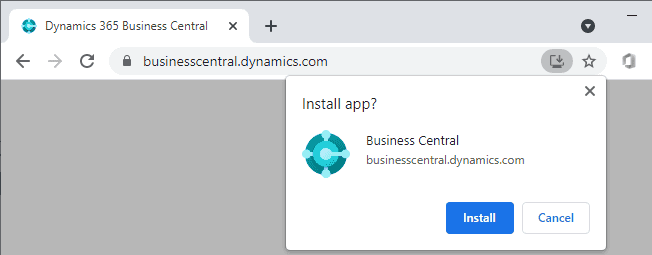
From the browser
Open the Business Central web client in either Microsoft Edge or Google Chrome.
If the page for selecting the environment appears, you can do one of two things:
Select the environment and go to the next step to install the app. In this case, the installed app will open the environment you select.Don't select the environment, and just go to next step to install the app. In this case, the installed app will open the environment selection page, instead of a specific environment.
To install the app, depending on your browser, select

App available. Install Business Central or

Install Business Central, then Install.
| Microsoft Edge | Google Chrome |
|---|---|
|
|
|
Tip
With Edge, you can also install the app by going to the Settings and more menu in the browser, then selecting Apps > Install this site as an app > Install.
Once installed, the app appears in the Start menu. If you've selected a specific environment for the app, the environment name is added to the app name in the Start menu.
Install the app for Business Central on-premises
Installing the desktop app when you're using Business Central on-premises is done directly from the browser as described above. If you only have one tenant, just open Business Central in your browser, and select either
App available. Install Business Central or
Install Business Central as shown above.
The difference is when you have multiple tenants. Unlike Business Central online, where you can install the app for different environments, you can only install the app for one tenant. So before you install the app when you have multiple tenants, be sure to switch to the correct tenant. Once installed, when you open the app, it will directly open the tenant.
2.1get business centerak on your desktop
3.setup best practices:supply planning
Supply planning is a critical business area. When set up and used correctly, supply planning helps a company avoid stock out and reduce both ordering costs and inventory costs.
It is not possible to prescribe one optimal setup of all planning fields as this varies from company to company because of business variables, such as market situation and business strategy. However, there are best practices for selecting options in items cards and global setup fields to help get the company started with timely and cost-effective inventory flows.
The following topics provide best-practice information about how to set up selected planning fields that are key to inventory and supply planning.
| To | See |
|---|---|
| Learn the best practices for selecting the best reordering policy to plan efficiently and economically for an item according to carrying costs and demand patterns. | Setup Best Practices: Reordering Policies |
| Learn the best practices for specifying selected planning parameters under the defined reordering policy to plan efficiently and economically for an item according to critical elements, such as lead time, carrying costs, and seasonality. | Setup Best Practices: Planning Parameters |
| Learn the best practices for applying a general supply strategy to all item cards, such as always receiving items one day before they are needed or dampening the system’s reaction to small demand fluctuations. | Setup Best Practices: Global Planning Setup |
3.1setup supply planning
The Planning FastTab on the Item Card page is the center of a company’s supply chain. Setting the correct planning parameters is very important for cost-effective inventory control and quality customer service.
This article provides best practices on how to set up selected planning parameter fields.
| Setup field | Best practice | Comment |
|---|---|---|
| Reordering Policy | To learn more, go to Setup Best Practices: Reordering Policies. | |
| Reserve | Select Never when the item is planned using a reorder point.
In manufacturing, select Never to allow the planning system to cover all demands. Select Optional for items that you may want to reserve for top-priority customers. Select Always for unique items (Non-Standard type of Items), such as items of type miscellaneous that are inbound for specific demands. |
Reservations generally counteract the purpose of planning, which is to balance demand and supply. Therefore, items that are set up for planning should generally not be reserved.
If the user reserves an inventory quantity for future demand, then the planning foundation will be disturbed, and the reorder point may not work correctly. Even if the projected inventory level is acceptable with regard to the reorder point, the quantities may not be available because of the reservation. |
| Dampener Period | Set with regard to the supplier’s flexibility.
A shorter period enables you to reduce working capital by avoiding excessive stock, but will also cause more rescheduling actions. |
If the supplier accepts last-minute changes to orders, then use a shorter period, but be prepared for more rescheduling actions. If the supplier requires firm planning, then extend the period as much as possible.
To learn more about this field, go to Design Details: Planning Parameters. |
| Include Inventory | Always select when you are using the Lot-for-Lot reordering policy. | Do not select only in special situations, such as when inventory items are not sellable. |
| Safety Lead Time | Set between 1D and 6D. Set a safety lead time of at least one day to make sure that supplies are available on the day before they are needed. If you're using a new supplier, define a longer time until their delivery performance is known.
In manufacturing, define longer safety lead times for critical components. Use longer safety lead times for produced components to have a buffer that allows for fluctuations in production times. |
Supply that is planned by the system to avoid a stock-out will arrive on the same day that the stock-out occurs. The supply might be several hours too late if, for example, the demand is needed in the morning and the supply arrives in the afternoon. Note: The Safety Lead Time field uses the base calendar. Therefore, 14D is not necessarily two weeks. |
| Safety Stock Quantity | Use for items with large demand fluctuations.
In manufacturing, use for critical components. Use for items that are subject to service agreements. |
If the Reorder Point field is not filled in, the safety stock quantity also acts as a reorder point. |
| Lot Accumulation Period | If you want only a few big orders and it's ok to carry inventory, specify a long period for lot accumulation.
If you want multiple small orders and minimal inventory, set a short lot accumulation period. |
The lot accumulation period is generally the longest period that you carry inventory. |
| Reorder Point | Base the reorder point on the item’s demand profile. | If historical data shows that the item’s average demand is 100 units during a lead time of seven days, the reorder point can be set to 100 as a minimum.
When the inventory level falls below 100 units, the planning system suggests that you replenish because it takes seven days to supply the item, and there must be enough to cover the demand within those seven days. |
| Time Bucket | Leave blank, meaning that the inventory level is checked every day. | Checking the inventory level every day ensures optimal reorder point planning. Note: A time bucket of 1W means that the inventory level can be below the reorder point for one week before a supply order is suggested. |
| Rounding Precision | In expensive manufacturing, set to 0.00001. | Large rounding quantities of scrap or material consumption can amount to very large inventory costs. It might be relevant to set the smallest rounding precision to minimize this potential cost. |
Note
The best practices for planning parameters on item cards also apply to the same fields on SKU cards.
If you plan for demand at different locations, we recommend that you define SKUs for each location and that all demand is created by using a value in the Location Code field. To learn more, go to Design Details: Planning With or Without Locations.
3.2 setup best practices:planning parameters
The Planning FastTab on the Inventory Setup page contains several fields that define global rules for supply planning.
The following table provides best practices on how to set up selected global planning parameter fields.
| Setup field | Best practice |
|---|---|
| Use Forecast on Locations | Select if you have forecasts for specific locations. |
| Use Forecast on Variants | Select if you have items with variants and want to specify forecast for each variant individually |
| Blank Overflow Level | Use only if you want to allow all or some of your items to overflow the reorder point. |
| Default Dampener Period | Set between 1D and 5D.
If you're new to planning in Business Central, set a longer period. When you're more familiar with the different reasons for action messages, shorten the dampener period to allow more change suggestions. |
| Default Dampener Quantity % | Set between 5 and 20 percent of the item’s lot size. |
The Planning FastTab on the Manufacturing Setup page also contains several fields that define global rules for supply planning.
The following table provides best practices on how to set up selected global planning parameter fields.
| Setup field | Best practice |
|---|---|
| Components at Location | If items aren't defined as SKUs, select the location code of your main warehouse. This selection also applies if you only use the requisition worksheet. |
3.3 setup best practices:global planning setup
The Reordering Policy field on item cards has planning methods that determine how the individual planning parameters interact.
One best-practice foundation for selecting a reordering policy is the item’s ABC classification. When you use ABC classification, you manage items according to three classes. The class you use depends on the item's value and volume relative to the total stock. The following table shows the value-volume distribution of the three classes.
| Class | Percent of total stock volume | Percent of total stock value |
|---|---|---|
| A | 10-20 | 50-70 |
| B | 20 | 20 |
| C | 60-70 | 10-30 |
The ABC classification states that effort and money can be saved by applying looser control to items of low value-volume than to items of high value-volume. The following illustration shows which reordering policy in Business Central is best suited for A, B, and C items respectively.
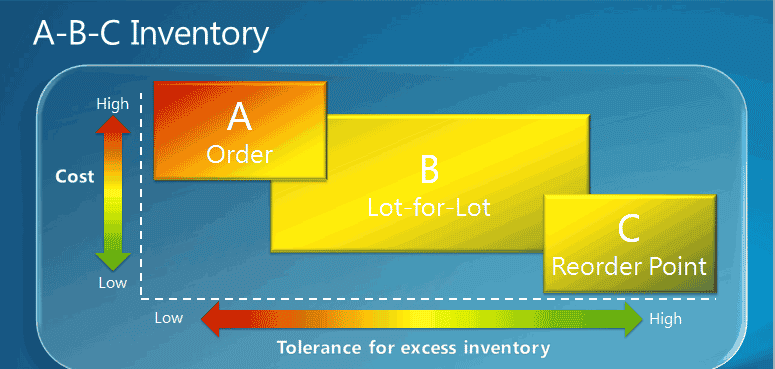
The following table provides best practices for selecting between the four policies.
| Setup option | Best practice | Comment |
|---|---|---|
| Order | Use for A items.
Use for make-to-order items. In manufacturing, use for top-level items and for expensive components and subassemblies. Use for items that are purchased as drop shipments and special orders. Don't use if you don't accept automatic reservation. |
A items, such as leather couches in a furniture store, are high-value items with low and irregular order velocity where inventory is unacceptable, or the required attributes vary. The best reordering policy is therefore one that plans specifically for each demand. |
| Lot-for-Lot | Use for B items.
In manufacturing, use for components that occur in multiple BOMs. This policy ensures that purchase orders are combined for the same vendor, so better prices can be negotiated. Use if you aren't sure about which reordering policy to select. |
B items, such as dining chairs, have a regular and fairly high order velocity, but also high carrying costs. The best reordering policy for B items is therefore one that is economical by bundling demand in the reorder cycle.
80 percent of items can use this policy. Can be used successfully without planning parameters. |
| Fixed Reorder Qty. | Use for C items.
Combine with reorder-point parameters. In manufacturing, use for lowest-level components. Don't use if the item is often reserved. |
C items, such as tea cups, are low-value items with high and regular order velocity. The best reordering policy for C items is therefore one that guarantees constant availability by always staying above a reorder point.
If the user reserves a quantity for a distant demand, the planning foundation is disturbed. Even if the projected inventory level is acceptable regarding the reorder point, the quantities might not be available because of the reservation. |
| Maximum Qty. | Use for C items with high carrying costs or storing limitations.
Combine with one or more order modifiers (Minimum/Maximum Order Quantity or Order Multiple). |
C items, such as tea cups, are low-value items with high and regular order velocity. The best reordering policy for C items is therefore one that guarantees constant availability by always staying above a reorder point, but below a maximum inventory quantity.
To modify the suggested order, you might want the order quantity to be decreased to a specified maximum order quantity, increased to a specified minimum order quantity, or rounded up to meet a specified order multiple. Note: If used with a reorder point, then inventory stays between the reorder point and the maximum quantity. |
3.4setup best practices:recordering policies
4.setup best practices:costing methods
The Costing Method on the item card defines item's cost flow is recorded and whether an actual or budgeted value is capitalized and used in the cost calculation.
Setting the correct costing method according to item type and business environment is important to ensure economical inventories.
The following table provides best practices on how to set up the Costing Method field. For more information, see Design Details: Costing Methods.
| Setup option | Best practice | Comment |
|---|---|---|
| FIFO | Use where the product cost is stable.
Use for items with a limited shelf life, because the oldest goods need to be sold before they pass their sell-by date. |
An item's unit cost is the actual value of any receipt of the item, selected by the FIFO rule.
In inventory valuation, it is assumed that the first items placed in inventory are sold first. Note: When prices are rising, the balance sheet shows greater value. This means that tax liabilities increase, but credit scores and the ability to borrow cash improve. |
| LIFO | Use where levels of inventories are consistently maintained or increased over time. | An item's unit cost is the actual value of any receipt of the item, selected by the LIFO rule.
In inventory valuation, it is assumed that the last items placed in inventory are sold first. Note: When prices are rising, the value on the income statement decreases. This means that tax liabilities decrease, but the ability to borrow cash deteriorates. Important: Disallowed in many countries/regions, as it can be used to depress profit. |
| Average | Use where the product cost is unstable.
Use where inventories are piled or mixed together and cannot be differentiated, such as chemicals. |
An item's unit cost is calculated as the average unit cost at each point in time after a purchase.
For inventory valuation, it is assumed that all inventories are sold simultaneously. |
| Specific | Use in production or trade of easily identifiable items with fairly high unit costs.
Use for items that are subject to regulation. Use for items with serial numbers. |
An item's unit cost is the exact cost at which the particular unit was received. |
| Standard | Use where cost control is critical.
Use in repetitive manufacturing, to value the costs of direct material, direct labor, and manufacturing overhead. Use where there is discipline and staff to maintain standards. |
An item's unit cost is preset based on estimated.
When the actual cost is realized later, the standard cost must be adjusted to the actual cost through variance values. |
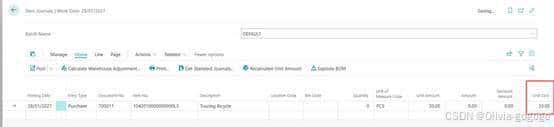
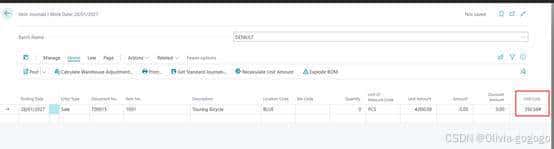
场景:If you back-date an inventory decrease, then existing entries are NOT reapplied to provide a correct FIFO cost flow.
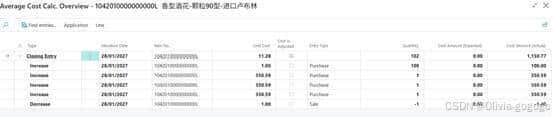
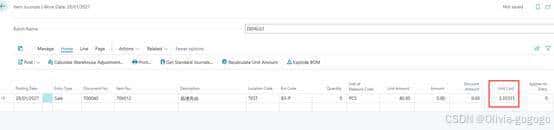
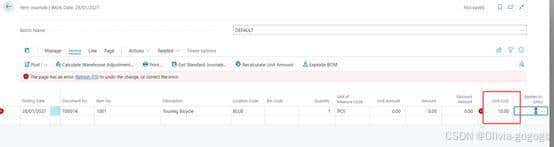
1042010000000000L-test FIFO
Unit cost 350.594上面写着
做item journal sales 的时候取值先进先出,取值11.18
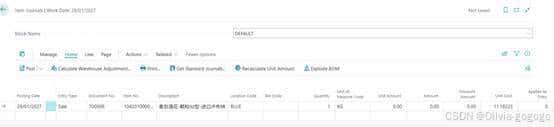
第二次成本变成11.28

Microsoft Dynamics 365 Business Central先进先出成本逻辑说明
Microsoft Dynamics 365 Business Central先进先出成本逻辑说明
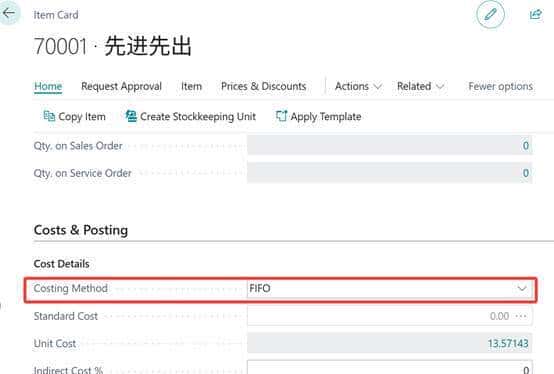
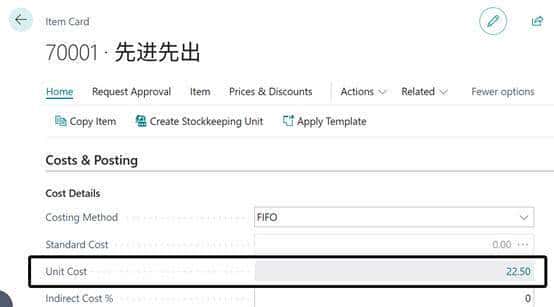
1.在物料卡片中设置FIFO
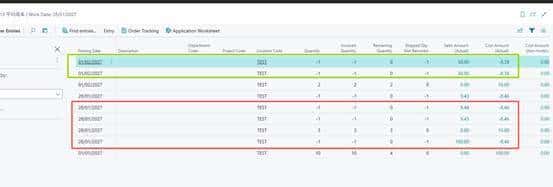
2.根据交易明细记录可以看出,8月份物料先进先出的消耗成本并不像平均成本那样是一个相同的值,而是根据每次的入库价格来作为它的出库成本。
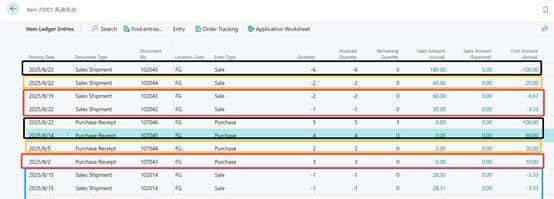
3.但是物料卡片中的成本字段是一个平均成本,它的取值逻辑是:
Unit Cost=所有明细行的Sum(Remaining Quantity × 单位成本)/Sum(Remaining Quantity)
22.50=(3×20 + 1×30)/(3+1)
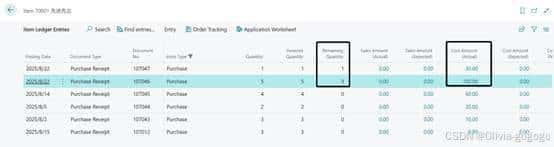
3.销售的时候默认成本取物料卡片中的Unit Cost。最后会通过ACIE来重新调整成本
6.2. LIFO
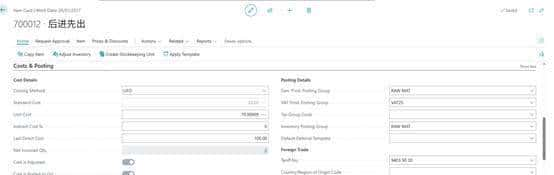
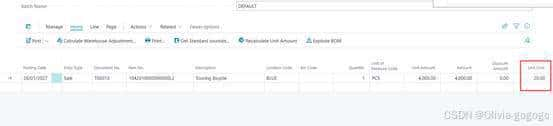
1042010000000000L3-test LIFO
Unit cost 350.594
Cost 调整就是20
做item journal取值30
Microsoft Dynamics 365 Business Central后进先出成本逻辑说明
1.在物料卡片中设置LIFO
2.根据交易明细记录可以看出,8月份物料先进先出的消耗成本并不像平均成本那样是一个相同的值,而是根据每次的入库价格来作为它的出库成本。

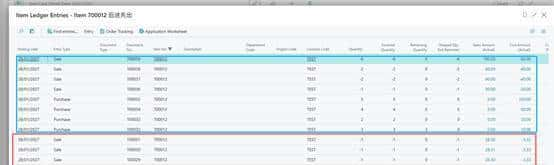
3.但是物料卡片中的成本字段是一个平均成本,它的取值逻辑是:
Unit Cost=所有明细行的Sum(Remaining Quantity × 单位成本)/Sum(Remaining Quantity)
3.33=(10)/(3)
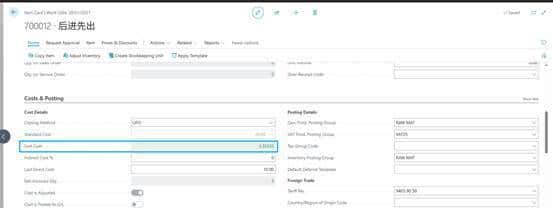

3.销售的时候默认成本取物料卡片中的Unit Cost。最后会通过ACIE来重新调整成本
6.3.average
场景:If you back-date an inventory increase or decrease, then the average cost is recalculated, and all affected entries are adjusted.
If you change the period or calculation type, then all affected entries must be adjusted.
1042010000000000L2-test average

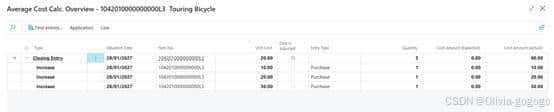
Item journal自动取值20
Sometimes, our customers want to know how Business Central calculates an item’s average cost. We provide a simple example to illustrate how this calculation is applied to inventory.
Microsoft explains how it calculates Average Cost as follows:
Determine the cost of the item at the start of the average cost period.
Adds the sum of the inbound costs that were posted during the average cost period. These include purchases, sales returns, positive adjustments, and production and assembly outputs.
Subtracts the sum of the costs of any outbound transactions that were fixed-applied to receipts in the average cost period. These typically include purchase returns and negative outputs.
Divides by the total inventory quantity for the end of the average cost period. Excludes inventory decreases that are being valued.
The calculated average cost is then applied to the inventory decreases for the item (or item, location, and variant) with posting dates in the average cost period. For inventory increases that are fixed-applied to inventory decreases in the average cost period, Business Central forwards the calculated average cost from the increase to the decrease.
Date Entry Type Quantity Unit Cost Total Cost
1/1/2025 Positive Inventory Adjustment 10 $20.00 $200.00
1/1/2025 Purchase Receipt 20 $25.00 $500.00
1/1/2025 Sales Shipment -15 $23.33 -$350.00
1/1/2025 Closing Entry 15 $23.33 $350.00
Table 1: Calculating the average cost of inventory at the beginning and ending of Day 1
In this example, we look at the daily average cost of an item in inventory. We begin the day on January 1 with ten items costing $20.00 each. We add another 20 items at $25.00 each, making a total value of items in inventory of $700.00 for 30 items (or an average cost of $23.33 per item). This average cost is applied to the Sales Shipment (decrease) of 15 items, leaving 15 items in inventory at an average cost of $23.33 each for a total value of $350.00.
Date Entry Type Quantity Unit Cost Total Cost
1/2/2025 Opening Entry 15 $23.33 $350.00
1/2/2025 Purchase Receipt 30 $20.00 $600.00
1/2/2025 Sales Shipment -10 $21.11 -$211.11
1/2/2025 Closing Entry 35 $21.11 $738.89
Table 2: Calculating the average cost of inventory at the beginning and ending of Day 2
On January 2, we have an opening balance of $350.00 (15 items at $23.33 each). We have a Purchase Receipt for 30 more items (increase) at $20.00 each and a total cost of $600.00. The inventory now stands at 45 items and a value of $950.00 for an average cost of $21.11 per item (950/45).
This cost of $21.11 per item is applied to the Sales Shipment (decrease) and to the remaining inventory at the end of the day: 35 items at $21.11 per item for a total inventory value of $738.89.
Microsoft Dynamics 365 Business Central平均成本逻辑说明
Microsoft Dynamics 365 Business Central的平均成本方法逻辑说明
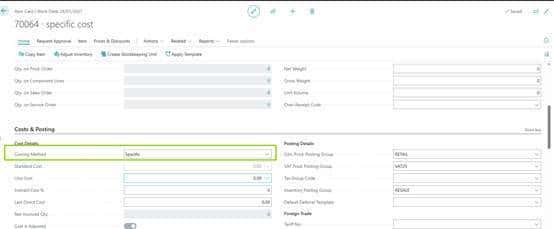
1.先在物料卡片中设置物料的成本方法:

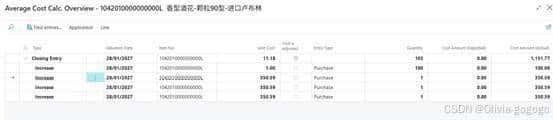
2.以下是8月份和9月份的出入库明细,可以看出8月份的所有出库成本都是一样的9.29,
9月份的出库成本是9.08,它的计算逻辑是:9月份出库成本=(8月末剩余库存数量10×8月末的平均单位成本 9.29 + 9月1日的入库数量2×入库成本8)/ (8月末剩余库存数量10 +9月1日的入库数量2) =(92.9+16)/(10+2)=9.08

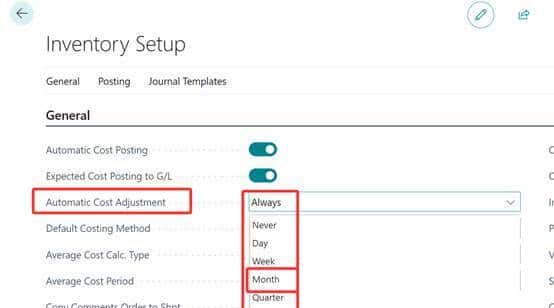
3.由此可见BC的平均成本和我国的月末一次加权平均成本是一样的。唯一区别是BC可以实现每次出入库都可以计算成本,或 按天,按周,按月等。通过Inventory Setup设置
在月末一次加权平均法下,1月份无论采购多少次、销售多少次,每次销售的成本均相同,因为该方法仅在月末计算一次加权平均单价,并以此统一核算当月全部销售成本。以下是详细说明与案例:
一、核心逻辑
月末统一计算单价:
将全月所有采购成本和数量汇总,计算加权平均单价:
加权平均单价
=期初存货成本+∑本月全部采购成本
期初存货数量+∑本月全部采购数量
加权平均单价= 期初存货数量+∑本月全部采购数量
期初存货成本+∑本月全部采购成本
该单价作为当月所有销售业务的成本依据。
销售成本一致性:
无论销售发生在1月的哪一天、销售多少次,每次销售均按月末计算的加权平均单价结转成本,因此每次销售成本相同。
二、具体案例
假设某企业1月存货数据如下:
期初:100件,单价10元(成本1000元)
采购记录(共20次,简化展示3次):
表格
日期 采购数量 单价(元) 成本(元)
1月5日 50 12 600
1月15日 80 11 880
1月25日 30 13 390
… … … …
合计 500 – 5800
销售记录(共15次,简化展示3次):
表格
日期 销售数量
1月8日 60
1月18日 70
1月28日 40
… …
合计 400
1. 计算月末加权平均单价
[
ext{加权平均单价} = frac{1000 ext{(期初)} + 5800 ext{(采购)}}{100 ext{(期初)} + 500 ext{(采购)}} = frac{6800}{600} approx 11.33 ext{元/件}
]
2. 核算销售成本
总销售成本 = 400件 × 11.33元/件 = 4532元
每次销售成本:
1月8日销售60件:60 × 11.33 = 679.8元
1月18日销售70件:70 × 11.33 = 793.1元
1月28日销售40件:40 × 11.33 = 453.2元
每次销售单价均为11.33元,成本仅因数量不同而总额差异,但单位成本相同。
在移动加权平均法下,若1月份采购了20次且每次采购单价不同,同时销售了15次,每次销售的成本可能不同,具体取决于每次销售时点的加权平均单价。以下是详细解释:
一、移动加权平均法的核心逻辑
动态计算单价:
每次采购后,需重新计算加权平均单价,公式为:
加权平均单价
=期初存货成本+∑本期购入存货成本
期初存货数量+∑本期购入存货数量
加权平均单价= 期初存货数量+∑本期购入存货数量
期初存货成本+∑本期购入存货成本
该单价会随每次采购而更新,并作为后续销售的成本依据。
销售成本的确定:
每次销售时,按当前时点的加权平均单价计算销售成本。因此,若采购单价频繁变动,加权平均单价也会随之波动,导致不同批次的销售成本可能不同。
二、具体案例分析
假设1月存货数据如下(简化版):
期初:100件,单价10元
采购与销售记录:
表格
日期 业务类型 数量 单价(元) 加权平均单价计算(销售时) 销售成本(元)
1月1日 期初 100 10 – –
1月5日 采购 50 12 – –
1月8日 销售 60 – (frac{100×10 + 50×12}{100+50} = 10.67) 60 × 10.67 = 640.2
1月10日 采购 80 11 – –
1月15日 销售 70 – (frac{90×10.67 + 80×11}{90+80} ≈ 10.83) 70 × 10.83 = 758.1
1月20日 采购 30 13 – –
1月25日 销售 40 – (frac{100×10.83 + 30×13}{100+30} ≈ 11.25) 40 × 11.25 = 450
关键结论:
每次销售时,加权平均单价可能因采购而变化,导致销售成本不同。
例如,1月8日销售成本为640.2元(单价10.67元),而1月15日为758.1元(单价10.83元)。
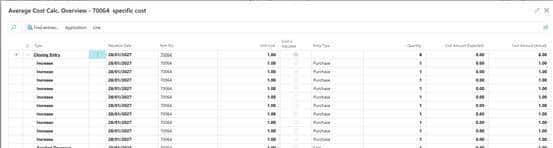
6.4.specific
结合 BC(Business Central)的库存与物料管理逻辑,这段描述对应的是 “个别计价法(Specific Identification Method)” 的适用场景(BC 中通常通过 “成本计价方法” 配置实现)。作为实施顾问,我帮你拆解其核心场景、业务逻辑及客户落地场景,方便你快速对接客户需求:
一、核心定义(先明确功能本质)
个别计价法是一种库存成本核算方式,核心特点是:
为每一个物理单位的物料分配唯一标识(如序列号、批次号);物料的 “单位成本” 直接对应其 “实际采购 / 生产时的成本”(而非加权平均、先进先出等估算方式);出库时需明确指定 “具体哪一个单位的物料” 被领用,确保成本核算 100% 精准。
二、适用场景(原文 3 句话的落地解读)
原文 3 个核心场景可直接对应客户实际业务,按行业优先级排序如下:
场景 1:高单价、易识别的生产 / 贸易类物料(对应第一句)
✅ 核心特征:单价高 + 可单独标识(避免成本核算误差导致利润波动)
典型行业:奢侈品贸易(如珠宝、名表)、高端设备制造(如精密仪器、机床)、汽车贸易(整车)、电子产品(如高端手机、服务器)。客户案例:
贸易公司进口 10 块名表,每块采购价不同(如 A 款 5 万、B 款 8 万),销售时需明确 “卖出的是哪一块”,并按其实际采购价结转成本(而非平均价);设备厂生产 5 台定制机床,每台的零部件采购成本、人工成本不同(如 1 号机床成本 20 万、2 号 22 万),交付客户时需按每台的实际生产成本核算利润。 BC 配置要点:物料卡片中 “成本计价方法” 选择 “Specific”,并启用 “序列号管理”(确保每台 / 每件可唯一识别)。
场景 2:受法规监管的物料(对应第二句)
✅ 核心特征:需全程追溯合规性(法规要求记录物料的来源、去向、成本等全流程信息)
典型行业:医药行业(处方药、疫苗)、食品饮料(婴幼儿配方奶粉、进口食品)、化工行业(危险化学品)、航空航天(零部件)。客户案例:
制药企业生产一批抗生素,需记录每一批次的原材料采购来源、生产批次、销售去向(如销往哪家医院),且成本需按每批次的实际生产成本核算(满足 GMP、药监局监管要求);食品厂生产婴幼儿奶粉,每罐需关联唯一追溯码,记录原料采购成本、生产流程,确保出现质量问题时可快速召回,且成本核算符合食品安全法要求。 BC 配置要点:启用 “批次管理 + 序列号管理”,配合 “个别计价法”,同时关联 “批号追溯报表”(满足监管部门核查需求)。
场景 3:需序列号管理的物料(对应第三句)
✅ 核心特征:每单位物料有唯一序列号(需精准跟踪单个物料的全生命周期)
典型行业:电子设备(手机、电脑、打印机)、家电(冰箱、空调)、工业设备(电机、传感器)、医疗器械(呼吸机、心电图机)。客户案例:
家电厂商生产 100 台空调,每台有唯一序列号,销售后需跟踪 “该序列号空调的销售成本(实际生产 / 采购价)、售后维修记录”(如客户报修时,通过序列号快速查询其出厂日期、成本、保修状态);IT 公司采购 50 台服务器,每台有序列号,部署到不同客户现场后,需按每台的实际采购价核算成本,同时通过序列号跟踪资产折旧、维护记录。 BC 配置要点:物料启用 “序列号管理”,成本计价法设为 “Specific”,出库时需在 “出库单” 中选择 “具体序列号”,系统自动带出该序列号对应的实际成本。
三、不适用场景(反向避坑)
以下情况不建议用个别计价法,避免增加操作复杂度:
低单价、大批量的通用物料(如螺丝、垫片、办公用品):单价低、数量大,逐件标识和跟踪成本的操作成本远高于核算收益;无法单独标识的物料(如液体、粉末状原料):如化工行业的酒精、食品行业的面粉,无法按单个单位跟踪,适合用 “批次计价法”;成本波动小、无需精准核算的物料(如普通包装材料):用 “加权平均法” 即可满足需求,简化操作。
四、实施关键注意事项(客户落地时必查)
必须配合 “序列号 / 批次管理”:个别计价法的核心是 “识别单个单位”,因此需在物料卡片中启用 “序列号”(单件唯一)或 “批次”(批量唯一,适用于同一批次成本相同的场景),否则无法实现成本精准跟踪。入库时需记录 “单位成本 + 唯一标识”:采购入库 / 生产入库时,需录入每一批次 / 序列号的实际成本(如采购发票金额、生产工单成本),BC 会自动关联该标识与成本。出库时需 “指定具体单位”:销售出库 / 生产领用出库时,需在单据中选择 “对应的序列号 / 批次”,系统会自动按该单位的实际成本结转(避免手动核算错误)。报表价值:客户可通过 BC 的 “序列号追溯报表”“个别计价成本报表”,查询单个物料的 “采购 – 入库 – 出库 – 成本” 全流程,满足对账、审计、合规需求。
五、向客户解释的通俗话术
“这个功能就像给每一件物料发‘身份证’(序列号 / 批次号):
高价值的东西(如名表、机床),每一件的进价 / 成本都不一样,用这个方法能精准算出来‘卖这件赚了多少’,不会因为平均价算错利润;受监管的东西(如药品、奶粉),用这个方法能全程查到‘这件东西从哪来、到哪去、成本多少’,合规检查时直接调报表就行;带序列号的设备(如空调、服务器),售后维修时扫一下序列号,就能知道它的出厂成本、保修状态,方便后续服务。简单说,就是‘精准核算成本 + 全程追溯’,适合贵司那些单价高、需要管得细的物料。”
总结
个别计价法的核心价值是 “成本精准 + 合规追溯”,适用场景集中在 “高单价、需监管、需序列号跟踪” 的行业。实施时只需判断客户物料是否符合 “可唯一识别 + 成本需精准核算 / 合规追溯” 的特点,再通过 BC 的 “成本计价方法 + 序列号 / 批次管理” 联动配置,即可满足业务需求。
场景:You can use specific item tracking without using the Specific costing method. The cost won't follow the lot number, but the cost assumption of the selected costing method.
1042010000000000L3-test specific
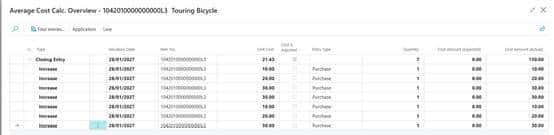
Item journal自动取值21.42857
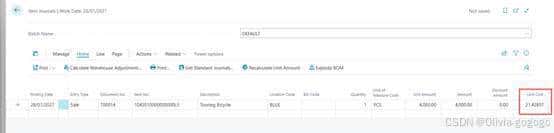

Cost amount(actual)/remaining qty=unit cost
6.5.standard
场景:核心使用场景说明
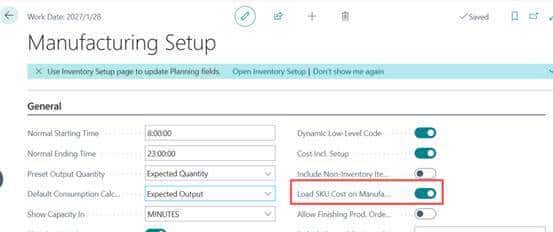
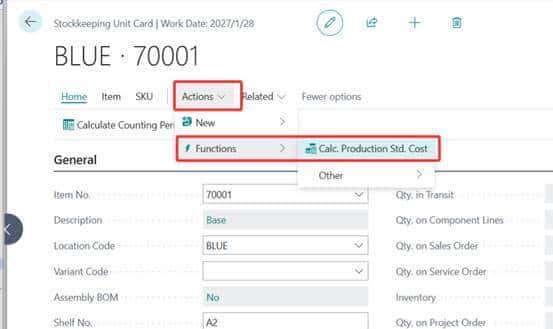
业务场景:生产型企业需要以 SKU 为单位设定 / 更新标准成本,用于生产核算、库存估值等核心业务。操作逻辑:先通过制造设置开启 “加载 SKU 成本到生产模块” 的开关,再在库存单位卡片上执行 “计算生产标准成本” 操作,完成标准成本的核算与更新。关键限制:系统不会保留标准成本的历史记录,仅记录当前生效的标准成本数据。
适用业务场景延伸
生产核算需求:企业需要按 SKU(而非笼统的物料编码)拆分成本,比如同一物料不同规格(SKU)的生产工艺、耗材不同,需单独核算标准成本。成本滚动更新:定期(如月度、季度)根据生产效率、原材料价格变化,重新计算并更新 SKU 的标准成本,确保成本数据精准。生产模块联动:标准成本需同步到生产模块,用于生产订单的成本估算、差异分析(如实际成本与标准成本的对比)。
BC标准成本(SKU维度)实施操作清单
本清单适用于Microsoft Dynamics 365 Business Central(BC)系统中按SKU维度维护和更新标准成本的实施场景,涵盖从前期准备到后期业务适配的全流程操作要点,助力实施顾问高效完成配置与落地。
一、实施准备阶段
业务需求确认:与客户财务、生产、仓储部门沟通,明确以下需求:①是否需按SKU(如规格、颜色、批次等维度)单独核算标准成本;②标准成本更新周期(月度/季度/年度);③成本构成要素(原材料、人工、制造费用等分配规则);④是否需与生产订单、库存估值模块联动。数据前提校验:检查系统基础数据完整性:①物料主数据已维护SKU维度(通过“库存单位”卡片关联物料编码与SKU属性);②BOM(物料清单)、Routing(工艺路线)已按SKU维度配置(若涉及生产环节成本计算);③原材料、半成品的标准成本基础数据已初步录入。权限配置规划:确定需操作“制造设置”“库存单位卡片”的用户角色(如成本会计、生产管理员),提前在BC系统中配置对应权限组(建议包含“Manufacturing Setup”“Stockkeeping Unit Card”的读写权限)。
二、核心系统配置
开启SKU成本加载开关: 路径:搜索并进入“Manufacturing Setup”(制造设置)页面;操作:在“General”(常规)选项卡中,找到“Load SKU Cost on Manufacturing”(加载SKU成本到生产模块) toggle开关,设置为“On”(开启);说明:开启后,生产模块的成本核算将优先调用SKU维度的标准成本,而非物料编码级别的成本。SKU成本计算参数配置(可选): 路径:进入“Manufacturing Setup”页面的“Costing”(成本核算)选项卡;配置项:根据客户需求设置“成本计算方法”(如按BOM层级滚动计算、按工艺路线工时分配制造费用等)、“汇率取值方式”(若涉及多币种采购)等参数。
三、标准成本计算与更新操作流程
单个SKU成本计算: 路径:搜索并进入“Stockkeeping Unit Card”(库存单位卡片)页面,通过物料编码或SKU编码筛选目标SKU;操作:在卡片顶部“Actions”(操作)菜单中,选择“Functions”(功能)→“Calc. Production Std. Cost”(计算生产标准成本);校验:执行后,在卡片“Costing”(成本核算)选项卡中,检查“Standard Cost”(标准成本)字段是否更新为计算结果。批量SKU成本计算(高效场景): 路径:搜索并进入“Stockkeeping Units”(库存单位列表)页面;操作:勾选需批量计算的SKU记录,在顶部“Actions”菜单中选择“Functions”→“Calc. Production Std. Cost”;注意:批量操作前建议备份当前标准成本数据(系统无历史记录,需手动导出Excel存档)。成本更新后的联动校验: 库存估值校验:进入“Item Ledger Entries”(物料分类账分录)页面,查看SKU对应的库存价值是否按新标准成本重估;生产订单校验:新建测试生产订单,检查“Planned Cost”(计划成本)是否取自SKU的最新标准成本。
四、业务适配与场景说明
适用业务场景:
多规格物料生产:如同一“T恤”物料下,不同尺码(S/M/L/XL)作为SKU,需分别核算面料用量、裁剪工时差异导致的标准成本;定制化生产:按客户需求定制的SKU(如印字LOGO的办公用品),其额外加工成本需单独计入标准成本;成本动态调整:原材料价格波动频繁时,定期(如月度)通过本流程更新SKU标准成本,确保库存估值与生产核算精准。
五、注意事项与风险提示
无历史记录风险:系统不自动保留标准成本变更历史,每次更新前需通过“Stockkeeping Unit Card”导出当前成本数据至Excel存档,便于后续成本差异追溯与审计。数据依赖风险:SKU标准成本计算依赖BOM和Routing的准确性,若BOM用料或工艺路线变更,需先更新基础数据再执行成本计算。业务中断规避:建议在非业务高峰期(如月末结账后)执行批量SKU成本更新,避免与生产订单下达、库存出入库等操作冲突。
六、用户培训要点
指导成本会计掌握“单个/批量计算SKU标准成本”的操作步骤,强调数据备份的重要性;向生产管理员说明SKU成本与生产订单计划成本的联动逻辑,确保其理解成本数据的来源;提供操作手册(可基于本清单简化),包含常见问题排查(如成本计算失败可能原因:BOM不完整、权限不足等)。
Use the Standard Worksheet page to periodically update and roll up standard costs for item.
To use standard cost from SKU, go to the Manufacturing Setup page and turn on the Load SKU Cost on Manufacturing toggle. Use the Calc. Production Std. Cost action on the Stockkeeping Unit Card page to calculate standard cost.
No historic records exist for standard costs.
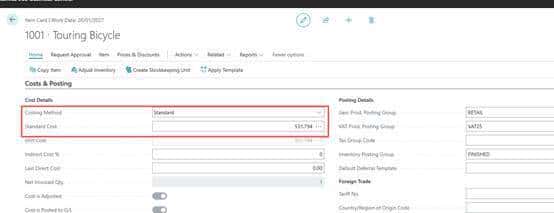
1001-test standard
Item card
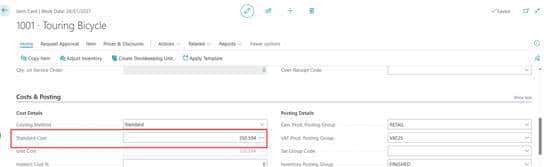
标准成本不能更改,只能通过standard worksheet 修改
5.get business central on your mobile device
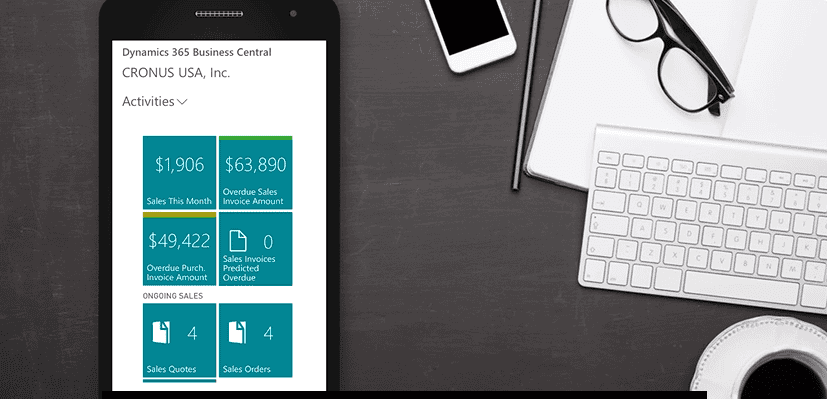
Access your Business Central data from your mobile device. You can navigate through your business data, use features such as send to Excel or Microsoft 365, view up-to-date charts and KPIs, email sales quotes and invoices, and shoot and attach pictures with your camera. Follow the steps below to download the app and get started.
Tip
Do want an app on your Windows or macOS computer desktop? See Get the Business Central Desktop App.
Get the app on my mobile device
Install the Business Central app on your mobile device by downloading the app from the App Store or Google Play.
App StoreGoogle Play
Launch the app from your mobile device.
Enter your user name and password that you created during sign-up for Business Central and follow the instructions on the screen.
If your Business Central has more than one production environment, then you'll be asked to choose the environment that you want to access (requires Business Central 2020 release wave 2 and later).
You should now have access to Business Central and can view and edit data.
Tip
If you want to connect the app to a sandbox environment, choose the Advanced options button, and then choose the Cloud sandbox sign-in option. Then, if you have more than one sandbox environment, choose the relevant environment.
Use Business Central on-premises?
If you're using Business Central on-premises, you can also enjoy the benefits of the mobile app. The installation is similar, but with a couple of exceptions.
Install the Business Central app on your mobile device by downloading the app from the App Store or Google Play.
App StoreGoogle Play
Launch the app from your mobile device.
Instead of entering an email address on the Welcome page, choose the Advanced options button, and then choose the On-premises sign-in option.
On the next page, in the Service name box, enter the web address that you use to open Business Central, such as https://mybusinesscentral:443/BC170. If you're not sure, ask your administrator.
Next, enter your user name and password for accessing Business Central.
When completed, the Business Central App opens.
Note
If you're having problems getting the app to work properly, talk to your administrator. It could be a missing prerequisite or an incomplete configuration. For more information, see Preparing the environment for the mobile app or Troubleshooting the Business Central Mobile App On-Premises.
6.get business central on your desktop
If you have a Windows (PC) or macOS computer, you can install a Business Central app on your desktop. The app works with Business Central online and on-premises.
Why use the app?
The Business Central app resembles the web client, but it provides a few benefits like:
The app is readily available from the Start menu, you can easily pin it to the task bar, or have it launch by default when you start your computer.
In general, the app also is a faster and smoother to render on screen, with no performance differences, compared to running Business Central in the browser.
The app opens in its own window, independent of any browser windows. This feature makes it easier to find when running a large number many apps or browser tabs.
If there's more than one Business Central environment (online only), you can install the app separately for each environment.
When you open the app for specific environment, the environment name is included in the window title. When working across multiple Business Central environments, each app window is displayed separately. The name makes it easier for you to see which window is associated with each environment.
Install the app for Business Central online
There are two ways to install the app for Business Central online. You can install it directly from the browser or from Microsoft Store. Whichever approach you use, it's the same app. The difference is that installing from the browser lets you install the app for each environment when there's more than one.
From Microsoft Store
Go to Microsoft Store.Choose Get > Install.When the app has been installed, choose Open, then sign in to Business Central.
The next time you want to open the app, look for it in Start menu.
From the browser
Open the Business Central web client in either Microsoft Edge or Google Chrome.
If the page for selecting the environment appears, you can do one of two things:
Select the environment and go to the next step to install the app. In this case, the installed app will open the environment you select.Don't select the environment, and just go to next step to install the app. In this case, the installed app will open the environment selection page, instead of a specific environment.
To install the app, depending on your browser, select
App available. Install Business Central or
Install Business Central, then Install.
| Microsoft Edge | Google Chrome |
|---|---|
|
|
|
Tip
With Edge, you can also install the app by going to the Settings and more menu in the browser, then selecting Apps > Install this site as an app > Install.
Once installed, the app appears in the Start menu. If you've selected a specific environment for the app, the environment name is added to the app name in the Start menu.
Install the app for Business Central on-premises
Installing the desktop app when you're using Business Central on-premises is done directly from the browser as described above. If you only have one tenant, just open Business Central in your browser, and select either
App available. Install Business Central or
Install Business Central as shown above.
The difference is when you have multiple tenants. Unlike Business Central online, where you can install the app for different environments, you can only install the app for one tenant. So before you install the app when you have multiple tenants, be sure to switch to the correct tenant. Once installed, when you open the app, it will directly open the tenant.
7.audit changes to your setup
Business Central allows you to configure your system in many ways. This article explains ways to monitor changes to your setup for financial auditing.
Set up the change log to capture changes
You can use the Change Log feature to capture changes to your setup. For example, you can find out what changed, who changed it, and when the change was made.
To use the Change Log to monitor your setup, you must specify the tables you want it to monitor. The following table lists some examples of finance setup tables where you might want to setup change tracking. Learn more in Log changes to know about the Change Log.
| If you want to audit changes to… | Table | Table ID | Learn more… |
|---|---|---|---|
| Financial Reporting | Report Definition | 88 | Audit changes to financial reporting |
| Financial Reporting | Row Definition | 84 | Audit changes to financial reporting |
| Financial Reporting | Column Definition | 333 | Audit changes to financial reporting |
| General ledger (G/L) | G/L Account | 15 | Audit changes to G/L accounts setup |
| General ledger (G/L) | G/L Account Category | 570 | Audit changes to account categories |
| Payment methods | Payment Method | 289 | Audit changes to payment methods |
| Payment terms | Payment Terms | 3 | Audit changes to payment terms |
| Posting groups | Gen. Product Posting Group | 251 | Audit changes to posting groups |
| Posting groups | Customer Posting Group | 92 | Audit changes to posting groups |
| Posting groups | Inventory Posting Group | 94 | Audit changes to posting groups |
| Posting groups | FA Posting Group | 5606 | Audit changes to posting groups |
| Posting groups | Vendor Posting Group | 93 | Audit changes to posting groups |
Learn more in Setting Up Finance for information on setting up the finance area.
Tip
If you want to track changes to data that isn't shown in the table, you can use the page inspection tool on the page that shows the data to find the corresponding table name and ID. Learn more in Inspecting and Troubleshooting Pages in the Business Central Developer and IT Pro help.
Get notified when system setup change
To add an extra layer of security to your setup, you can monitor changes to fields and get an email when someone changes a value. Learn more in Monitor sensitive fields.
Analyze changes to your setup
You can use the Data Analysis feature to answer questions such as:
Which definition changed?Who changed it, and when?
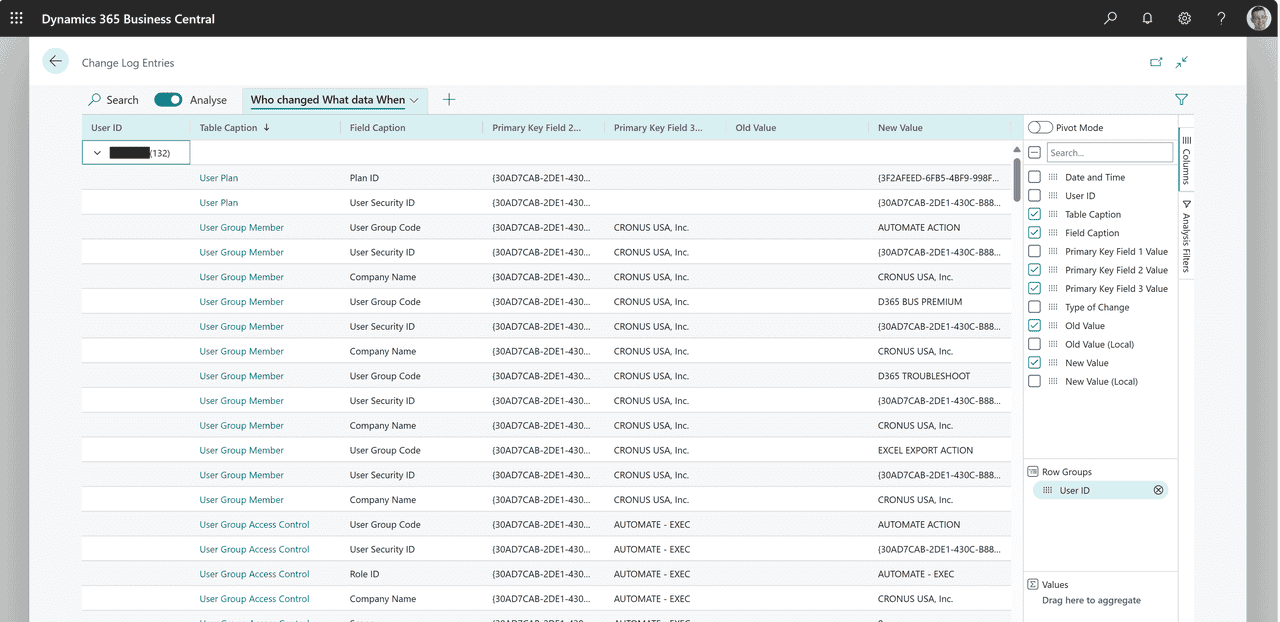
Learn more in Analyze data in the Change Log.
8.set up email
8.1set up email
Note
Azure Active Directory is now Microsoft Entra ID. Learn more
People in businesses send information and documents, such as sales and purchase orders and invoices, by email every day. Administrators can connect one or more email accounts to Business Central, letting you send documents without having to open an email app. You can compose each message individually with basic formatting tools, such as fonts, styles, colors, and so on, and add attachments of up to 100 MB. Additionally, report layouts enable administrators to include only the key information from documents. Learn more at Send Documents by Email.
Email capabilities in Business Central are for outbound messages only. You can't receive replies, that is, there's no “Inbox” page.
Note
You can use the email capabilities of Business Central online only with Exchange Online. We don't support hybrid scenarios, such as connecting Business Central online to an on-premises version of Exchange.
If you're using Business Central on-premises, before you can set up email you must create an app registration for Business Central in the Azure Portal. The app registration will enable Business Central to authorize and authenticate with your email provider. Learn more at Set Up Email for Business Central On-Premises. In Business Central online, we handle this for you.
Requirements
There are a couple of requirements for setting up and using the email features.
To set up email, you must have the EMAIL SETUP permission set. To learn more, go to Assign Permissions to Users and Groups.Everyone who uses the email features must be a fully licensed Business Central. For example, delegated admins and guest users can't use the tenant's email account.Everyone who uses the email features must have a valid, paid license for Exchange Online. Otherwise, some features won’t work. For example, they can’t send emails because Exchange rejects their messages. You can’t use trial licenses.
Add email accounts
You add email accounts through extensions that enable accounts from different providers to connect to Business Central. The standard extensions let you use accounts from Microsoft Exchange Online. However, other extensions that let you connect accounts from other providers, such as Gmail, might be available.
You can specify predefined business scenarios in which to use an email account to send emails. For example, you can specify that all users send sales documents from one account, and purchase documents from another. Learn more at Assign Email Scenarios to Email Accounts.
The following table describes the email extensions that are available by default.
| Extension | Description | Examples of when to use |
|---|---|---|
| Microsoft 365 Connector | Everyone sends email from a shared mailbox in Exchange Online. | When all messages come from the same department, for example, your sales organization sends messages from a sales@cronus.com account. This option requires that you set up a shared mailbox in the Microsoft 365 admin center. To learn more, go to Shared mailboxes. |
| Current User Connector | Everyone sends email from the account they used to sign in to Business Central. | Allow communications from individual accounts. |
| SMTP Connector | Use Simple Mail Transfer Protocol (SMTP) protocol to send emails. | Allow communications through your SMTP mail server. |
The Microsoft 365 Connector and Current User Connector extensions use the accounts you set up for users in the Microsoft 365 admin center for your Microsoft 365 subscription. To send email using the extensions, users must have a valid license for Exchange Online. Additionally, in sandbox environments, these extensions, including the Outlook REST API extension, require that the Allow HttpClient Requests setting is enabled. To check whether it's enabled for these extensions, go to the Extension Management page, choose the extension, and then choose the Configure option.
External users, such as delegated admins and external accountants, can't use these extensions to send email messages from Business Central.
Note
If you’re using service-to-service (S2S) authentication, the Microsoft 365 and Current user connectors can’t authenticate the user when they send a sales or purchase document by email. When someone sends a document, the following error message displays:
“You are not authorized to access this resource: https://graph.microsoft.com/.default. Contact your system administrator.”
The problem is caused by the bound actions on the document APIs that send email. To learn more about the bound actions, go to Bound Actions.
If you want to use S2S authentication and the email features, use the SMTP connector option.
Use SMTP
If you want to use SMTP protocol to send emails from Business Central, you can use the SMTP Connector extension. When you set up an account that uses SMTP, the Sender Type field is important. If you choose Specific User, emails are sent using the name and other information from the account you're setting up. However, if you choose Current User, emails are sent from the email account specified for each user's account. Current User is similar to the Send As feature. To learn more, go to Use a Substitute Sender Address on Outbound Email Messages.
Important
To use Auth 2.0 for SMTP authentication, consider the following:
All users must be on the same Microsoft Entra tenant.You can't use Specific User for the Sender type, as you can with Basic authentication. The reason is that OAUTH 2.0 uses the credentials of the current (signed-in) user.For Business Central on-premises, you must create an application registration in the Azure portal, and then run the Set up Microsoft Entra ID assisted setup guide in Business Central to connect to Microsoft Entra ID. Learn more at Create an App Registration for Business Central in Azure Portal.
Exchange Online is deprecating use of Basic authentication for SMTP. Tenants that are currently using SMTP AUTH won't be affected by this change. However, we strongly recommend using the latest version of Business Central and setting up OAuth 2.0 authentication for SMTP. We currently don't support certificate-based authentication. If you can't set up OAuth 2.0 authentication, we encourage you to explore third-party alternatives if you want to use SMTP email in earlier versions.
Note
When you copy a company that's using an SMTP email account to send emails, the password for the account isn't included. You'll need to re-enter the password on the SMTP Account page in the new company.
Use the Set Up Email assisted setup guide
The Set Up Email assisted setup guide can help you get started quickly with emails.
Note
You must have a default email account, even if you add only one account. The default account will be used for all email scenarios that aren't assigned to an account. Learn more at Assign Email Scenarios to Email Accounts.
Select Search (Alt+Q)

in the upper-right corner, enter Set Up Email Accounts, and then choose the related link.Fill in the fields as necessary. Hover over a field to read a short description.
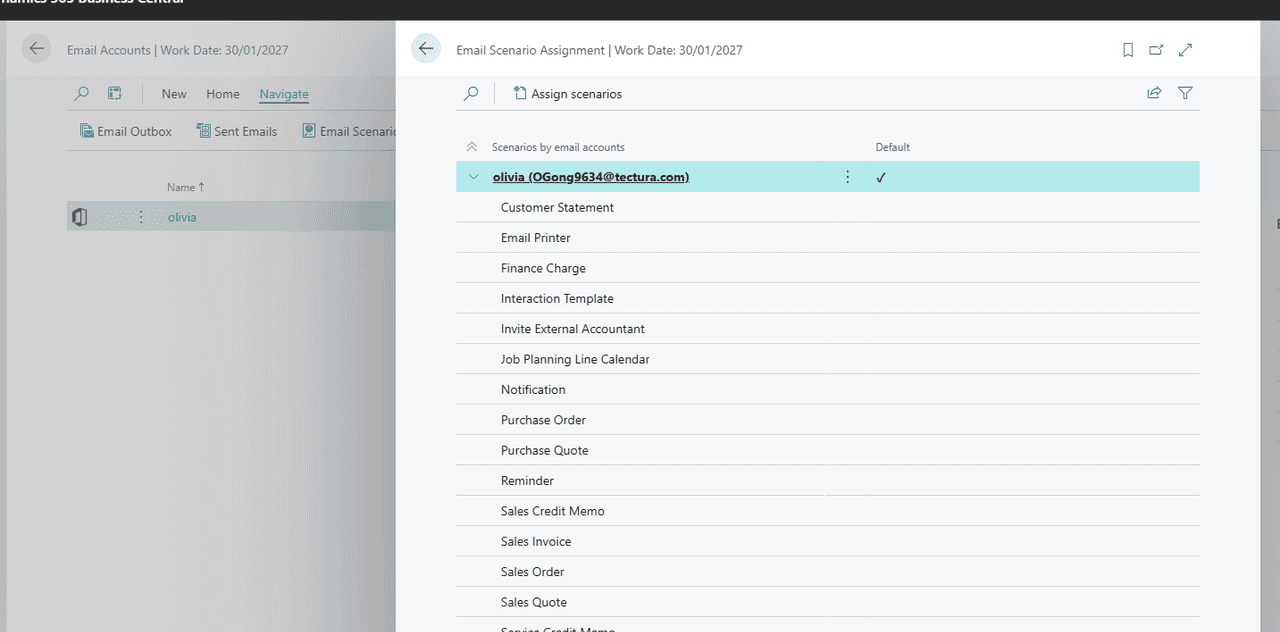
Assign email scenarios to email accounts
Email scenarios are processes that involve sending a document. For example, a sales or purchase order or a notification, such as an invitation to an external accountant. Specific email accounts can be used for specific scenarios. For example, you can specify that all users always send sales documents from one account, purchase documents from another, and warehouse or production documents from a third account. You can assign, reassign, and remove scenarios whenever you want. A scenario can only be assigned to one email account at a time. The default email account is used for all scenarios that aren't assigned to an account.
On the Email Scenario Assignment page, you can choose the Set Default Attachments action to add attachments to email scenarios. The attachments will always be available when you compose an email for a document related to the scenario. Each email scenario can have one or more default attachments. Default attachments are automatically added to emails for the email scenario. For example, when you send a sales order by email, the default attachment specified for the Sales Order scenario will be added. Default attachments display in the Attachments section at the bottom of the Compose an Email page. You can manually add non-default attachments to the email.
Set up view policies
You can control the email messages that a user can access in the Email Outbox and Sent Emails pages.
On the User Email View Policies, choose a user, and then choose one of the following options in the Email View Policy field:
View own emails – The user can view only their own email messages.View all emails – The user can view all email messages, including emails that were sent by other users.View if access to all related records – This view policy is used if no other policy is specified. A user can view email messages that other users sent if the user has access to the record that was sent and all of the related records. For example, User A sent a posted sales invoice to a customer. User B can access the email message if they have access to both the invoice and the customer.View if access to any related records – The user can view email messages that were sent by other people if the user has access to at least one record that is related to the record that was sent. For example, User A sent a posted sales invoice to a customer. User B can access the email message if they have access to either the invoice or the customer.
Note
If you leave the User ID field empty and then choose the Email View Policy action, the view policy applies to all users.
Specify how many messages an account can send per minute
Some email providers (ISPs) limit the number of email messages an email account can send in one go, or within a certain amount of time, or both. Known as email throttling, the practice helps ISPs control traffic on their servers and prevent spam. If an email account exceeds the limit, the ISP might block the messages. To ensure that the number of messages that you send from Business Central complies with your ISP's limit, specify the limit for each of your email accounts.
The default limit for the Microsoft 365 and Current User account types is 30, which matches the limit set by Exchange Online.
There are a few ways to specify the limit:
When you use the Set Up Email assisted setup guide to create a new account, specify the limit in the Rate limit per minute field.
For existing email accounts, specify:
The number of messages an account can send per minute in the Email rate limit field on the account.The maximum number of messages an account can send simultaneously in the Email Concurrency Limit field. By default, the limit is 3, but you can allow up to 10.
Set up reusable email texts and layouts
You can use reports to include key information from sales, purchase, and service documents in texts for emails. Report layouts define the style and the content of the text in the email. For example, the content might include texts such as a greeting or instructions that precede the document information. This procedure describes how to set up the Sales – Invoice report for posted sales invoices, but the process is similar for other reports.
Note
To use the layout to create content for email messages, you must use the Word file type for your layout.
Select Search (Alt+Q)

in the upper-right corner, enter Report Selections – Sales, and then choose the related link.On the Report Selection – Sales page, in the Usage field, select Invoice.On a new line, in the Report ID field, select, for example, standard report 1306.Select the Use for Email Body checkbox.Choose the Email Body Layout Description field, and then select a layout from the list.To view or edit the layout that the email text is based on, select the layout on the Custom Report Layouts page, and then choose the Export Layout action. If you customize the layout, use the Import Layout action to upload the new layout.
Note
To customize a standard report layout, such as 1306, you must make a copy of the report. Business Central will help you create a copy when you import a custom layout for a standard report. The name of your new custom report layout will be prefixed with “Copy of.”
If you want to let customers use a payment service, such as PayPal, you have to set up the service. Afterward, the PayPal information and link are inserted in the email text. To learn more, go to Enable Customer Payments Through PayPal.Choose the OK button.
Now, when you choose, for example, the Send action on the Posted Sales Invoice page, the email body contains the document information of report 1306 preceded by styled standard text according to the report layout that you selected in step 5.
Use a substitute sender address on outbound email messages
If you're using the SMTP Connector extension, you can use the Send As or Send on Behalf capabilities from Microsoft Exchange to change the sender address on outbound messages. Business Central will use the SMTP account to authenticate to Exchange, but will either replace the sender address with the one you specify, or amend it with “on behalf of.”
When you set up an account and you want to use the Send As or Send on Behalf capabilities from Exchange, in the Sender Type field, choose Specific User.
Alternatively, you can choose Current User to allow people to send messages through the SMTP Connector. The message will appear to be sent from the email account specified in the Contact Email field on the User Card for the user they're signed in as. However, it will function similar to the Send As feature and will be sent from the account specified in the setup of the SMTP Connector.
The following are examples of how Send As and Send on Behalf are used in Business Central:
You might want the purchase or sales orders that you send to vendors and customers to appear to come from a noreply@yourcompanyname.com address.When your workflow sends an approval request by email using the email address of the requester.
Note
You can only use one account for substitute sender addresses. That is, you can't have one substitute address for purchasing processes, and another for sales processes.
Set up document sending profiles
You can save time by setting up a preferred method of sending sales documents for each of your customers. You won't have to select a sending option, such as whether to send the document by email or as an electronic document, every time you send a document. To learn more, go to Set Up Document Sending Profiles.
Optional: Set up email logging in Exchange Online
Get more out of the communications between salespeople and your existing or potential customers. You can track email exchanges, and then turn them into actionable opportunities. Learn more at Track Email Message Exchanges Between Salespeople and Contacts.
Optional: Monitor email usage and troubleshoot email failures with telemetry
Administrators can switch on the telemetry feature in Business Central to get data about usage and failures of different capabilities. For email, we log the following operations:
An email was sent successfullyAn attempt to send an email failedAuthentication to an SMTP server succeeded/failedConnection to an SMTP server succeeded/failed
Learn more at Analyzing Email Telemetry (administration content).
Set up email for Business Central on-premises
Business Central on-premises can integrate with services that are based on Microsoft Azure. For example, you can use Cortana Intelligence for smarter cash flow forecasts, Power BI to visualize your business, and Exchange Online for sending email. Integration with these services is based on an app registration in Microsoft Entra ID. The app registration provides authentication and authorization services for communications. To use the email capabilities in Business Central on-premises, you must register Business Central as an app in the Azure portal, and then connect Business Central to the app registration. The following sections describe how.
Create an app registration for Business Central in Azure portal
The steps to register Business Central in Azure portal are described in Register an application in Microsoft Entra ID.
Note
To use the email features, your app registration must use a multi-tenant configuration.
The settings that are specific to the email capabilities are the delegated permissions that you grant to your app registration. The following table lists the minimum permissions.
| API / Permission Name | Type | Description |
|---|---|---|
| Microsoft Graph/User.Read | Delegated | Sign in and read user profile. |
| Microsoft Graph/Mail.ReadWrite | Delegated | Compose email messages. |
| Microsoft Graph/Mail.Send | Delegated | Send email messages. |
| Microsoft Graph/offline_access | Delegated | Maintain data access consent. |
| Microsoft Graph/Mail.Send.Shared | Delegated | Shared Mailbox |
If you're using the SMTP Connector and want to use OAuth 2.0 for authentication, the permissions are slightly different. The following table lists the permissions.
| API / Permission Name | Type | Description |
|---|---|---|
| Microsoft Graph/offline_access | Delegated | Maintain data access consent. |
| Microsoft Graph/openid | Delegated | Sign users in. |
| Microsoft Graph/User.Read | Delegated | Sign in and read user profile. |
| Microsoft Graph/SMTP.Send | Delegated | Send emails from mailboxes using SMTP AUTH. |
| Office 365 Exchange Online/User.Read | Delegated | Sign in and read user profile. |
When you create your app registration, note the following information. You'll need it to connect Business Central to your app registration.
Application (client) IDRedirect URI (optional)Client secret
Learn more about general guidelines for registering an app at Quickstart: Register an application with the Microsoft identity platform.
Note
If you have trouble using the SMTP protocol to send email after you connect Business Central to your app registration, it might be because SMTP AUTH is not enabled for your tenant. We recommend that you use the Microsoft 365 and Current User email connectors instead, because they use Microsoft Graph Mail APIs. However, if you must use SMTP protocol you can enable SMTP AUTH. To learn more, go to Enable or disable authenticated client SMTP submission (SMTP AUTH) in Exchange Online.
Connect Business Central to your app registration
After you register your application in Azure portal, in Business Central, use the Email Microsoft Entra application registration page to connect Business Central to it.
In Business Central, select Search (Alt+Q)

in the upper-right corner, enter Email Microsoft Entra application registration, and then choose the related link.Fill in the fields as necessary. Hover over a field to read a short description.
Tip
Alternatively, if you're connecting for the first time, you can run the Set up email assisted setup guide. In this case, the guide includes the Email Microsoft Entra application registration page for connecting to your app registration.
8.2set up your business inbox in Microsoft outlook
8.2.1get the business centeral add-in for outlook
With Business Central, you can manage business interactions with your customers and vendors, directly in Microsoft Outlook. With the Business Central Outlook add-in, you can view financial data related to customers and vendors. You can also create and send financial documents, such as quotes and invoices.
There are two ways to get the Business Central add-in for Outlook installed, depending on your role in the organization:
As a Microsoft 365 administrator, use Centralized Deployment to install the add-in automatically for the entire organization, groups, or specific users.
As any user, install the add-in for your own use if not already done by your admin.
About the Business Central add-in for Outlook
The Business Central add-in for Outlook consists of two smaller add-ins:
Contact insights
This add-in provides users with Business Central customer or vendor information in Outlook emails and calendar appointments. It also enables you to create and send Business Central business documents, such sales quotes and invoices to a contact.
Document view
When an email refers to a business document number in the email body, this add-in provides a direct, in-line link from email body to the actual business document in Business Central.
For more information about what you do with the add-ins, see Use Business Central as your Business Inbox in Outlook.
Each add-in is provided as an XML file, called a manifest, which must be installed in Outlook of anyone who wants this functionality. These files describe how to activate the add-ins and connect to Business Central when they're used in Outlook. Working with these files is typically done by an admin. As a user, in most cases, you won't have to handle with these files directly. Either your admin will set up the add-in to install automatically for you or you'll use the built-in assisted setup to handle the installation.
Important
Working with multiple environments? The Business Central add-in for Outlook is designed to work with a single Business Central environment. When the add-in is installed, the name of the environment is included in the add-in's manifest. This configuration means that the add-in will only connect to the environment that it was installed from. To use the add-in with a different environment, you'll open the environment and install the add-in again.
Deploy the add-in by using Centralized Deployment as an admin
Centralized Deployment is a feature in Microsoft 365 admin center that you use to automatically install add-ins in users' Office apps, like Outlook. It's the recommended way for admins to deploy for Office add-ins to users and groups within your organization.
Note
For Business Central on-premises, see Setting Up the Add-In for Outlook Integration with Business Central On-Premises in the administration content (English only).
Prerequisites
A Microsoft 365 subscriptionUsers are assigned a Microsoft 365 licenseYour Microsoft 365 account has at least the Exchange Administrator role
Deploy the add-in
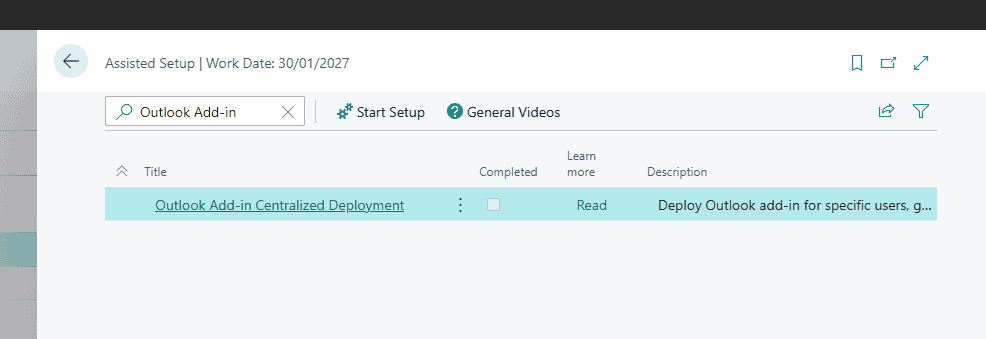
In Business Central, select Search (Alt+Q)
in the upper-right corner, enter Assisted Setup, and then select the related link.
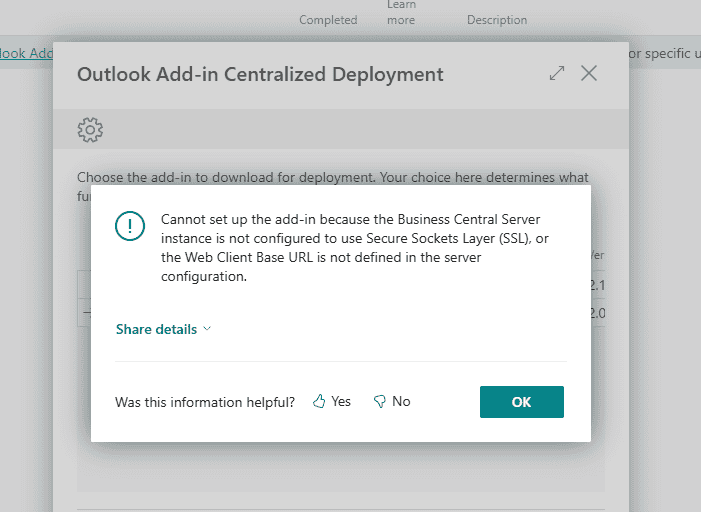
Select Outlook Add-in Centralized Deployment to start the assisted setup guide.
Review the first page and select Next to open the page for downloading the add-ins.
In the Deploy column, select the check box for the add-ins that you want to deploy, then select Download and Continue.
A file with the name OutlookAddins.zip is downloaded to your device.
At this point, you're finished with the work you need to do in Business Central, so you can select Done.
Tip
Before you select Next, select the Go to Microsoft 365 (opens in a new window) link to open and sign in to the Microsoft 365 admin center in a new browser window. You'll have to go to the Microsoft 365 admin center in a later step anyways.
Go the folder where the OutlookAddins.zip was downloaded, and extract the Contact Insights.xml and Document View.xml files from the .zip to a folder of your choice.
For more information, see Zip and Unzip files and folders.
Sign in to the Microsoft 365 admin center, then go to Integrated Apps.
Select Upload custom apps.
On the Upload Apps to deploy page, set App type to Office Add-in.
Select Upload manifest file (.xml) from device > Choose file.
Choose one of the add-in files Context Insights.xml or Documents.xml that you extracted earlier.
Follow the instructions to assign users and deploy the add-in.
Repeat step 9 through 11 for the other add-in file if you want.
Important
A green check mark appears when the add-in is deployed to the admin center. However, it can take up to 24 hours before users see the add-in in the Outlook app. Users might have to restart Outlook as well.
When finished, you can always change the deployment in Microsoft 365 admin center, like assigning more users. For more information about deploying add-ins in the admin center, see Deploy add-ins in the admin center.
Install the add-in for your own use
If your organization allows it, you can install the Business Central add-in for just yourself. Contact your administrator if you're not sure.
In Business Central, go to the
icon, enter Get the Outlook Add-in, and then select the related link.Read the page and select Next when ready.If you want to receive a welcome email message from Business Central with overview of using the add-in, turn on Send sample email message.Select Finish to complete the installation.
Business Central now connects to your email server and installs the add-in in your Outlook. This operation doesn't take long. You're now ready to start using the add-in in Outlook.
For Business Central on-premises
If you're using Business Central on-premises, installing the add-in might be slightly different.
In Business Central, go to the
icon, enter Get the Outlook Add-in, then select the related link.
Read the page and select Next when ready.
Do one of the following steps, depending on the page you see:
If you see the Install to my Outlook button, select it and you're all done.If you see the Next button, select it. On the next page, if you want to receive a welcome email message from Business Central with overview of using the add-in, turn on Send sample email message. Then, select Finish and you're all done.If you see the Download Add-in button, select it, then continue to the next step.
When you select Download Add-in, a file with the name OutlookAddins.zip is downloaded to your device. You should find the file at the top of the browser.
Go the folder where the OutlookAddins.zip was downloaded, and extract the Contact Insights.xml and Document View.xml file from the .zip to a folder of your choice. For more information about how to extract files, see Zip and Unzip files and folders.
In your browser, visit https://aka.ms/olksideload. This link opens Outlook on the web, and then loads the Add-Ins for Outlook dialog.
Select My add-ins > Add a custom add-in > Add from a file.
Select one of the .xml files that you extracted, like Contact Insights.xml, then select Open > Install.
Repeat step 6 and 7 for the other .xml file, if you downloaded one.
You're now ready to start using the add-in in Outlook.
Learn more about installing add-ins in Outlook at Use add-ins in Outlook.
8.2.2use business central as your business inbox in outlook
Business Central offers an add-in that lets you manage business interactions with your customers and vendors, directly in Microsoft Outlook. With the Business Central add-in for Outlook, you can see financial data related to customers and vendors, and create and send financial documents, such as quotes and invoices.
Business Central add-in consists of two separate add-ins that provide the following capabilities:
Contact insights
This add-in lets you look up Business Central customer or vendor information in Outlook emails and calendar appointments. It also lets you create and send Business Central business documents, such a sales quote or invoice to a contact.
Document view
When a business document is sent in an email, the add-in provides a direct link from email to the actual business document in Business Central.
Get started
The first thing to do is get the Business Central add-in installed in Outlook. Your administrator may have already installed the add-in for you. So if you're not sure, check with your administrator or see the next step to verify whether it's installed.
If the add-in hasn't been installed for you, see Install the add-in for your own use.
With the add-in installed, you can access the Business Central add-in from any new or existing email message or calendar appointment in Outlook.
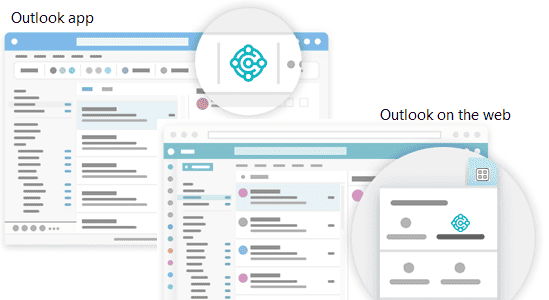
Start by signing in to Outlook and opening an email message. Then, if you're using the Outlook app, go to the ribbon, and look for Business Central. Or if you're using Outlook on the web, at the top the email message, select Apps

> Business Central

or go to the more actions

button.
If you've installed the add-in on your own and chose to get a sample email, check your inbox for the welcome email. This email provides information to help you get started.
The first time you use the add-in, in Business Central add-in pane, you might be asked to sign in. In this case, choose Sign in now and follow the instructions onscreen to sign in to Business Central using your account.
Tip
If you use the new Outlook on the web, you can pin Business Central so that it is always immediately visible, instead of having to go to the more actions button, making it convenient to view contact insights while you browse through different emails.
For more information, see Use add-ins in Outlook on the web.
Work with contacts and documents using the Contact Insights add-in
Let's say that you get an email from a customer that wants to get a quote on some items. Directly in Outlook, you open the Business Central add-in, which recognizes the sender as a customer, and opens the customer card for that company. From this dashboard, you see overview information for the customer, and drill down for more detail on specific documents. You can also dig into the sales history for the customer. If it's a new contact, you can create them as a new customer in Business Central without leaving Outlook.
In the add-in, you can create a sales quote and send it back to this customer without leaving Outlook. All of the information that you need to send the sales quote is available in your business inbox in Outlook. Once you have the data entered, you post the quote and send it by email. Business Central generates a .PDF file with the sales quote and attaches it to the email message that you draft in the add-in.
Similarly, if you get an email from a vendor, you can use the add-in to work with vendors and purchase invoices.
Sometimes you want to see more fields than you can see in the add-in, such as when you want to fill in lines in an invoice. To give you a bit more space to work with, you can pop out the add-in to a separate page. It's still part of Outlook, but you have more space. As you enter data for the document in the pop-out view, the changes are automatically saved. The following sections lead you through some basic tasks to give you a general understanding how to use it.
Tip
The tasks explain how to use the add-in from an email message. But you can do the same from a calendar appointment in Outlook.
Look up a business contact when composing an email
Create a new email message.
In the ribbon, go to Business Central and choose Contact Insights. Or if you're using Outlook on the web, at the top of the message, select Apps
> Business Central

> Contact Insights.
In the Business Central add-in pane that opens, scan for and choose the contact you want.
An overview of the contact displays in the pane and the contact is added in the To line of the email.
View and change the contact details or switch company
The action bar at the top of the Business Central add-in pane includes several actions that let you dig deeper into details about the contact and change things.
For example, you can open the full contact details as you would see them in Business Central. If you work with more than one Business Central company, you can easily switch between companies.
Track incoming documents
Perhaps you use the Incoming Documents list in Business Central to track documents for processing that vendors send to you, such as a purchase invoice that needs to be paid. If you do, you can easily create Incoming Documents records from the Outlook add-in and include the email attachments.
When you receive an email from a vendor that has an attachment, choose
Business Central > Contact Insights.
In the action bar of the add-in, choose Show more actions, then choose the Send to Incoming Documents… action.
Create and send new document to a contact
In the ribbon or at the bottom of the email message, choose
Business Central > New, then choose the type of document you want to create, such as Sales Quote.Make changes to the document in the Business Central add-in pane.When the document is ready to send to the contact, in the action bar, choose Show more actions, then choose the Send by Email action.
Attach files to records
Your email inbox often serves as a source of incoming files that initiate or unblock workflows. Files can include things like PDF invoice payments, photos of goods, or requirements in a Word document. When working in Outlook with Business Central records like vendors, customers, purchase invoices, or sales orders, you can attach these files to the records.
There's a couple ways you can attach files. One way is to upload files from your device. The other way is to upload files that are attached to an email. For example, suppose you get an email with files from a contact. The add-in will automatically display the contact record that matches the email sender. From there, you can navigate to a document for the contact, like the latest sales order. Once you've identified the order that the email relates to, you quickly upload the files from the email to that order.
After attaching a file, coworkers can instantly download and view the file from the Attachments FactBox in any of their Business Central clients. Or, they can open the file in OneDrive to share and collaborate with their department.
How to attach a file
Open the email, choose
Business Central > Contact Insights.
In the action bar of the add-in, choose Show more actions > Attachments.
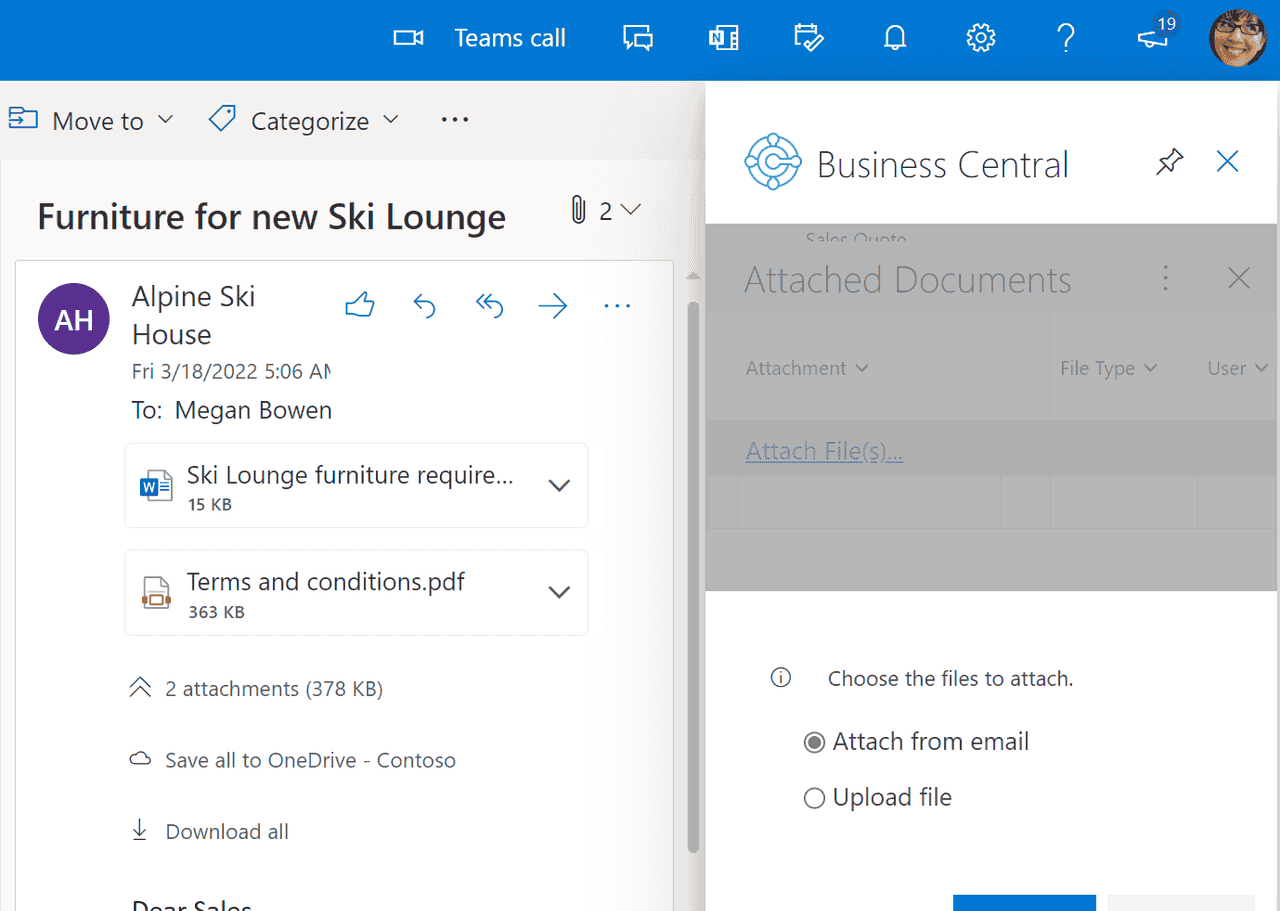
The Attached Documents page opens to list any documents that are already attached to the record.
Choose Attached File(s)…, then choose one of the following options:
Choose Attach from email to upload all or selected files that are attached to the email.Choose Upload from file to upload one or files from your device.
Note
You can't attach files to all records. This feature is available for records that use the Attachments FactBox, such as a vendor, customer, purchase invoice, or sales order.
View a document from an email using the Document View add-in
Whether it's an email you sent or received, you can surface any Business Central document, like the sales quote, directly in Outlook. From there, you can make changes and navigate to related information—just as you would from within Business Central.
If you're using the Outlook app, just choose Document Link at the top of the email message. For Outlook on the web, look for the document reference link in the email message. The reference link text will include the document number, which is based on the number series used in Business Central. For example, the link for a sales quote would be something like Sales Quote S-QUO1000.
Tip
Starting in 2022 release wave 1, documents open in a new browser window with all the capabilities that you know from Business Central. You can navigate from a document to a list and back again, open lists in Excel, send documents to be printed, and run or preview related reports. You also have all of the familiar keyboard shortcuts right there when you open documents from Outlook.
8.2.3synchroniza with contacts in outlook
synchronize with contacts in outlook
You can set up contact synchronization so that your contacts in Business Central have the same information as your contacts in Microsoft Outlook. For example, if you're a sales person, you might work in Outlook and Business Central at the same time. If the contacts are the same in both places, your work is more straightforward.
By default, the contacts you're syncing are kept in a Business Central folder in your Favorites on the Folder Pane in Outlook. The Business Central folder can make it easier to identify which contacts you're syncing. You can set filters to sync only specific contacts from Business Central to Outlook. After you set up synchronization, you can synchronize manually or automate the process to synchronize on a scheduled basis.
Prerequisites
Your user account in Business Central must specify your Microsoft 365 email account.
You can check this setting in the Microsoft 365 section of your User Card, which you open from the Users list.
With Business Central on-premises, you set up contact synchronization as described in Set Up contact synchronization with Outlook for Business Central on-premises.
Set up synchronization
You set up how you want to synchronize contacts with Outlook on the Exchange Sync. Setup page in Business Central.
On the Exchange Sync. Setup page, you can validate that the connection to Exchange is working and then set up contact synchronization. From the Exchange Sync. Setup page, you can open the Contact Sync. Setup page and start the synchronization. Optionally, set a filter to specify which contacts to synchronize. For example, you can filter on name, type, company, and so on. You can also change the default name of the folder in Outlook that the contacts synchronize to.
Each of your coworkers can also set up their own Exchange synchronization and set their own filters on which contacts to synchronize.
After you set up synchronization, sync changes manually. Business Central versions 2023 release wave 2 and earlier support automated synchronization. Learn more about automation in the next section of this article.
Synchronize contacts
To sync contacts, select one of these actions on the Exchange Sync. Setup page:
Sync with Microsoft 365
Synchronize all changes from Business Central to Microsoft 365 that were made after the last synchronization, based on the last modified date. Also, new contacts from Microsoft 365 are synchronized to Business Central. Typically, this action is faster than a full sync.
Full Sync with Microsoft 365
Synchronize all contacts in both directions, regardless of the last sync date and last modified date.
In both cases, contacts are only synchronized from Outlook if they have the required fields filled in. The required fields to synchronize to Microsoft 365 are Name, Email address and the contact must be of the type Person. Business Central is the source of the contact information, so the Business Central contact information is saved if there are duplicates.
Note
If you delete a contact in Outlook, but keep it in Business Central, the contact will be recreated in Outlook the next time you sync.
Automate synchronization (background synchronization)
Important
Starting in 2024 release wave 1 (version 24), you can't turn on background synchronization anymore. If it's currently on, it works as expected. If you turn it off, you can't turn it on again.
To automate sync, if the Enable Background Synchronization toggle is on, create a job queue entry to sync contacts on a schedule you set. Learn more in Use Job Queues to Schedule Tasks.
The following table lists the settings on the Job Queue Entry Card page for syncing contacts:
| Field | Setting for contact sync |
|---|---|
| Object Type to Run | Codeunit |
| Object ID to Run | 6700 |
set up contact sync for on-premises
Note
Azure Active Directory is now Microsoft Entra ID. Learn more
In this article, you learn how to set up Business Central on-premises to synchronize contacts in Business Central with contacts in Outlook. For more information the feature, go to Synchronize Contacts in Business Central with Contacts in Microsoft Outlook.
Introduction
Contact synchronization requires using the OAuth 2.0 protocol for authentication with Exchange Online. Previously, basic authentication was also supported, but it's been deprecated and no longer supported with Exchange Online. You can read more about the deprecation at Deprecation of Basic authentication in Exchange Online. This change means that contact synchronization in Business Central may have stopped working on your on-premises environment. This article will explain how to get it working again.
Prerequisites
Exchange Online, either a standalone version or through Microsoft 365 planAccess to the Microsoft Entra tenant used by Exchange OnlineBusiness Central users have a Microsoft 365 or Exchange Online email account, which is assigned to their accounts in Business Central. You can check this setting in the Microsoft 365 Authentication section of user profile in the Users list.
Set up contact sync
Complete the following steps to set up contact sync. If you're running Business Central Spring 2019 (v.14), you'll have to do an extra step that either modifies application code or sets up a connection to Power BI.
Register an app for Exchange Online API in your Microsoft Entra tenant.
In this step, you add a registered app in the Microsoft Entra tenant of your Microsoft 365 or Exchange Online plan. Like other Azure services that work with Business Central, Exchange Online requires a registered app in Microsoft Entra ID. The registered app provides authentication and authorization services between Business Central and Exchange Online.
Follow the detailed instructions in the developer and IT pro help at Register an application in Microsoft Entra ID. As you go through the instructions, remember the following points:
If you've already registered an application as part of an integration with another Microsoft product, such as Power BI, then reuse that registered app. In this case, you'll just have to set up the app with the Office 365 Exchange Online permissions described in the next bullet.
Configure the registered app with the following delegated permissions to the Office 365 Exchange Online API:
Contacts.ReadWriteEWS.AccessAsUser.All
For Business Central version 14, do one of the following tasks:
Modify page 6700 by changing
FALSE
TRUE
OnPageOpen
PasswordRequired := AzureADMgt.GetAccessToken(AzureADMgt.GetO365Resource,AzureADMgt.GetO365ResourceName,TRUE) = '';
Create new page with the following code on the OnPageOpen trigger:
PasswordRequired := AzureADMgt.GetAccessToken(AzureADMgt.GetO365Resource,AzureADMgt.GetO365ResourceName,TRUE) = '';
Set up Power BI by following the instructions at Set up Business Central on-premises for Power BI integration.
After the solution you choose is in place, ask users to either run the new/modified page or connect to Power BI. They'll only need to do this step once.
Next steps
Synchronize Contacts in Business Central with Contacts in Microsoft Outlook
optimize outlook
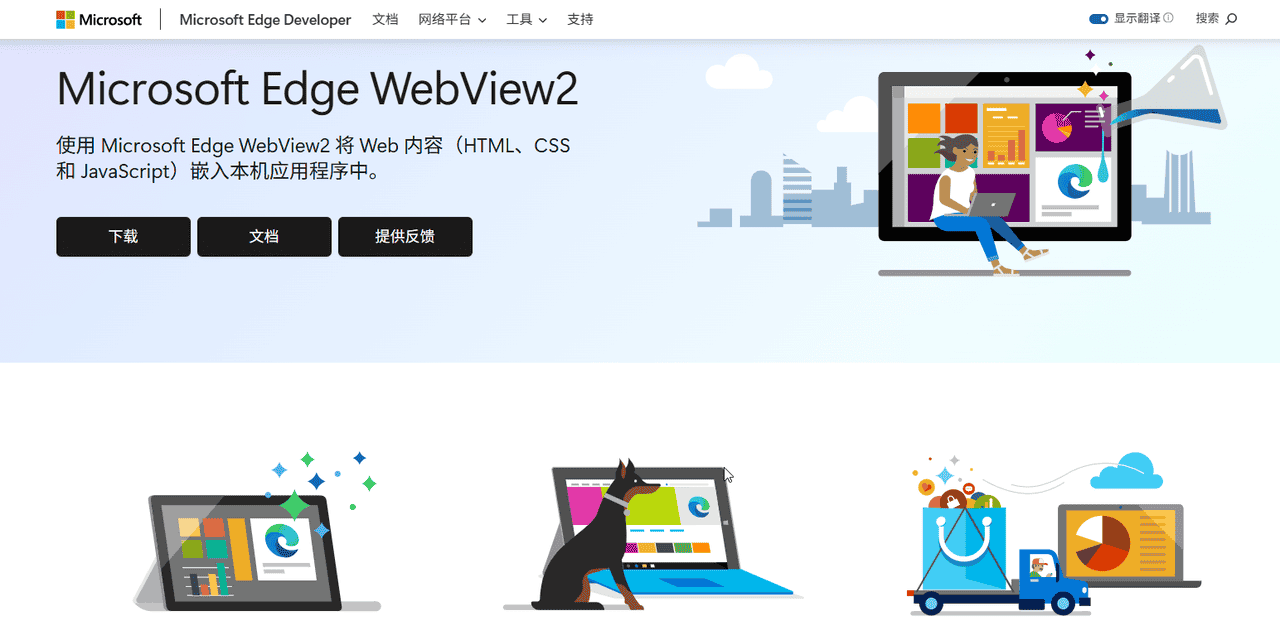
This article discusses things you can do to get the best possible experience with the Business Inbox in Microsoft Outlook.
Update Outlook
Update to Outlook version 2012 or newer.
Note
If you are unable to update Outlook to version 2012 or later, make sure that you at least update to version 1905. This prevents the Outlook Add-in from running using legacy Internet Explorer components
How to check your version of Outlook
Whether you use Office 2019 or Microsoft 365, follow this Microsoft Support guide to check which version of Outlook you have:
About Office: What version of Office am I using?
How to update Outlook
To update Outlook to the latest version, follow this Microsoft Support guide or contact your administrator:
Install Office updates
Install Microsoft Edge WebView2
Ensure that Microsoft Edge WebView2 is installed on your device.
How to check if Microsoft Edge WebView2 is installed
To check if you have Microsoft Edge WebView2 installed on a computer, do the following steps:
From Start menu:
Choose Start

> Settings

> Apps & Features.In the search box, type WebView2. If Microsoft Edge WebView2 is installed, you see an entry called Microsoft Edge WebView2 Runtime.
From Control Panel:
In the search box next to Start
, type Control Panel, and then select the result.Choose Programs > Programs and Features.In the search box, type WebView2. If Microsoft Edge WebView2 is installed, you see an entry called Microsoft Edge WebView2 Runtime.
How to install Microsoft Edge WebView2
Using your browser, go to https://developer.microsoft.com/microsoft-edge/webview2/.Choose Download.Set Select Architecture to match your system.Choose Download.
Note
Your organization may have restriction on which components can be installed on your device. Contact your administrator for assistance.
Use a supported browser
Consider using Outlook for the Web in one of the browsers supported by Business Central. For a list of supported browsers, see Minimum Requirements for Using Business Central.
use bisniess central without outlook
Business Central has deep integration with Microsoft 365, and you can use Business Central as your business inbox in Outlook. But if you don't have Outlook, you can work with Business Central in the browser or on your mobile device.
Sending email
You can send documents such as invoices as email using your business email address. From your Role Center, you can access an assisted setup guide that helps you set up email. If you don't use a Microsoft 365 email account, you must specify technical information about your mail server. If you don't have this information available, please contact your IT support staff.
FAQ
This article answers questions that users often ask about the Business Central add-in for Outlook.
How do I change the environment my add-in is pointing to?
The environment URL is configured in the add-in when the add-in is installed (specifically, in the add-in's manifest file). If you want the add-in to point to a different environment, open the desired Business Central environment and deploy the add-in again, for example, by running the Get the Outlook Add-in assisted setup. This action will redeploy the add-in with updated environment URLs.
Note
It might take some time before the change takes effect.
Can I customize the add-in to connect to multiple environments?
Yes. As an administrator, developer, or partner, you can modify and build your own add-in manifests. One way is to download the Contact Insights manifest from each environment that the users want to connect to. Then, modify the
<Id>
<DisplayName>
Outlook add-in tells me the page is not supported. Why?
Some features in Business Central require significant workspace to provide a great experience and aren't available when using the Outlook add-in pane. For example, any step-by-step wizard page isn't available in the pane. To overcome this, you can pop out the page in the add-in using the “Pop out” action. The popout window can be stretched to any size including expanding to fill your screen.
Does the Outlook add-in work on a shared mailbox?
No, not currently.
set up reports
report selection for documents
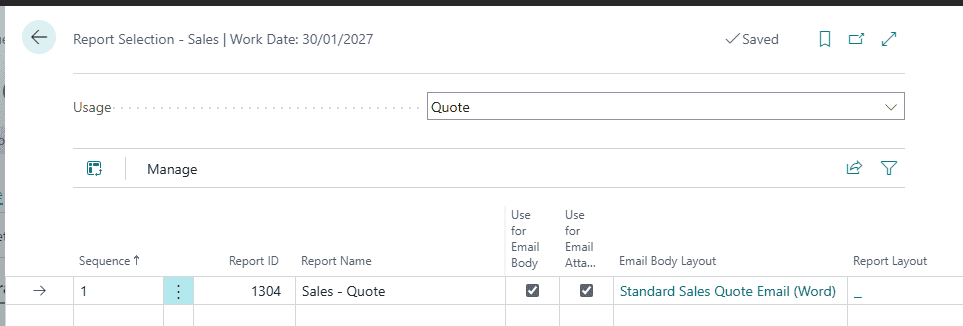
You can set up default reports to use to print sales, purchases, and service documents, such as orders, quotes, and invoices, and which layout is used. For example, if you have a specific layout for sales invoices, you can specify that report in the Report Selections – Sales page. You can then use the report when you send or print sales invoices.
Available report selections
The Report Selections pages specify the reports to print in different situations and the layout to use. Business Central provides default configurations, but you can change them if needed. You can also add reports to the Report Selection pages if you want to print more than one report per document type, for example.
The following table describes where you can find information about the different pages.
| Area or task | Learn more |
|---|---|
| Example of how report selection works (sales) | Report selection for sales documents |
| Default layout for emails with sales and purchase documents | Set Up Reusable Email Texts and Layouts for Sales and Purchase Documents |
| Define check layouts | Select a Check Layout |
| Define reports for value-added tax (VAT) reporting (Germany) | Set Up Reports for VAT and Intrastat |
Tip
Your Business Central can include additional Report Selection pages, depending on your location and industry, for example. To check your setup, select Search (Alt+Q)
in the upper-right corner, enter Report Selection, then choose the relevant link.
The default version of Business Central includes the following Report Selection pages:
Report Selection – SalesReport Selection – ProjectReport Selection – ServiceReport Selection – PurchaseReport Selection – Cash FlowReport Selection – WarehouseReport Selection – InventoryReport Selection – Bank AccountReport Selection – Production OrderReport Selection – Reminder/Finance Charge
Example: Report selection for sales documents
The Report Selection – Sales page offers default reports to use in different scenarios for each related document type. Choose a document type in the Usage field, then add or review the report selection. You can set up more than one report and specify the sequence the reports must be sent or printed in.
Hover over a field to read a short description.
You can't send all document types as email attachments. For the document types you can, the Report Selection page contains extra fields.
For example, on the Report Selection – Sales and Report Selection – Purchase pages, the following fields help you set up email:
| Field name | Description |
|---|---|
| Use for Email Body | Insert summarized information, such as the invoice number, due date, or a link to a payment service in an email. |
| Use for Email Attachment | Attach the related document to the email. |
| Email Body Layout Description | Specify the email body layout to use. Typically, it's a custom report layout. |
| Report Layout | Specify the layout to use for the report. Typically, it's a custom report layout. |
Report selection for finance reports
Similar to document reports, you can also configure the financial report definition for core finance reports such as Balance Sheet, Income Statement, and Retained Earnings. Learn more in Report selection for finance reports.
set up approval workflows based on templates
set up workflow users
You can set up and use workflows that connect business-process tasks performed by different users. System tasks, such as automatic posting, can be included as steps in workflows, preceded or followed by user tasks. Requesting and granting approval to create new records are typical workflow steps. Learn more at Use Approval Workflows.
Before you begin to use approval workflows, you must set up workflow users and approval users, specify how users receive notifications about workflow steps, then create the workflows.
On the Workflow page, you create a workflow by listing the involved steps on the lines. Each step consists of a workflow event, moderated by event conditions, and a workflow response, moderated by response options. You define workflow steps by filling in fields on workflow lines using fixed lists of event and response values that represent scenarios supported by the application code.
Note
If a business scenario requires a workflow event or response that is not supported in the default version, sign up for Power Automate. For more information, see Use Business Central in Power Automate Flows. Alternatively, get an app at AppSource or work with a Microsoft partner to customize the application code.
The following table describes a sequence of tasks, with links to the articles that describe them.
| To… | Go to… |
|---|---|
| Set up workflow users and user groups. | Set Up Workflow Users |
| Set up workflow users who take part in approval workflows. | Set Up Approval Users |
| Specify how workflow users are notified of workflow steps, including approval requests. | Setting Up Workflow Notifications |
| Specify if users are notified by email or note and how often notifications are sent. | Specify When and How to Receive Notifications |
| Customize the content of the email notification by modifying Report 1320, Notification Email. | Create and Modify Custom Report Layouts |
| Set up an SMTP server to enable email communication in and out of Business Central | Set up Email |
| Specify the different steps of a workflow by connecting workflow events with workflow responses. | Create Approval Workflows |
| Use workflow templates to create new workflows. | Create Approval Workflows from Workflow Templates |
| Share workflows with other Business Central databases. | Export and Import Approval Workflows |
| Learn how to set up a workflow for approving sales documents by following an end-to-end procedure. | Walkthrough: Setting Up and Using a Purchase Approval Workflow |
set up apprval uses

Before you can create approval workflows, you must set up the users who can submit requests and their approvers. For example, you can specify who receives a notification to act on a workflow step. You set up approval workflow participants on the Approval User Setup page. Learn more at Set Up Approval Users.
On the Workflow User Groups page, you can specify where a participant engages in an approval workflow by entering a number in the Sequence No. field. For example, you can specify that users engage in a sequential order, such as a chain of approvers. You can also specify a flat list of approvers by entering the same number. In the latter case, only one of the approvers must approve a request.
When you set up users for approval workflows, it's important that the same user isn't both a requestor and an approver in a workflow user group. When a user is both a requestor and an approver, approvals work for them as follows:
Their requests are always approved automatically.If there are multiple approvers, only the approvers with a higher sequence number in the workflow user group can change the status of a request to Approved. Approvers with a lower sequence number can approve requests, however, their approvals won't affect the status of a request.
To set up a workflow user group
Select Search (Alt+Q)
in the upper-right corner, enter Workflow User Groups, then choose the related link.
Choose the New action. The Workflow User Group page opens.
In the Code field, enter a maximum of 20 characters to identify the workflow.
In the Description field, describe the workflow.
On the Workflow User Group Members FastTab, fill in the fields on the first line, as described in the following table.
| Field | Description |
|---|---|
| User Name | Specify the user who takes part in a workflow.
The user must exist on the User Setup page. Learn more at Assign Permissions to Users and Groups. |
| Sequence No. | Specify the order in which the workflow user engages in a workflow relative to other users. This field can specify, for example, when the user approves relative to other approvers by setting up the Workflow User Group option in the Approver Type field on the related workflow response. |
Note
Typically, sequence numbers are sequential for users in a workflow user group. However, multiple users can have the same sequence number. When that's the case, only one of the users must approve a request before the workflow goes to the next step. For example, if user A and user B are both number two in the sequence, the workflow goes to the step 3 when either user A or user B approves the request.
Repeat step 5 to add more workflow users to the workflow user group.
apprval workflow notifications
Set up your workflows to automatically notify users when their attention is required for a step in a workflow. Many workflow responses involve notifying a user an event they must act on has occurred.
For example, you can set it so User 2, the approver user, receives a notification whenever User 1 requests approval for a new record. On the next workflow step, after User 2 approves the record, User 3 is notified and can begin a related processing of the record. With approval workflow steps, each notification is tied to an approval entry. Learn more at Workflow.
Note
The default version of Business Central supports notifications in email or as internal notes.
Important
All workflow notifications are sent through a job queue. Make sure the job queue in your installation is set up to handle workflow notifications, and that you've selected the Start Automatically From Server check box. Learn more at Use Job Queues to Schedule Tasks.
Set up notifications
You can set up different aspects of workflow notifications in the following places:
Approver notification
For approval workflows, set up the recipients of workflow notifications by filling in a line on the Approval User Setup page for each user that takes part in the workflow.
For example, if User 2 is specified in the Approver ID field on the line for User 1, then the approval request notification is sent to User 2. Learn more at Set Up Approval Users.
Notification schedules
Set up when and how users receive workflow notifications by filling in the Notification Schedule page for each workflow user. Learn more at Specify When and How to Receive Notifications.
Customize the email notifications
If you like, you can customize the content of the email notification by modifying Report 1320, Notification Email. Learn more at Create and Modify Custom Report Layouts.
Note
If you want to use email as the notification method, you must set up email for both the sender and the receiver in Business Central. Learn more at Set up Email.
Response options
Set up specific content for and rules of a workflow notification when you create the workflow in question. Select the customization options on the Workflow Responses page for the workflow response that represents the notification. Learn more from step 9 in the Create Workflows section.
Notify sender
For approval workflows, add a workflow response step to notify the sender when the request has been approved or rejected. Learn more from step 9 in the Create Workflows section.
specify when and how to receive workflow notifications
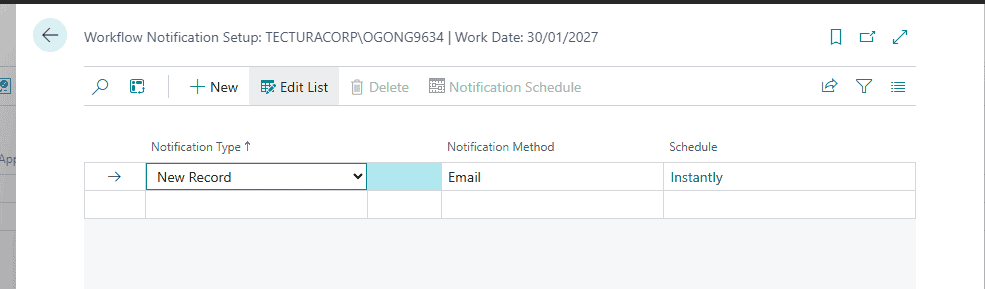
In workflows that require that someone approves changes, you must set up the approval users who approve or reject changes. For example, you might want someone to approve new records. An important part of the approval user setup is to specify how and when the user is notified of the change. For example, you can specify that an approval user immediately receives an email when someone creates a new customer. You can also schedule notifications to be delivered, for example, on a weekly or monthly basis.
People can also change their notification setup by choosing Change Notification Settings on any notification.
Note
Notifications are delivered according to the notification settings for the receiver, not the sender. That's an important distinction because it means that when someone requests an approval as part of a workflow, their request isn't necessarily sent immediately. Instead, it's delivered according to the notification schedule specified in the approver's notification settings.
Before you can set up an approval user's notification preferences, you must set up the user as an approval user. Learn more at Set Up Approval Users.
Note
To use email as the notification method, you must set up email for both the sender and the receiver in Business Central. Learn more at Set up Email.
Steps in workflows
Many approval workflow steps are about notifying users of an event they must act on. For example, on one workflow step, the event can be that User 1 requests approval of a new record. The related response is that a notification is sent to User 2, the approver. On the next workflow step, the event can be that User 2 approves the record. The related response is that a notification is sent to User 3 to start a process with the approved record. For workflow steps involving approvals, each notification is tied to an approval entry. Learn more at Workflow.
Specify when and how approval users receive notifications
Select Search (Alt+Q)
in the upper-right corner, enter Approval User Setup, then choose the related link.
Select the line for the user you want to set up notification preferences for, then choose the Notification Setup action.
On the Workflow Notification Setup page, fill in the fields as described in the following table.
Note
If you open the Workflow Notification Setup page from the Approval User Setup page the notification setup is linked to the approval user. The approval user will always receive workflow notifications according to that notification setup. If you use the Tell Me feature to open the Workflow Notification Setup page, the notification setup applies to all users.
| Field | Description |
|---|---|
| Notification Type | Specify the type of event the notification is about.
Select one of the following options: – New Record specifies that the notification is about a new record, such as a document, that the user must act on. |
| Notification Method | Specify if the notification is an email or an internal note. |
You can define the layout of email notifications by customizing Report 1320, Notification Email. Learn more at Create and Modify Custom Report Layouts.
You specified how the user receives notifications. Now specify when the user receives notifications.
Choose the Notification Schedule action.
On the Notification Schedule page, fill in the fields as described in the following table.
| Field | Description |
|---|---|
| Recurrence | Specify the recurring pattern in which notifications are sent to the user. |
| Time | Specify what time of day notifications are sent to the user when the value in the Recurrence field is anything other than Instantly. |
| Daily Frequency | Specify on which type of days the user receives notifications when the value in the Recurrence field is Daily.
Select Weekday to receive notifications every day of the work week. Select Daily to receive notifications every day of the week, including weekends. |
| Monday through Sunday | Specify on which days the user receives notifications when the value in the Recurrence field is Weekly. |
| Date of Month | Specify if the user receives notifications on the first, last, or a specific date of the month. |
| Monthly Notification Date | Specify the date of the month on which the user receives notifications when the value in the Date of Month field is Custom. |
Change when and how you receive notifications
On one of the notifications you received, either as an email or a note, choose Change Notification Settings.On the Workflow Notification Setup page, change your notification preferences as described in steps 3-5 above.
Confirm that the correct notification is chosen under the Notification Type field.Choose whether to receive an email or note notification under the Notification Method field.Select the Notification Schedule to change the frequency and recurrence in which notifications are sent.
create approval workflows
You can create workflows that connect tasks that different people do in business processes. You can include system tasks, such as automatic posting, as steps in workflows that user tasks precede or follow. Requesting and granting approval to create new records are typical workflow steps.
On the Workflow page, create a workflow by listing the steps on the lines. Each step consists of a trigger and a response:
An event that specifies the conditions that start the workflow.A workflow response that defines what the workflow does.
Note
If a business scenario requires a workflow event or response that is not supported in the default version, sign up for Power Automate. For more information, see Use Business Central in Power Automate Flows. Alternatively, get an app at AppSource or work with a Microsoft partner to customize the application code.
When you create workflows, you can copy the steps from existing workflows or from workflow templates. Workflow templates are noneditable workflows that Business Central provides. The identifiers for workflow templates are prefixed with “MS-“. For example, “MS-PIW.” Learn more at Create Workflows from Workflow Templates.
Note
All notifications about workflow steps are sent through a job queue. Make sure the job queue reflects your business needs. Learn more at Use Job Queues to Schedule Tasks.
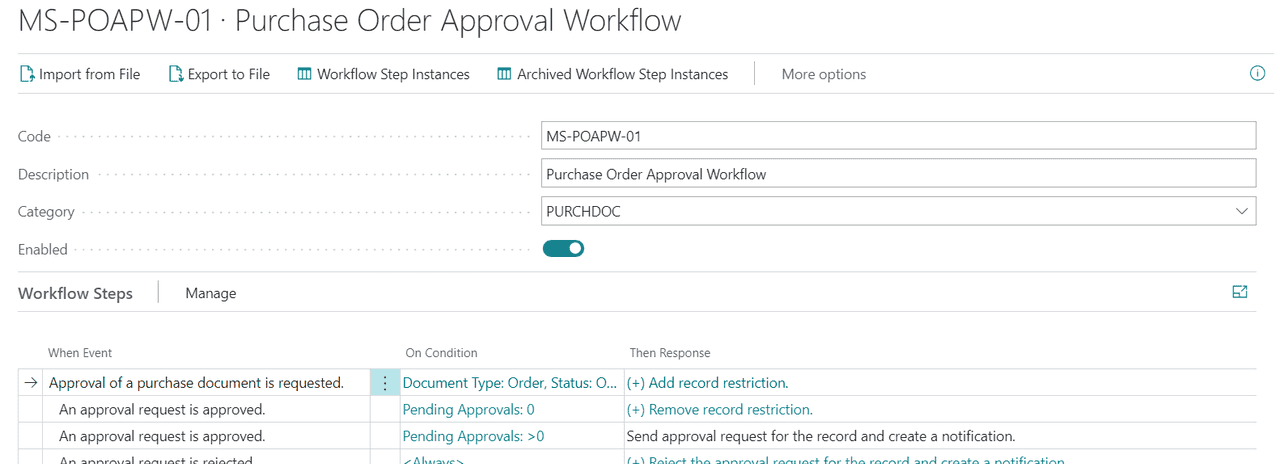
A workflow is divided into three sections:
When Event
This is where you select the trigger.
Examples of a trigger:
A master data record is changedA journal line is createdAn incoming document is created or releasedApproval of a document is requested
On Condition
Conditions are related to the event and allow you to create filters to specify how the workflow continues.
Then Response
Responses specify the next steps in the workflow.
The options for events and responses are system-defined. To add new options, you must develop an extension.
To create a workflow
Select Search (Alt+Q)
in the upper-right corner, enter Workflows, then choose the related link.
Choose the New action. The Workflow page opens.
In the Code field, enter a maximum of 20 characters to identify the workflow.
To create the workflow from a workflow template, on the Workflows page, choose the New Workflow from Template action. Learn more at Create Workflows from Workflow Templates.
In the Description field, describe the workflow.
In the Category field, specify which category the workflow belongs to.
In the When Event field, specify the event that must occur to start the workflow step.
When you choose the field, the Workflow Events page lists all available workflow events.
In the On Condition field, specify one or more conditions that must be met before the event in the When Event field can occur.
When you choose the field, the Event Conditions page lists filter fields that can be conditions for the event. You can add new filter fields if you want.
If the workflow event is the change of a specific field on a record, use the Event Conditions page to select the field and the type of change.
To specify a field change for the event, on the Event Conditions page, in the Field field, select the field that changes.In the Operator field, select either Decreased, Increased, or Changed.
In the Then Response field, specify the response when the workflow event occurs.
When you choose the field, the Workflow Responses page lists all available workflow responses and response options.
On the Options for the Selected Response FastTab, specify options for the workflow response by selecting values in the different fields that appear, as follows:
To specify options for a workflow response that involves sending a notification, fill the fields as described in the following table.
Note
These fields vary, depending on the response you chose.
| Field | Description |
|---|---|
| Notify Sender | Specify whether to notify the approval requestor instead of the approval request recipient. If you select the checkbox, the Recipient User ID field is disabled because the requestor of the approval, the sender, is notified instead. The name of the workflow response changes accordingly, to Create Notification for <Sender>. If the checkbox isn't selected, the name of the workflow response is Create Notification for <User>. |
| Recipient User ID | Specify the user the notification must be sent to. Note: This option is only available for workflow responses with a placeholder for a specific user. For workflow responses without placeholders for users, the notification recipient is typically defined by the Approval User Setup. |
| Notification Entry Type | Specify a trigger for the workflow notification. The trigger can be a record change, an approval request, or passed due date. |
| Link Target Page | Specify the page that the link in the notification opens. The page must have the same source table as the record involved. |
| Custom Link | Specify the URL of a link included in the notification in addition to the link to the page. |
To specify options for a workflow response that involves creating an approval request, fill the fields as described in the following table.
| Field | Description |
|---|---|
| Due Date Formula | Specify the number of days the approver has to resolve the request. The period starts when the request is sent. |
| Delegate After | Specify if and when an approval request is automatically delegated to the substitute. You can select to automatically delegate one, two, or five days after the date when the approval was requested. |
| Approver Type | Specify who the approver is, according to the setup of approval users and workflow users. When the field is set to Salesperson/Purchaser, the user specified in the Salespers./Purch. Code field on the Approval User Setup page determines the approver. Approval request entries are then created according to the value in the Approver Limit Type field. Learn more at Set Up Approval Users. |
| Show Confirmation Message | Specify whether to show a confirmation message after a user requests an approval. |
| Approver Limit Type | Specify the effect of limits for approvers. An approver's approval limit must be above the value on the request. The following options exist: Approver Chain specifies that approval request entries are created for all the requester's approvers up to and including the first qualified approverDirect Approver specifies that an approval request entry is only created for the requester's immediate approver, regardless of the approver's approval limit.First Qualified Approver specifies that an approval request entry is only created for the requester's first approver.Specific Approver specifies that you notify the user chosen in the Approver ID field. |
To specify options for a workflow response that involves creating journal lines, fill in the fields as described in the following table.
| Field | Description |
|---|---|
| General Journal Template Name | Specify the name of the general journal template that the specified journal lines are created in. |
| General Journal Batch Name | Specify the name of the general journal batch that the specified journal lines are created in. |
Choose the Increase Indent and Decrease Indent buttons to indent the event name in the When field to define the step's position in the workflow.
To indicate that it's the next step, indent the event under the name of the previous step.Indicate the step is one of several alternative steps that might start, depending on its condition, by indenting the event name to match the other alternative steps. Order such optional steps according to priority by placing the most important step first.
Note
You can only change the indent of a step that doesn't have a subsequent step.
Repeat steps 7 through 11 to add more workflow steps, either before or after the step you created.
Turn on the Enabled toggle to specify that the workflow starts when the event on the first step of type Entry Point occurs. Learn more at Use Workflows.
Note
Don't enable a workflow until you're sure it's ready.
Tip
To explore the relations between the tables used in workflows, select Search (Alt+Q)
in the upper-right corner, then enter Workflow – Table Relations.
Example of creating a new workflow using existing events
The following example creates a workflow to approve a change to the name of a vendor:
Select Search (Alt+Q)
in the upper-right corner, enter Workflows, then choose the related link.
Choose the New action. The Workflow page opens.
In the workflow section, fill in the fields as described in the following table.
| Field | Value |
|---|---|
| Code | VENDAPN-01 |
| Description | Vendor Name Change Approval |
| Category | PURCH |
To create the first workflow step, do the following.
In the When Event field, specify A vendor record is changed.In the On Condition field, choose the word Always. Then, on the Event Conditions page, choose the Add a condition for when a field value changes link, then select the Name field. The result of this step is that the condition reads as Name is Changed.In the Then Response field, choose the Select Response link. Then, on the Workflow Responses page, in the Select Response field, choose the Revert the value of the <Field> field on the record and save the change response. Then, in the Options for the Selected Response section, specify the Name field.Choose the Add More Responses link, then add an entry for the Create an approval request for the record using approver type <%1> and <%2> response.In the Options for the Selected Response section for the new response, change the Approver type field to Workflow User Group. Then, in the Workflow User Group field, specify the user group. Learn more at Set Up Approval Users.Add a third response, Send approval request for the record and create a notification.Add a fourth response, Show message “%1”. Then, in the Options for the Selected Response section, in the Message field, specify An approval request has been sent.Choose OK to return to the workflow step.
In the next line, add a new workflow step for the An approval request is approved event.
In the When Event field, specify An approval request is approved.Choose the line menu, then choose Increase Indent.In the On Condition field, choose Always. Then, in the Pending Approvals field, specify 0. The condition reads as Pending Approvals:0 to indicate that the request doesn't require more approvers.In the Then Response field, choose the Select Response link. Then, on the Workflow Responses page, in the Select Response field, choose the Send approval request for the record and create a notification response.Choose OK.
In the next line, add a second workflow step for the An approval request is approved event.
In the When Event field, specify An approval request is approved.In the On Condition field, choose Always. Then, in the Pending Approvals field, specify >0. The condition reads as Pending Approvals:>0 to indicate that this isn't the last approver.In the Then Response field, choose the Select Response link. Then, on the Workflow Responses page, in the Select Response field, choose the Send approval request for the record and create a notification response.Choose OK.
In the next line, add a workflow step for the An approval request is delegated event.
In the When Event field, specify An approval request is delegated.In the On Condition field, leave the value as Always.In the Then Response field, choose the Select Response link. Then, on the Workflow Responses page, in the Select Response field, choose the Send approval request for the record and create a notification response.Choose OK.
In the next line, add a second workflow step for the An approval request is rejected event.
In the When Event field, specify An approval request is rejected.In the On Condition field, leave the value as Always.In the Then Response field, choose the Select Response link. Then, on the Workflow Responses page, in the Select Response field, choose the Discard the new values response.Choose the Add More Responses link, then add an entry for the Reject the approval request for the record and create a notification responseChoose OK.
To enable the workflow, turn on the Enabled toggle.
The following illustration provides an overview of the result of this procedure.
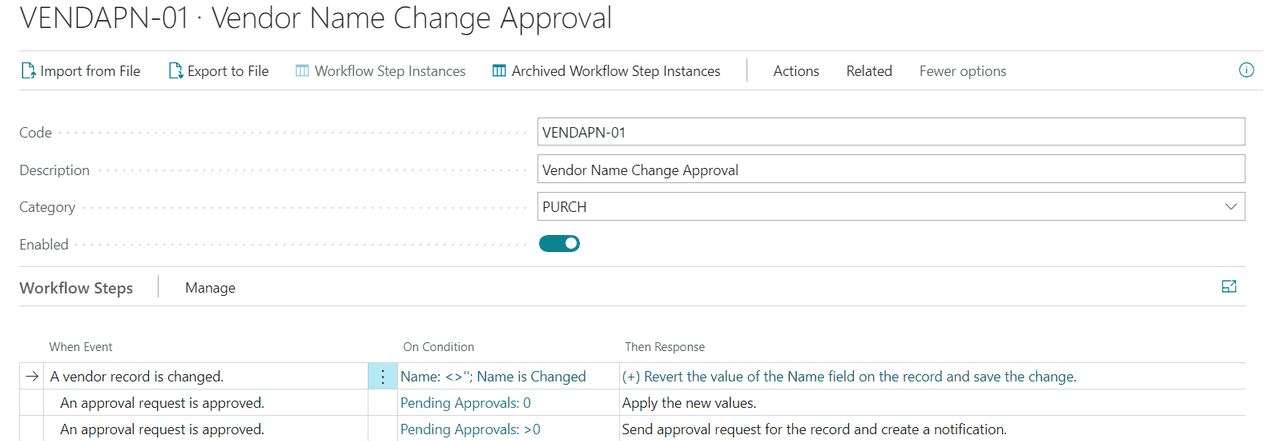
Next, test the workflow by opening an existing vendor card and changing their name. Verify that an approval request is sent after changing the vendor name.
create workflows from workflow templates
On the Workflow page, you create a workflow by creating a series of workflow steps on the lines. Each step consists of a workflow event (When Event), moderated by event conditions (On Condition), and a workflow response (Then Response), moderated by response options. The fields on workflow lines provide fixed lists of event and response values that represent the scenarios that Business Central supports. Learn more at Create Workflows.
To save you time when you create approval workflows, Business Central provides workflow templates. The templates are available on the Workflow Templates page. You can use the templates as they are, or customize them to meet your needs. The codes for the workflow templates from Microsoft are prefixed with MS-.
Important
When you change the when event for a workflow step, the then responses also changes. Sometimes, then responses of other when events refer to these then responses as the next step in the workflow. After you change a when event, verify that the next steps for its then events are correct.
For example, the Vendor Approval Workflow workflow template has a primary when event Approval of a vendor is requested. This when event has a Send approval request for the record and create a notification then response, which other then responses reference. If you change the primary Approval of a vendor is requested when event to, for example, A vendor record is changed, the then response is cleared along with the references.
The then responses for the An approval request is delegated and An approval request is approved (with the On Condition of Pending Approvals >0) when events are examples of where changing a primary when event can cause problems. Their then responses have a next step that refers to the Send approval request for the record and create a notification then response of the Approval of a vendor is requested when event. Because the then response for the Approval of a vendor is requested when event is no longer available, the indented when events won't work as expected.
You'll need to specify the next steps for the then responses for when events that referred to the changed when event.
If you change a workflow template, but later regret the change, use the Reset Microsoft Templates action to revert to the original setting for the workflow.
Caution
The Reset Microsoft Templates action resets all of the Microsoft workflow templates. You can't reset a single template.
Another way to quickly create a workflow is to import it, for example, if you exported it from another instance of Business Central. Learn more at Export and Import Workflows.
To create a workflow from a workflow template
Select Search (Alt+Q)
in the upper-right corner, enter Workflows, then choose the related link.
Choose the New Workflow from Template action. The Workflow Templates page opens.
Select a workflow template, then choose OK.
The Workflow page opens for a new workflow containing all the information of the selected template. The value in the Code field is extended with, for example, “-01” to indicate that this is the first workflow created from the workflow template.
To customize the workflow, edit the workflow steps or add new steps. Learn more at Create Workflows.
export and import approval workflows
To transfer workflows to other Business Central databases, for example to save time when creating new workflows, you can export and import workflows.
Another way to quickly create workflows is to use workflow templates. Learn more at Create Workflows from Workflow Templates.
On the Workflow page, you create a workflow by listing the involved steps on the lines. Each step consists of a workflow event, moderated by event conditions, and a workflow response, moderated by response options. You define workflow steps by filling fields on workflow lines using fixed lists of event and response values representing scenarios supported by the application code. Learn more at Create Workflows.
Export a workflow
Select Search (Alt+Q)
in the upper-right corner, enter Workflows, then choose the related link.Select a workflow, then choose the Export to File action.
Import a workflow
Select Search (Alt+Q)
in the upper-right corner, enter Workflows, then choose the related link.Choose the Import from File action.On the Import page, select Choose, choose the XML file containing the workflow, then select Open.
Caution
If the workflow code already exists in the database, the workflow steps are overwritten with the steps in the imported workflow.
walkthrough:set up and use a purchase apprval workflow
You can automate the process of approving new or changed records, such as documents, journal lines, and customer cards, by creating workflows with steps for the approvals in question.
Before you create approval workflows, you must set up an approver and substitute approver for each approval user. To define which sales and purchase records they're qualified to approve, you can also set amount limits for approvers. Approval requests and other notifications can be sent as emails or internal notes. For each approval user setup, you can also set up when they receive notifications.
Note
In addition to the workflow functionality in Business Central, you can use Power Automate to define workflows for events in Business Central. Note that although they're two separate workflow systems, any flow template that you create with Power Automate is added to the list of workflow templates in Business Central. Learn more at Use Business Central in an Automated Workflow.
You can set up and use workflows that connect business-process tasks performed by different users. System tasks, such as automatic posting, can be included as steps in workflows, preceded or followed by user tasks. Requesting and granting approval to create new records are typical workflow steps. Learn more at Workflow.
About this walkthrough
This walkthrough is a scenario illustrating the following tasks:
Setting up approval usersSetting up notifications for approval usersModifying and enabling an approval workflowRequesting approval of a purchase order (as Alicia)Receiving a notification and then approving the request (as Sean)
Story
Sean is a super user at CRONUS and creates two approval users. One is Alicia who represents a purchasing agent. The other is Sean themself, representing Alicia's approver. Sean then gives themself unlimited purchase approval rights and specifies that they'll receive notifications by internal note as soon as a relevant event occurs. Finally, Sean creates the required approval workflow as a copy of the existing Purchase Order Approval Workflow template, leaves all existing event conditions and response options unchanged, and then enables the workflow.
To test the approval workflow, Sean signs in to Business Central as Alicia and then requests approval of a purchase order. Sean then signs in as themself, finds the note in the Role Center, follows the link to the approval request for the purchase order, and approves the request.
Users
Before you can set up approval users and their notification method, you must make sure that those users exist in Business Central: One user will represent Alicia. The other user, yourself, will represent Sean. Learn more at Create Users According to Licenses.
Set up approval users
When signed in as yourself, set up Alicia as an approval user whose approver is yourself. Set up your approval rights and specify how and when you're notified of approval requests.
To set up yourself and Alicia as approval users
Select Search (Alt+Q)

in the upper-right corner, enter Approval User Setup, and then choose the related link.
On the Approval User Setup page, choose the New action.
Note
You must set up an approver before you can set up users who require that approver's approval. That means you must set yourself up before you can set Alicia up.
Set up the two approval users by filling the fields as described in the following table.
| User ID | Approver ID | Unlimited Purchase Approval |
|---|---|---|
| YOU | Selected | |
| ALICIA | YOU |
Set up notifications
In this walkthrough, the user is notified by an internal note about requests to approve. Approval notifications can also be sent by email, and you can add a workflow response step that notifies the sender when a request is approved or rejected. Learn more at Specify When and How to Receive Notifications.
To set up how and when you're notified
On the Approval User Setup page, select the line for yourself, and then choose the Notification Setup action.On the Notification Setup page, in the Notification Type field, choose Approval.In the Notification Method field, choose Note.On the Notification Setup page, choose the Notification Schedule action.On the Notification Schedule page, in the Recurrence field, select Instantly.
Create the approval workflow
Create the purchase order approval workflow by copying the steps from the Purchase Order Approval Workflow template. Leave the existing workflow steps unchanged, and then enable the workflow.
Tip
Optionally, add a workflow response step to notify the sender when their request is approved or rejected. Learn more at Specify When and How to Receive Notifications.
To create and enable a purchase order approval workflow
Select Search (Alt+Q)

in the upper-right corner, enter Workflows, then choose the related link.
On the Workflows page, select Actions, then select New, and then choose the New Workflow from Template action.
On the Workflow Templates page, select the workflow template named Purchase Order Approval Workflow.
The Workflow page opens for a new workflow containing all the information of the selected template. The value in the Code field is extended with -01 to indicate this is the first workflow created from the Purchase Order Approval Workflow template.
On the header of the Workflow page, turn on the Enabled toggle.
Use the approval workflow
Use the new Purchase Order Approval Workflow by first signing in to Business Central as Alicia to request approval of a purchase order. Then sign in as yourself, view the note on the Role Center, follow the link to the approval request, then approve the request.
To request approval of a purchase order, as Alicia
Sign in as Alicia.Select Search (Alt+Q)

in the upper-right corner, enter Purchase Orders, then choose the related link.Select the line to open Purchase Order 106001.On the Purchase Order page, choose Actions, then Request Approval, and then choose the Send Approval Request action.
Notice that the value in the Status field has changed to Pending Approval.
To approve the purchase order, as Sean
Sign in as Sean.On the Role Center, in the Self Service area, choose Requests to Approve.On the Requests to Approve page, select the line about the purchase order from Alicia, then choose the Approve action.
The value in the Status field on Alicia's purchase order changes to Released.
You have now set up and tested a simple approval workflow based on the first two steps of the Purchase Order Approval Workflow. You can easily extend this workflow to automatically post Alicia's purchase order when Sean approves it. To do this, you must enable the Purchase Invoice Workflow, so the response to a released purchase invoice is to post it. First you must change the event condition on the first workflow step from (purchase) Invoice to Order.
The generic version of Business Central includes many workflow templates for scenarios that are supported by the application code. Most of these templates are for approval workflows.
You define variations of workflows by filling in fields on workflow lines using fixed lists of event and response values representing scenarios that are supported by the application code. Learn more at Create Workflows.
Note
If a business scenario requires a workflow event or response that is not supported in the default version, sign up for Power Automate. For more information, see Use Business Central in Power Automate Flows. Alternatively, get an app at AppSource or work with a Microsoft partner to customize the application code.
set up connections
connection overview
Business Central supports integrations to other Microsoft products. The following table provides links to articles that describe how to set up the integrations.
| To set up … | Go to… |
|---|---|
| Integration to Excel | Get the Business Central add-in for Excel |
| Integration to Microsoft Outlook | Get the Business Central add-in for Outlook |
| Integration to Microsoft Word | Get the Business Central add-in for Word (administrator documentation) |
| Integration to Microsoft Teams | Get the Business Central app for Teams |
| Integration to OneDrive | OneDrive integration for Business Central |
| Integration to Power BI | Enable Power BI integration for Business Central |
| Integration to Power Automate | Use Power Automate flows in Business Central |
| Integration to Power Apps | Use Power Apps with Business Central data |
get the business central add-in for excel
Business Central includes an add-in for Excel that lets users select the Edit in Excel action on certain pages to open the data in an Excel worksheet. This action is different than the Open in Excel action because it lets users make changes in Excel, then publish the changes back to Business Central
Overview
About the add-in
The add-in is called Microsoft Dynamics Office Add-in and it's available for installation from the Office Store (AppSource). With the add-in installed, the Edit in Excel action is available on most list and list part pages from the Share icon

. Learn more about using the add-in at View and Edit in Excel From Business Central.
Note
The add-in works on Windows only.
About deployment as an admin
With Business Central online, there are a few deployment options for getting the add-in to users. One option is individual acquisition, where users install the add-in themselves. With this option, users must have access to downloading files from the Office Store. Another option is to set up Centralized Deployment in the Microsoft 365 admin center to automatically deploy the add-in to your entire organization, groups, or specific users. Centralized Deployment provides a way to get the add-in to users if your organization doesn't give users access to the Office Store.
For the user, the installation experience is different for the two deployment scenarios:
With individual acquisition, the first time users choose the Edit in Excel action, the New Office Add-in pane opens in Excel. To install the add-in, the user chooses Trust this add-in, which in turn installs the add-in directly from the Office Store. Users then sign in to Business Central using their user name and password.
With Centralized Deployment, the first time users choose the Edit in Excel action, the add-in is automatically installed in Excel from Centralized Deployment; not the Office Store. The only thing users have to do is sign in to Business Central.
With both these deployment options, the add-in is automatically configured to connect to Business Central. A third deployment option is a manual installation of the add-in directly from Excel. With this option, users need to configure the add-in to connect to Business Central.
Switching from individual acquisition to Centralized Deployment or the other way around
When you change from individual acquisition of the add-in to Centralized Deployment, or vice versa, it affects Excel files that users created before the transition. After the transition, users can still open any Excel worksheets previously created using the Edit in Excel action or created manually by configuring the Excel add-in. But they can't update the data in the file from Business Central or push updates to Business Central.
This situation happens because each Excel file gets assigned an “add-in” identifier. In the transition to or from Centralized Deployment, a different ID is assigned, so the earlier ID becomes blocked.
Preparation (on-premises only)
Business Central on-premises requires that your environment is configured for the add-in. If not, the Edit in Excel action isn't available to users. Learn more in Setting up the Business Central add-in for Excel in Business Central on-premises in the Developer and IT Pro help.
Deploy the add-in by using Centralized Deployment
Centralized Deployment is a feature in the Microsoft 365 admin center that you use to automatically install add-ins in users' Office apps, like Excel. To help you with Centralized Deployment, Business Central includes the Excel Add-in Centralized Deployment assisted setup.
Before you begin
Learn more about preventing users from downloading from the Office store at Manage add-ins in the admin center.Verify that Centralized Deployment works for your organization. Learn more at Determine if Centralized Deployment of add-ins works for your organization.Learn more about transitioning from individual acquisition at Switching from individual acquisition to Centralized Deployment.
Note
Enabling Centralized Deployment affects features that use the Excel add-in, such as the Edit in Excel action. It has no effect on other Excel-related features or permissions assigned to users in Business Central.
Set up Centralized Deployment of the add-in
In this task, you work in both Business Central and the Microsoft 365 admin center.
In Business Central, select Search (Alt+Q)
in the upper-right corner, enter Excel Add-in Centralized Deployment, and then choose the related link.
Read the information on the Business Central Excel add-in setup page and choose Next.
Sign in to the Microsoft 365 admin center and go to Integrated Apps.
Complete the following steps to configure the add-in to deploy from the Office Store:
Choose Get apps to open Office Store (AppSource).
Search for Microsoft Dynamics Office Add-in, then select Get it now.
On the Add Users page, specify the users that you want to deploy the add-in for, then choose Next.
Review the Accept permissions requests, then choose Next > Finish Deployment.
Wait for the green check mark next to Deployed appears for the add-in, then choose Done.
The add-in appears on the Add-ins page. Learn more about deploying add-ins in the Microsoft 365 admin center at Deploy add-ins in the admin center.
Go back to Excel Add-in Centralized Deployment assisted setup in Business Central, and choose Next.
Turn on Use Centralized Deployment, and choose Finish.
If you don't turn on this switch, Business Central gets the add-in directly from the Office Store.
When finished, you can always change the deployment in the Microsoft 365 admin center, like assigning more users. Learn more about deploying add-ins in the admin center at Deploy add-ins in the admin center.
Important
If you have more than one environment, you must run the Excel Add-in Centralized Deployment assisted setup on each environment that you want to use Centralized Deployment. However, you don't have to configure the Centralized Deployment in Microsoft 365 again. The only thing you have to do is turn on the Use Centralized Deployment switch in the assisted setup.
Note
It can take up to 24 hours before the add-in deploys automatically in Excel for users.
Individual acquisition: Install the add-in manually for your own use
In most cases, when you open Excel from Business Central, the add-in either installs automatically for you or you're prompted to install it. There might be cases, however, where you have to manually install the add-in.
Open Excel, then open any Excel workbook.On the Home tab, select Add-ins, and then More Add-ins.Go to Admin managed and find Microsoft Dynamics Office Add-In. If the option is available, select it, and then choose Add. If the option isn't available, go to Store, and then search for Microsoft Dynamics Office add-In and follow the instructions to add it.
When the add-in is installed, it shows up as a panel in Excel. Next, configure the connection.
Configure the Business Central connection
If a user can't connect automatically, you can unblock them by asking them to follow these steps:
In the Microsoft Dynamics add-in pane in Excel, choose Add server information. If the option isn't available, choose the

icon at the top to open the options dialog.For Business Central online, set Server URL to
https://exceladdinprovider.smb.dynamics.com
https://myBCserver/240
The add-in is now connected to Business Central, and you can edit data and publish the changes to Business Central.
Prepare devices and network for the Excel add-in
Network services such as proxies or firewalls must allow routing between each client device on which the add-in is installed and many service endpoints. For a list of endpoints, go to Preparing your network for the Excel add-In.
Troubleshooting
Sometimes, users run into problems with the Excel add-in. This section gives tips for how to unblock users in certain circumstances.
| Problem | Solution or workaround | Comments |
|---|---|---|
| The add-in doesn't start.
For example, the user gets the message “Add-in Warning: This add-in is no longer available” when trying to use the add-in. This particular problem can happen if Centralized Deployment is configured correctly, but the user wasn't assigned access. |
Check whether the add-in is deployed centrally. Or, check whether the user is blocked from installing it locally. | The admin can configure Office so that users can't acquire add-ins. In that case, the admin must deploy the add-in centrally. Learn more at Deploy add-ins in the admin center. |
| Data doesn't load into Excel. | Test the connection by opening another list in Excel from Business Central. Or, open the workbook in Excel in a browser. | If the user specified a company name that contains special characters, the add-in can't connect. |
| Data can't publish back to Business Central. | Test the connection by opening the workbook in Excel in a browser. | Sometimes an extension can block the publishing job. If the page is extended or customized, remove the extensions, and then try again. |
| The dates are wrong. | Excel might show times and dates in a different format than Business Central. This condition doesn't make them wrong, and the data in Business Central doesn't get messed up. | |
| For some list pages, editing multiple lines in Excel consistently causes errors. This condition can occur if OData calls include FlowFields and fields outside of the repeater control. | On the Web Services page, select the Exclude Non-Editable FlowFields and Exclude Fields Outside of the Repeater checkboxes for the published page. Selecting these checkboxes excludes noneditable FlowFields and fields from the eTag calculation. | These checkboxes are hidden by default. To show them on the Web Services page, use personalization. |
| Users can no longer sign in to the add-in. When they try to sign in, the process stops without completing. | This problem might happen because of an update that we made to the add-in. Learn more at Modify the Excel Add-in Configuration to Support July 2022 Update. | Applies to Business Central on-premises only. |
| The add-in communicates using the API v2.0 for Dynamics 365 Business Central, and any limitations of this API are automatically inherited. An example limitation is if you try to edit a list and the underlying card uses a confirmation dialog in its AL logic, for example, as its validation logic. | Sometimes there's nothing to do because it's a design choice that the user must explicitly confirm the change. If the confirmation is negligible when using Edit in Excel, then you can wrap the confirmation dialog call in an if-conditional statement that checks whether the client type is different from ODataV4, for example, |
There might be other clients that you want to remove the confirmation dialog from, such as OData and SOAP. |
| When you choose Edit In Excel, the following message displays: “Certain filters applied on the page are not available in Office, so more rows will be shown compared to Business Central. Removed Filters: …”. | If the removed filter applies to a field that you added through an AL extension, make sure that the page field name and the underlying table field name are identical. For example, for the page field |
Known limitations in business logic
| Page | Limitation | Comments |
|---|---|---|
| Sales Orders | Error message: 'Microsoft Dynamics 365 Business Central Data Services attempted to issue a client callback to run page 301 Ship-to Address List as modal.' Client callbacks aren't supported on Microsoft Dynamics 365 Business Central Data Services. | The Ship-to Code on the Sales Order page is editable only with specific Ship-to options. Setting Alternate Shipping Address to Ship-to opens the Ship-to Address List modal dialog, which isn't compatible with Edit in Excel. |
| Project Journal | Update of the Unit Price field doesn't trigger an update of the Line Amount. Instead, it updates Line Discount. | Using the web client, you can update fields in any order—price, amount, line discount. Other fields are updated automatically. To avoid cascade updates, the fields have advanced logic that relies on xRec, which behaves differently when called via APIs. |
Known limitations in metadata generation
When using Edit in Excel in Business Central, either by selecting the Edit in Excel action on a page or when the Excel add-in loads after opening an Excel workbook, you might encounter the following error: Metadata was unable to be retrieved for entity <entity name> as it was not found.
This error occurs when the page you're attempting to modify becomes too complex for Edit in Excel to process effectively. The primary cause is the installation of multiple extensions that add fields with identical field names to the same parent page, leading to conflicts. It's also possible for a single extension to block the metadata generation.
Single extension blocking metadata creation
Consider the following scenario involving extension A, which includes the page extension CustomerCardExtA and the page WebViewerA where PageType = CardPart.
When metadata is generated for the Customer Card page, the algorithm evaluates each individual field, including those fields added by extensions. However, if extension A is installed, this process fails because WebViewerA doesn't share the same source table as the Customer Card page.
To resolve this issue, you should add a Customer
SourceTable
In some cases, you might need to embed the
CardPart
CardPart
AL
pageextension 50120 CustomerCardExtA extends "Customer Card"
{
    layout
    {
        addlast(content)
        {
            part("Bing WebViewer"; "WebViewer")
            {
                ApplicationArea = All;
            }
        }
    }
}
AL
page 50120 "WebViewerA"
{
    ApplicationArea = All;
    Caption = 'WebViewer', Locked = true;
    PageType = CardPart;

    layout
    {
        area(Content)
        {
            usercontrol(WebViewer; WebPageViewer)
            {
                #region ControlAddInReady
                trigger ControlAddInReady(callbackUrl: Text)
                begin
                    CurrPage.WebViewer.Navigate('https://www.bing.com')
                end;
                #endregion ControlAddInReady
            }
        }
    }
}
AL
pageextension 50120 CustomerCardExtB extends "Customer Card"
{
    layout
    {
        addlast(content)
        {
            part("Bing WebViewer"; "WebViewer")
            {
                ApplicationArea = All;
            }
        }
    }
}
AL
page 50120 "WebViewerB"
{
    ApplicationArea = All;
    Caption = 'WebViewer', Locked = true;
    PageType = CardPart;
    SourceTable = Customer;

    layout
    {
        area(Content)
        {
            usercontrol(WebViewer; WebPageViewer)
            {
                #region ControlAddInReady
                trigger ControlAddInReady(callbackUrl: Text)
                begin
                    CurrPage.WebViewer.Navigate('https://www.bing.com')
                end;
                #endregion ControlAddInReady
            }
        }
    }
}
Multiple extensions causing collisions
To resolve this issue, there are two potential solutions:
Disable extensions: To identify which extension is causing the conflict, you can disable extensions that affect the page one at a time. However, this approach might not be ideal if the extensions in question are necessary for your business processes.
Modify extension code: This solution involves analyzing the root cause of the issue and addressing it by modifying the code of the conflicting extensions.
To better understand this issue, consider the following example involving the Customer Card page (ID 21). When you are on the Customer List page (ID 22) and select Edit in Excel, a web service is generated in the background that exposes the fields from the Customer Card page. This web service includes all page fields defined on the Customer Card page, while table fields are only exposed if they correspond to a page field or are part of the primary key.
When an extension is installed that extends the Customer Card page, the fields added by the extension are also exposed in the web service. While extensions can't create page fields with the same names as those fields already existing on the Customer Card page, conflicts can still arise when multiple extensions add fields with identical names.
For example, suppose the following extension, referred to as A, is installed:
AL
using Microsoft.Sales.Customer;

// Extension A
pageextension 50101 CustomerCardExtA extends "Customer Card"
{
    layout
    {
        addLast(General)
        {
            field("ShoeSize"; Rec.ShoeSize)
            {
                ApplicationArea = ALL;
                Caption = 'ShoeSize';
            }
        }
    }
}

tableextension 50101 CustomerTableExtension extends Customer
{
    fields
    {
        field(50100; ShoeSize; Integer) { }
    }
}
Now, consider that another extension, referred to as B, is installed, which also modifies the Customer Card page:
AL
using Microsoft.Sales.Customer;

// Extension B
pageextension 50102 CustomerCardExtB extends "Customer Card"
{
    layout
    {
        addLast(General)
        {
            field("ShoeSize"; Rec.ShoeSizeField)
            {
                ApplicationArea = ALL;
                Caption = 'ShoeSize';
            }
        }
    }
}

tableextension 50102 CustomerTableExtension extends Customer
{
    fields
    {
        field(50105; ShoeSizeField; Integer) { }
    }
}
In this scenario, both extensions A and B add a page field named
ShoeSize
To resolve this issue, you need access to the code of at least one of the extensions, and then to modify the conflicting page field names to avoid collisions.
use business central as your business inbox in outlook
With Business Central, you can manage business interactions with your customers and vendors, directly in Microsoft Outlook. With the Business Central Outlook add-in, you can view financial data related to customers and vendors. You can also create and send financial documents, such as quotes and invoices.
There are two ways to get the Business Central add-in for Outlook installed, depending on your role in the organization:
As a Microsoft 365 administrator, use Centralized Deployment to install the add-in automatically for the entire organization, groups, or specific users.
As any user, install the add-in for your own use if not already done by your admin.
About the Business Central add-in for Outlook
The Business Central add-in for Outlook consists of two smaller add-ins:
Contact insights
This add-in provides users with Business Central customer or vendor information in Outlook emails and calendar appointments. It also enables you to create and send Business Central business documents, such sales quotes and invoices to a contact.
Document view
When an email refers to a business document number in the email body, this add-in provides a direct, in-line link from email body to the actual business document in Business Central.
For more information about what you do with the add-ins, see Use Business Central as your Business Inbox in Outlook.
Each add-in is provided as an XML file, called a manifest, which must be installed in Outlook of anyone who wants this functionality. These files describe how to activate the add-ins and connect to Business Central when they're used in Outlook. Working with these files is typically done by an admin. As a user, in most cases, you won't have to handle with these files directly. Either your admin will set up the add-in to install automatically for you or you'll use the built-in assisted setup to handle the installation.
Important
Working with multiple environments? The Business Central add-in for Outlook is designed to work with a single Business Central environment. When the add-in is installed, the name of the environment is included in the add-in's manifest. This configuration means that the add-in will only connect to the environment that it was installed from. To use the add-in with a different environment, you'll open the environment and install the add-in again.
Deploy the add-in by using Centralized Deployment as an admin
Centralized Deployment is a feature in Microsoft 365 admin center that you use to automatically install add-ins in users' Office apps, like Outlook. It's the recommended way for admins to deploy for Office add-ins to users and groups within your organization.
Note
For Business Central on-premises, see Setting Up the Add-In for Outlook Integration with Business Central On-Premises in the administration content (English only).
Prerequisites
A Microsoft 365 subscriptionUsers are assigned a Microsoft 365 licenseYour Microsoft 365 account has at least the Exchange Administrator role
Deploy the add-in
In Business Central, select Search (Alt+Q)
in the upper-right corner, enter Assisted Setup, and then select the related link.
Select Outlook Add-in Centralized Deployment to start the assisted setup guide.
Review the first page and select Next to open the page for downloading the add-ins.
In the Deploy column, select the check box for the add-ins that you want to deploy, then select Download and Continue.
A file with the name OutlookAddins.zip is downloaded to your device.
At this point, you're finished with the work you need to do in Business Central, so you can select Done.
Tip
Before you select Next, select the Go to Microsoft 365 (opens in a new window) link to open and sign in to the Microsoft 365 admin center in a new browser window. You'll have to go to the Microsoft 365 admin center in a later step anyways.
Go the folder where the OutlookAddins.zip was downloaded, and extract the Contact Insights.xml and Document View.xml files from the .zip to a folder of your choice.
For more information, see Zip and Unzip files and folders.
Sign in to the Microsoft 365 admin center, then go to Integrated Apps.
Select Upload custom apps.
On the Upload Apps to deploy page, set App type to Office Add-in.
Select Upload manifest file (.xml) from device > Choose file.
Choose one of the add-in files Context Insights.xml or Documents.xml that you extracted earlier.
Follow the instructions to assign users and deploy the add-in.
Repeat step 9 through 11 for the other add-in file if you want.
Important
A green check mark appears when the add-in is deployed to the admin center. However, it can take up to 24 hours before users see the add-in in the Outlook app. Users might have to restart Outlook as well.
When finished, you can always change the deployment in Microsoft 365 admin center, like assigning more users. For more information about deploying add-ins in the admin center, see Deploy add-ins in the admin center.
Install the add-in for your own use
If your organization allows it, you can install the Business Central add-in for just yourself. Contact your administrator if you're not sure.
In Business Central, go to the
icon, enter Get the Outlook Add-in, and then select the related link.Read the page and select Next when ready.If you want to receive a welcome email message from Business Central with overview of using the add-in, turn on Send sample email message.Select Finish to complete the installation.
Business Central now connects to your email server and installs the add-in in your Outlook. This operation doesn't take long. You're now ready to start using the add-in in Outlook.
For Business Central on-premises
If you're using Business Central on-premises, installing the add-in might be slightly different.
In Business Central, go to the
icon, enter Get the Outlook Add-in, then select the related link.
Read the page and select Next when ready.
Do one of the following steps, depending on the page you see:
If you see the Install to my Outlook button, select it and you're all done.If you see the Next button, select it. On the next page, if you want to receive a welcome email message from Business Central with overview of using the add-in, turn on Send sample email message. Then, select Finish and you're all done.If you see the Download Add-in button, select it, then continue to the next step.
When you select Download Add-in, a file with the name OutlookAddins.zip is downloaded to your device. You should find the file at the top of the browser.
Go the folder where the OutlookAddins.zip was downloaded, and extract the Contact Insights.xml and Document View.xml file from the .zip to a folder of your choice. For more information about how to extract files, see Zip and Unzip files and folders.
In your browser, visit https://aka.ms/olksideload. This link opens Outlook on the web, and then loads the Add-Ins for Outlook dialog.
Select My add-ins > Add a custom add-in > Add from a file.
Select one of the .xml files that you extracted, like Contact Insights.xml, then select Open > Install.
Repeat step 6 and 7 for the other .xml file, if you downloaded one.
You're now ready to start using the add-in in Outlook.
Learn more about installing add-ins in Outlook at Use add-ins in Outlook.
overview
synchronize with contacts in microsoft outlook
You can set up contact synchronization so that your contacts in Business Central have the same information as your contacts in Microsoft Outlook. For example, if you're a sales person, you might work in Outlook and Business Central at the same time. If the contacts are the same in both places, your work is more straightforward.
By default, the contacts you're syncing are kept in a Business Central folder in your Favorites on the Folder Pane in Outlook. The Business Central folder can make it easier to identify which contacts you're syncing. You can set filters to sync only specific contacts from Business Central to Outlook. After you set up synchronization, you can synchronize manually or automate the process to synchronize on a scheduled basis.
Prerequisites
Your user account in Business Central must specify your Microsoft 365 email account.
You can check this setting in the Microsoft 365 section of your User Card, which you open from the Users list.
With Business Central on-premises, you set up contact synchronization as described in Set Up contact synchronization with Outlook for Business Central on-premises.
Set up synchronization
You set up how you want to synchronize contacts with Outlook on the Exchange Sync. Setup page in Business Central.
On the Exchange Sync. Setup page, you can validate that the connection to Exchange is working and then set up contact synchronization. From the Exchange Sync. Setup page, you can open the Contact Sync. Setup page and start the synchronization. Optionally, set a filter to specify which contacts to synchronize. For example, you can filter on name, type, company, and so on. You can also change the default name of the folder in Outlook that the contacts synchronize to.
Each of your coworkers can also set up their own Exchange synchronization and set their own filters on which contacts to synchronize.
After you set up synchronization, sync changes manually. Business Central versions 2023 release wave 2 and earlier support automated synchronization. Learn more about automation in the next section of this article.
Synchronize contacts
To sync contacts, select one of these actions on the Exchange Sync. Setup page:
Sync with Microsoft 365
Synchronize all changes from Business Central to Microsoft 365 that were made after the last synchronization, based on the last modified date. Also, new contacts from Microsoft 365 are synchronized to Business Central. Typically, this action is faster than a full sync.
Full Sync with Microsoft 365
Synchronize all contacts in both directions, regardless of the last sync date and last modified date.
In both cases, contacts are only synchronized from Outlook if they have the required fields filled in. The required fields to synchronize to Microsoft 365 are Name, Email address and the contact must be of the type Person. Business Central is the source of the contact information, so the Business Central contact information is saved if there are duplicates.
Note
If you delete a contact in Outlook, but keep it in Business Central, the contact will be recreated in Outlook the next time you sync.
Automate synchronization (background synchronization)
Important
Starting in 2024 release wave 1 (version 24), you can't turn on background synchronization anymore. If it's currently on, it works as expected. If you turn it off, you can't turn it on again.
To automate sync, if the Enable Background Synchronization toggle is on, create a job queue entry to sync contacts on a schedule you set. Learn more in Use Job Queues to Schedule Tasks.
The following table lists the settings on the Job Queue Entry Card page for syncing contacts:
| Field | Setting for contact sync |
|---|---|
| Object Type to Run | Codeunit |
| Object ID to Run | 6700 |
synchronize with contacts in microsoft outlook
set up contact sync for on-premises
Note
Azure Active Directory is now Microsoft Entra ID. Learn more
In this article, you learn how to set up Business Central on-premises to synchronize contacts in Business Central with contacts in Outlook. For more information the feature, go to Synchronize Contacts in Business Central with Contacts in Microsoft Outlook.
Introduction
Contact synchronization requires using the OAuth 2.0 protocol for authentication with Exchange Online. Previously, basic authentication was also supported, but it's been deprecated and no longer supported with Exchange Online. You can read more about the deprecation at Deprecation of Basic authentication in Exchange Online. This change means that contact synchronization in Business Central may have stopped working on your on-premises environment. This article will explain how to get it working again.
Prerequisites
Exchange Online, either a standalone version or through Microsoft 365 planAccess to the Microsoft Entra tenant used by Exchange OnlineBusiness Central users have a Microsoft 365 or Exchange Online email account, which is assigned to their accounts in Business Central. You can check this setting in the Microsoft 365 Authentication section of user profile in the Users list.
Set up contact sync
Complete the following steps to set up contact sync. If you're running Business Central Spring 2019 (v.14), you'll have to do an extra step that either modifies application code or sets up a connection to Power BI.
Register an app for Exchange Online API in your Microsoft Entra tenant.
In this step, you add a registered app in the Microsoft Entra tenant of your Microsoft 365 or Exchange Online plan. Like other Azure services that work with Business Central, Exchange Online requires a registered app in Microsoft Entra ID. The registered app provides authentication and authorization services between Business Central and Exchange Online.
Follow the detailed instructions in the developer and IT pro help at Register an application in Microsoft Entra ID. As you go through the instructions, remember the following points:
If you've already registered an application as part of an integration with another Microsoft product, such as Power BI, then reuse that registered app. In this case, you'll just have to set up the app with the Office 365 Exchange Online permissions described in the next bullet.
Configure the registered app with the following delegated permissions to the Office 365 Exchange Online API:
Contacts.ReadWriteEWS.AccessAsUser.All
For Business Central version 14, do one of the following tasks:
Modify page 6700 by changing
FALSE
TRUE
OnPageOpen
PasswordRequired := AzureADMgt.GetAccessToken(AzureADMgt.GetO365Resource,AzureADMgt.GetO365ResourceName,TRUE) = '';
Create new page with the following code on the OnPageOpen trigger:
PasswordRequired := AzureADMgt.GetAccessToken(AzureADMgt.GetO365Resource,AzureADMgt.GetO365ResourceName,TRUE) = '';
Set up Power BI by following the instructions at Set up Business Central on-premises for Power BI integration.
After the solution you choose is in place, ask users to either run the new/modified page or connect to Power BI. They'll only need to do this step once.
use business centrak without outlook
Business Central has deep integration with Microsoft 365, and you can use Business Central as your business inbox in Outlook. But if you don't have Outlook, you can work with Business Central in the browser or on your mobile device.
Sending email
You can send documents such as invoices as email using your business email address. From your Role Center, you can access an assisted setup guide that helps you set up email. If you don't use a Microsoft 365 email account, you must specify technical information about your mail server. If you don't have this information available, please contact your IT support staff.
use mirosoft teams with business central
H4 overview
APPLIES TO: Business Central online
Microsoft Teams is a Microsoft 365 product that lets you connect with others, collaborate seamlessly, and simplify work. Business Central offers an app that connects Microsoft Teams to your business data in Business Central so you can quickly share details across team members, look up contacts, and respond faster to inquiries.
The app is available on the Teams marketplace, and you can use it with the Teams desktop, mobile app, or web.
Features overview
The Business Central app for Teams offers the following features.
Look up details of customers, vendors, and other contacts
No matter where you are in Teams, you can look up details about customers, vendors, and other Business Central contacts. This feature not only lets you view general information about contacts, but also gives access to interaction history, related documents, and more.
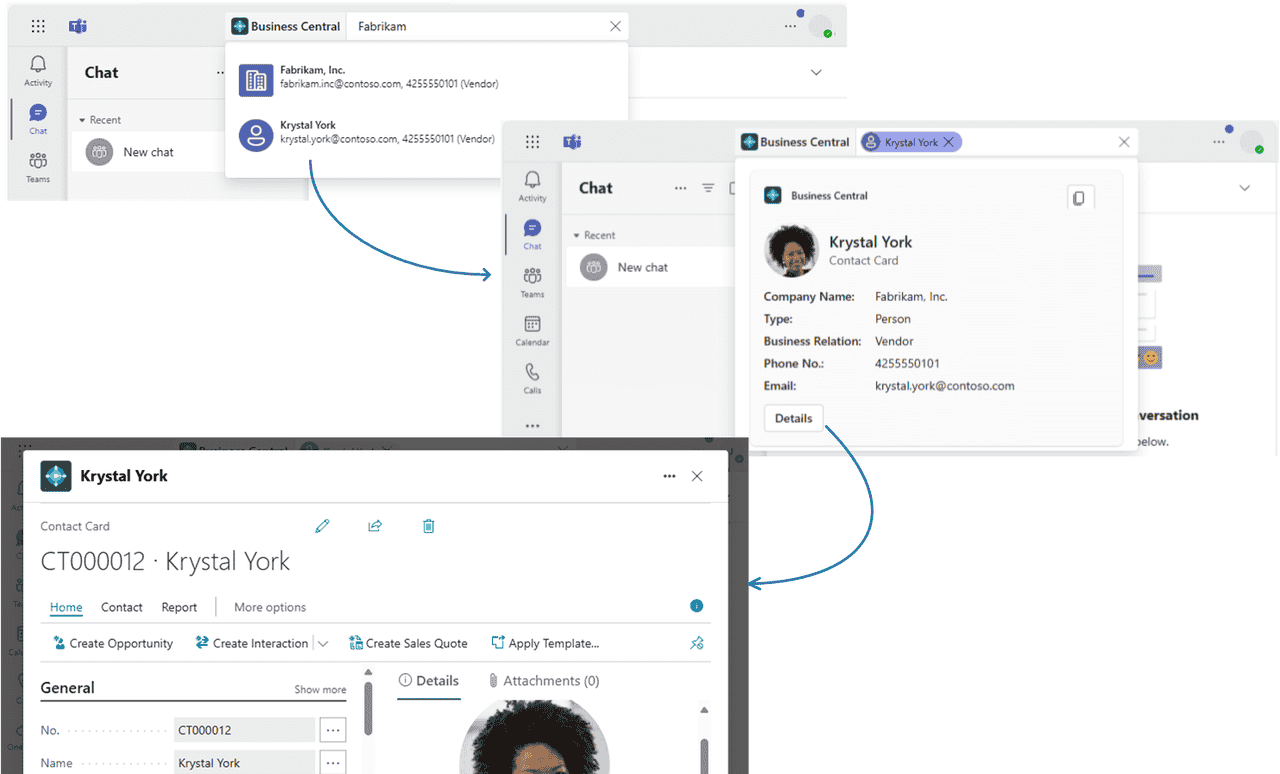
You can also share contact details in a conversation. From there, participants have access to even more details about the contact as well.

Learn more in Searching for Contacts from Microsoft Teams.
Share records in conversations
Copy a link to any Business Central record and paste it into a Teams conversation to share with your coworkers. The app will then expand the link into a compact, interactive card that displays information about the record.

Once in the conversation, you and coworkers can view more details about the record, edit data, and take action – without leaving Teams.
Learn more in Share Records in Microsoft Teams.
Share links from pages in Business Central to Teams
Directly from most collection and details pages in Business Central, you can use the Share to Teams action from the
icon to type a message, choose recipients, such as team members, groups or channels, and send the message with a link and to the Business Central page.

Learn more in Share Records and Page Links in Microsoft Teams.
Add a Business Central tab to Teams channel or chat
With the Business Central app for Teams installed, you can add a tab in a channel or chat the shows Business Central data from lists and card pages.
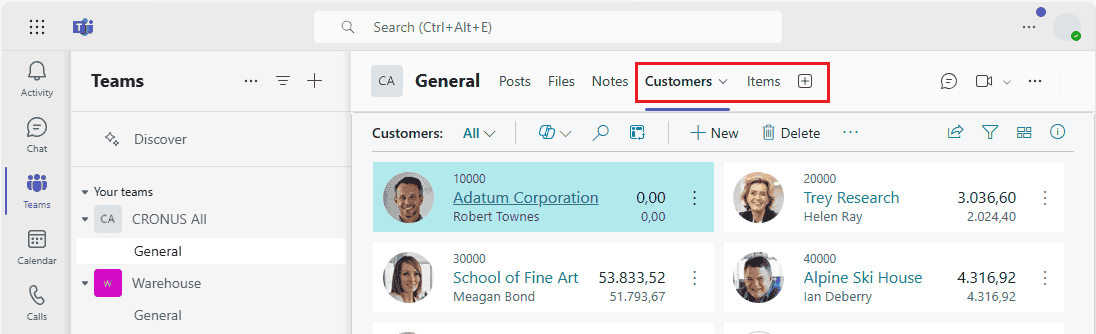
Learn more in Add a Business Central tab in Teams.
Get Started
A Business Central online user account is required for Business Central app for Teams.
If you’re not sure whether you have an account, or if you don’t know your credentials for signing in, contact your company administrator to help you get started.
Tip
If your organization doesn't have a Business Central subscription, you can sign up for a free trial. Learn more at Sign up for a free Dynamics 365 Business Central trial.
As an administrator, refer to Managing Microsoft Teams Integration with Business Central for information about getting users set up to work with Business Central and Teams.
Install Business Central app in Teams. See Install the Business Central App for Microsoft Teams.
Once the app is installed, you're ready to go. Learn more in Searching for Customers, Vendors, and Other Contacts from Microsoft Teams and Share Records in Microsoft Teams.
manage teams integration
APPLIES TO: Business Central online
This article provides an overview of what you can do as an administrator to control Microsoft Teams integration with Business Central.
In Microsoft Teams
Minimum requirements
This section describes the minimum requirements for the Business Central app features to work in Teams.
Required licenses
The Business Central app requires a Teams license through a Microsoft 365 Business or Enterprise plan, Microsoft Teams EEA, or a similar plan that includes Microsoft Teams. Standalone Teams plans like Microsoft Teams (free) or Microsoft Teams Essentials aren't supported.
Most features of the Business Central app for Teams also require a Business Central license, as shown in the following table.
| What | Business Central license |
|---|---|
| Search for Business Central contacts. |
|
| Paste a link to a Business Central record into a conversation, and send it as a card. |
|
| Share a link from a page in Business Central to Teams conversation. |
|
| View a card of a Business Central record in a conversation. | |
| View more details of card for a Business Central record in a conversation. |
|
| Open a page link in Business Central from a conversation. |
|
Allow URL previews
Allow URL previews policy setting must be turned on. Otherwise, a card can't be generated for Business Central links pasted into a Teams conversation. Learn more about this setting in Manage messaging policies in Teams.
Managing the Business Central app (optional)
As a Teams administrator, you can manage all apps for your organization, including the Business Central app. You can approve or install the Business Central app for your organization, block user's from installing the app, and more.
Learn more in the Microsoft Teams documentation at:
Manage your apps in the Microsoft Teams admin centerManage app setup policies in Microsoft Teams
In Business Central
Minimum requirements
Business Central version:
Teams integration is only supported for Business Central online, not on-premises.
Codeunit 2718 Page Summary Provider is published as a web service:
This codeunit is published as a web service by default. The codeunit is part of the Business Central system application. It's used to get the field data for a Business Central page added to a Teams conversation. Learn more about publishing web services in Publish a Web Service.
User permissions:
For the most part, the contact search, pages, and data that users can view and edit in a Teams conversation is controlled by their permissions in Business Central.
To search for contacts, users must have at least read permission to the Contacts table.To paste a Business Central link into a Teams conversation and have it expand into a card, users must have at least read permission on the page and its data.Once a card is submitted into a conversation, any user in that conversation can view that card without permission to Business Central.To view more details for a card or open the record in Business Central, users must have read permission on the page and its data.To change data, user's need modify permissions.
Learn more in Assign Permissions to Users and Groups.
Installing the Business Central app by using Centralized Deployment
The Microsoft Teams admin center is where you configure Teams app setup policies for the organization. In the Teams admin center, you can use the Centralized Deployment feature to automatically install the Business Central app in Teams for all users in your organization, specific groups, or individual users.
Note
To set up Centralized Deployment, your Teams account must have at least the Teams Administrator role.
In Business Central, choose the
icon, enter Teams App Centralized Deployment, and then choose the related link. Or select here to open the page directly.
Read the information on the Set up the Business Central app for Teams, then choose Next when ready.
Open the Teams admin center, and complete the following steps.
Go to Teams apps > Setup policies.
Create a new policy or select the policy that you want to use to install the Business Central app, then select Add apps.
In the Add installed apps page, search for and select Business Central.
Choose Add.
Business Central should now appear under Installed apps for the policy.
Configure more settings as needed, then choose Save.
Learn more in Manage app setup policies in Microsoft Teams in the Teams documentation.
Go back to Teams App Centralized Deployment in Business Central and select Done.
Important
It can take up to 24 hours for the app setup policy to be applied and the app deployed to users.
Managing privacy and compliance
Microsoft Teams provides extensive controls for compliance and management of sensitive or personally identifiable data—including data added to chats and channels by the Business Central app.
Understanding where Business Central cards are stored
After a card is sent to a chat, the card and the fields shown on the card are copied to Teams. This information is subject to the Teams policies for your organization, such as data retention policies. When displaying card details, none of the data in the details window is stored in Teams. The data remains stored in Business Central and will only be retrieved by Teams when the user chooses to view the details.
Learn more about where Teams stores that data at Location of data in Microsoft Teams.Learn more about retention policies in Teams at Retention policies in Microsoft Teams.
Restricting sharing of cards
You prevent specific users or groups from sending cards to chats or channels by setting up messaging policies that turn off the URL Previews setting. For more information about this setting, see Manage messaging policies in Teams.
You can also use information barriers to prevent individuals or groups from communicating with each other. To learn more, see Information barriers in Microsoft Teams.
Data loss prevention features in the Microsoft Purview can't be applied specifically to cards. But they can be applied to the chat messages that contain the cards.
Responding to data requests
You allow team members and team owners to delete messages that contain sensitive cards by setting up messaging policies, like: Owners can delete sent messages and Users can delete sent messages. Learn more at Manage messaging policies in Teams.
Content search and eDiscovery compliance features in the Microsoft Purview can also be applied to cards.
Because card data in Teams is a copy of data in Business Central, you can also use Business Central features to export a customer’s data if requested. Learn more about privacy in Business Central in Privacy FAQ for Business Central Customers.
Show or hide record data on cards
When a record is shared with others in a Teams chat or channel, a card with fields that contain data about the record is shown. All recipients can view this data (or record summary) by default, regardless of their license or permissions in Business Central. If you're an admin, you can use the Card Settings assisted setup guide to hide the record summary from appearing on cards in Teams. Hiding the record summary removes all fields and images but continues to show the Details button and other non-record information on the card.
| Record summary on | Record summary off |
|---|---|
|
|
|
You configure the setting per environment. So when you turn the record summary on or off, it affects all companies in the environment.
In Business Central, open the environment that you want to change.
Tip
To switch the environment, select Ctrl+O.
Choose the
icon, enter Card Settings, and then choose the related link.
Read the information on the Card Settings, then choose Next when ready.
On the Data Visibility page, turn on the Show record summary switch to display data on the cards or off to hide the data.
Select Next and follow the instructions to complete the setup guide.
install business central app for teams
APPLIES TO: Business Central online
In this article, you learn how to install the Business Central App for Microsoft Teams. The app is available on the Teams marketplace, and you can use it with the Teams web, desktop, or mobile app.
Note
Your administrator may have set up things so that the app is automatically installed for you. To check whether the app is installed, open Teams, then choose Apps. Search for Business Central, then choose it when you find it. If you see Open on the Business Central page, the app is already installed.
Prerequisites
A Business Central online user account is required for Business Central app for Teams.
If you’re not sure whether you have an account, or if you don’t know your credentials for signing in, contact your company administrator to help you get started.
Access to the Teams desktop app or Teams in the browser. You can't install the Business Central by using Teams mobile app.
Your organization's policies allow you to install apps in Microsoft Teams.
Add the Business Central app to Teams
There are three ways to install the Business Central app:
Option 1: From a link
This option is the quickest way to install the app.
Select this link: https://teams.microsoft.com/l/app/84c2de91-84e8-4bbf-b15d-9ef33245ad29.
Wait for the Business Central app to appear.
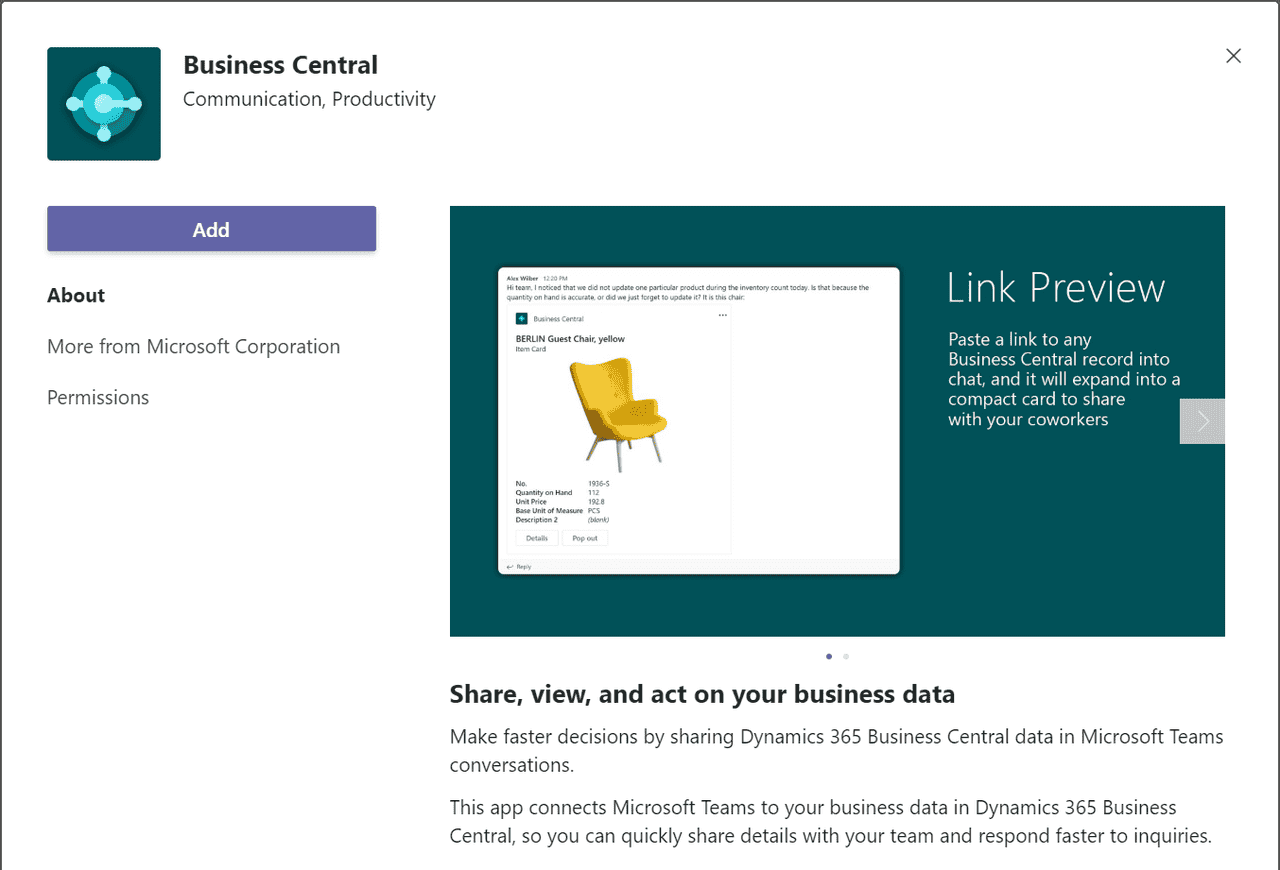
Select Add.
Option 2: From Teams
Open and sign in to Teams.In the left side, select Apps.Search for Business Central.Choose the app when you find it.Choose Add.
Tip
If you paste a link to a Business Central page into a Team conversation, and you don't have the app installed, you get a message like: Business Central wants to show a preview of this link. To install the app, select Show Preview and follow the instructions.
Option 3: From Business Central
Open Business Central.Choose the
icon, enter Get the Business Central app for Teams, and then choose the related link.Choose Get the app from store.Wait for Teams to open and the Business Central app to appear, then choose Add.
Note
With either option, you may be asked to sign in to Business Central. Select the sign in link, and follow the instructions to enter sign-in name and password for Business Central.
access data inteams without business central license
Business Central users are assigned a Dynamics 365 Business Central license that allows them to view, modify, and act on their business data within Teams. These users can collaborate on data by sharing records into chats or channels, or adding tabs that show records. However, there may be other employees across the organization who don't have a Business Central license but could benefit by being able to view data in Teams. For these users, Business Central offers limited access through their Microsoft 365 licenses only.
As an administrator, you can configure environments to enable access with Microsoft 365 licenses. You can then choose exactly which tables and other objects this category of user will have access to. Once configured, employees who have a Microsoft 365 license, but no Business Central license, can view Business Central records that are shared with them in Microsoft Teams chat and channels.
To learn more about access with Microsoft 365 Licenses, go to Business Central Access with Microsoft 365 Licenses and Access with Microsoft 365 Licenses FAQ.
serch for customers,vendors,and contacts
APPLIES TO: Business Central online. Introduced in 2021 release wave 1.
Business Central has a comprehensive business contact management system that's essential for users in sales, operations, or other departmental roles. If you're a user in one of these roles, you'll often need to look up, meet, or start a conversation with your vendors, customers, and other contacts. With the Business Central app for Teams, you can do these tasks directly from Teams, without having to switch to Business Central. From within Teams, you can:
Look up Business Central contacts from the Teams command box or from the message compose area. Contacts can include prospects, vendors, customers, or other business relationships.Share a contact as a card in a Teams conversation.View details about the contact, interaction history, and other insights like outstanding payments or open documents.
Prerequisites
You have access to Microsoft Teams.You've installed the Business Central app in Teams. Learn more in Install the Business Central App for Microsoft TeamsYou've got a Business Central account with access to contacts in at least one company.
Note
Whether you searching from the command box or message compose box, you may be asked to sign in or set up the app the first time. This step is necessary to search for contacts in the right Business Central company. Learn more about setting up the app to choose your company in Changing Company and Other Settings in Teams.
Look up contacts from the command box
The command box is at the top of every screen in Teams. It lets you search, take quick actions, or launch apps, like the Business Central app. Searching from the command box is great for quickly looking up contacts and their related data for your own use. For example, suppose you want to look up an email address of a vendor to set up a calendar meeting. Or maybe you want to look up interaction history during a meeting with a customer.
In the command box, type /Business Central, then select the Business Central app from the results.

In the Business Central box, start typing search text, like a name, address, or phone number.
As you type, matching results appear.

Select a contact from the results.
The contact card appears beneath the command box.
If you want to add the contact card into a conversation, go to the upper right corner of the card, select … (More options) > Copy. Then, paste the copy in the message compose box of a conversation.
Learn more about the Teams command box at Teams – Use the command box.
Look up contacts from the message compose box
The advantage of using the message compose box is that you can add a contact card directly to a conversation, for others to see.
Next to the message compose box, select + and then select Business Central from the list to launch the app.
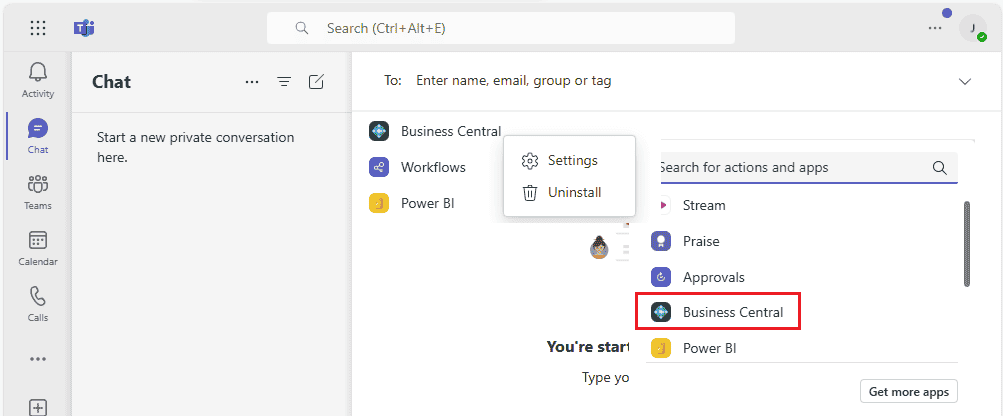
In the Business Central box, start typing search text, like a name, address, or phone number.
As you type, matching results appear.
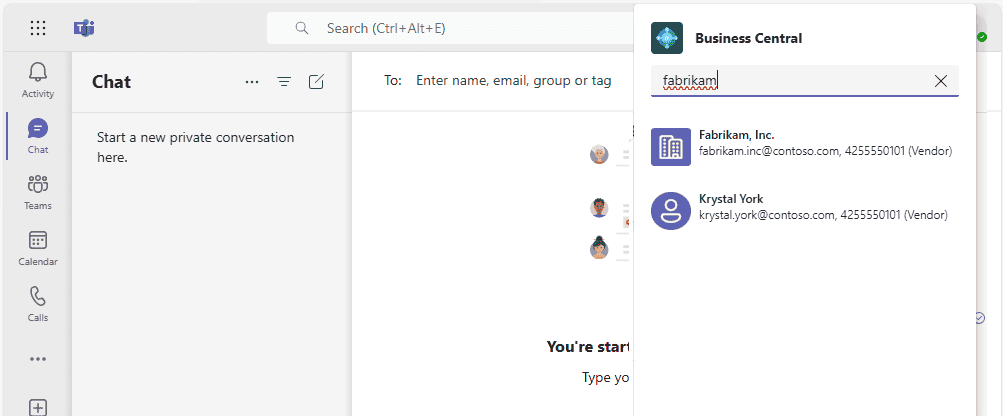
Select a contact from the results.
The contact card appears in the message compose box.
Note
The contact card isn't sent to the conversation right away for others to see. You have the opportunity to review the contents of the card, and add text before or after it as you like. Then, send your message to the chat when ready.
View contact card details
The contact card in Teams gives you a quick overview of the customer, vendor, or contact. The card is interactive—meaning you can view more information or even modify a contact by using the Details or Pop-out buttons.
The Details button opens a window within Teams that displays more information about the contact, but not as much as you'd see in Business Central. To see all the information about a contact in Business Central, select Pop-out.
The contact card works just like cards for records, like items, customers, or sales orders. Learn more in View card details.
Note
All participants in a Teams conversation can view cards for Business Central contact that you submit to a conversation. But to view more details about records, by using the Details or Pop out buttons on a card, they need access to Business Central. Learn more in Managing Microsoft Teams Integration.
add business central tab in channel or chat
APPLIES TO: Business Central online
In Teams, tabs appear at the top of channels and chats, giving participants quick access to pertinent information. This article explains different ways to add a tab that displays Business Central data.
About Business Central tabs
A Business Central tab provides a focused view of Business Central list and card pages. The tab doesn't display the full Business Central web client. There's no browser border, Business Central banner (for example with Tell Me, search, help) or top navigation menu—just page content and its actions. The content is interactive, meaning that you can select actions and links, change data, and more. You're limited to what you see and can do by the same permissions assigned to your account in Business Central.
Learn more about who can view the content of a Business Central tab in Who can see the content of a tab?.
Tip
Are you a developer? You can also add tabs programmatically using the Microsoft Graph API. Learn more in Add Business Central Tabs to Teams.
Prerequisites
To add a Business Central tab, the following requirements must be met:
You have access to Microsoft Teams.You have a Business Central license.You've installed the Business Central app in Teams. Learn more in Install the Business Central App for Microsoft Teams.
To view Business Central tab that was added by another participant in the channel or chat, the following requirements must be met:
You have access to Microsoft Teams.You have a Business Central license or limited access to Business Central with a Microsoft 365 license only. Learn more in Business Central Access with Microsoft 365 Licenses.You've installed the Business Central app in Teams.
Add tab using recommended content
Use these steps to add a tab by choosing what to display from a readily available list of recommended content that's based your role center—without leaving Teams. Learn more about the content that you can choose from in Where does the recommended content come from?.
At the top of a channel or chat in Teams, select + Add a tab.
In the Search box, type business central, then select the Business Central icon and wait for the Business Central tab configuration window to appear.
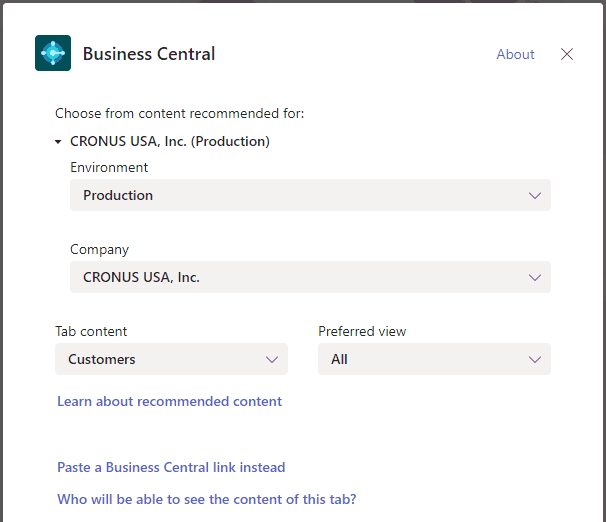
The Choose from content recommended for option shows the company in Business Central that you working with. If you want to show content from another company, select the current company, then use the Environment and Company options to specify company you want to work with.
Select down arrow in the Tab content option and choose the content that you want to display.
Some pages may include different views, which are variations of the page that's filtered to show specific data. To change the view for the content, select the down arrow for the Preferred view option and choose the view from the list.
Learn more in Save and Personalize Views.
Select Post to the channel about this tab to automatically post an announcement in the Teams channel or chat to let participants know that you've added this tab.
Select Save.
Add tab using a page link
Another way to add a tab by using a link (URL) to the page that you want to show. This way is useful when you want to display a specific Business Central record or a list page that isn't bookmarked on your role center.
At the top of a channel or chat in Teams, select + Add a tab.
In the Search box, type business central, then select the Business Central icon.
Wait for the Business Central tab configuration window to appear, then select Paste a Business Central link instead option.

Go to Business Central, and open the page that you want to display in the tab.
Copy the link to the page.
There are two ways to copy the link. The easiest and preferred way is to select Share
> Copy Link. The other way is to copy the entire URL from the browser's address bar. Learn more in Sharing Business Central Records and Page Links.
Go back to Teams and paste the link in the URL box.
In the Tab name box, enter a name that displays on the tab.
Select Post to the channel about this tab to automatically post an announcement in the Teams channel or chat to let participants know that you've added this tab.
Select Save.
Change a tab and its content
After a tab has been added, you can make certain changes to the tab. For example, you can rename the tab, move it, and remove it. You find these actions in the tab options that are available by selecting the down arrow on the tab.

As for the content of a tab, you can modify the data, if you have permission. If you change the data, others won't see the changes until they leave the tab and come back. The same is true for you if someone else makes changes to data. You can't change the page that displays on the tab, so just remove the tab and add another one the suits.
You can also change your view of the page and its data, like sorting and switching the layout between list and tile views. When you make these kinds of changes, they won't affect what others see. They see what you originally posted, until they make similar changes themselves.
share records and page links in teams
APPLIES TO: Business Central online
The Business Central app for Teams includes a Settings page that lets you view and change information about your connection to Business Central. For example, you switch the Business Central environment and company you're connected to. You can also see which account you're using to access Business Central, and sign out and in again as needed.
There are two ways to open the Settings page: 1) from the message compose box or 2) from the command box.
Next to the message compose box, select +, right-click the Business Central app icon, then select Settings.

From the command box at the top, search for /Business Central and then select the Business Central app icon. Then, in the message that appears the under the [search for business contacts] box, select … (More options) and then Settings. If the message isn't displayed, click the [search for business contacts] box.

change company and other setting
APPLIES TO: Business Central online
The Business Central app for Teams includes a Settings page that lets you view and change information about your connection to Business Central. For example, you switch the Business Central environment and company you're connected to. You can also see which account you're using to access Business Central, and sign out and in again as needed.
There are two ways to open the Settings page: 1) from the message compose box or 2) from the command box.
Next to the message compose box, select +, right-click the Business Central app icon, then select Settings.

From the command box at the top, search for /Business Central and then select the Business Central app icon. Then, in the message that appears the under the [search for business contacts] box, select … (More options) and then Settings. If the message isn't displayed, click the [search for business contacts] box.
team FAQ
Teams FAQ – Business Central | Microsoft Learn
troubleshoot teams intergration
Troubleshooting Microsoft Teams Integration – Business Central | Microsoft Learn
use onedirve for business with business central
H4 overview
Business Central and OneDrive for Business Integration – Business Central | Microsoft Learn
manage onedrive for business intergration
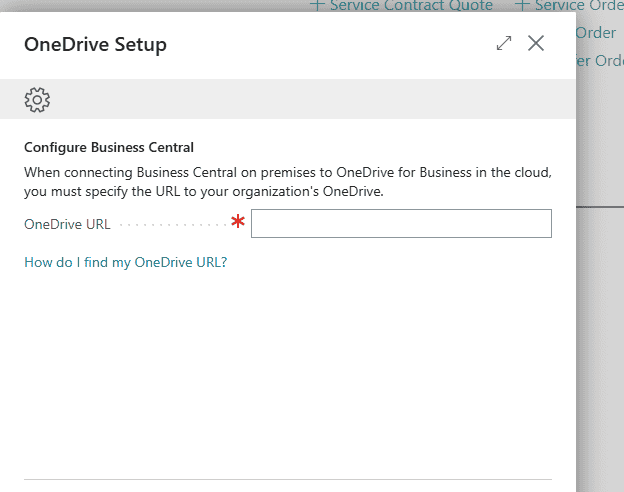
open and share files
manage onedrive for business intergration
Managing OneDrive Integration with Business Central – Business Central | Microsoft Learn
H5 manage onedrive for business integration
configuring onedrive
configuration with business central on-premises
Configuring OneDrive integration with Business Central on-premises – Business Central | Microsoft Learn
open and share files in onedrive
Opening Business Central Files in OneDrive – Business Central | Microsoft Learn
onedrive FAQ
OneDrive in Business Central FAQ – Business Central | Microsoft Learn
Use power bi with business central
H4 introduction
Introduction to Business Central and Power BI – Business Central | Microsoft Learn
administrator
integration overview
Power BI integration component and architecture overview for Business Central – Business Central | Microsoft Learn
enable power bi intergration
Enabling Power BI integration with Business Central – Business Central | Microsoft Learn
report creator
Building reports in Power BI Desktop to display Business Central data – Business Central | Microsoft Learn
get started:build reports
create reports to display list date
Display custom Power BI reports – Business Central | Microsoft Learn
business user
work with power bi reports in business central
Working with Power BI reports in Business Central – Business Central | Microsoft Learn
connect to power bi from bisness central on premises
Connect to Power BI from Business Central on-premises – Business Central | Microsoft Learn
use the business central apps in power bi
Use the Business Central apps in Power BI – Business Central | Microsoft Learn
FAQ
Power BI FAQ – Business Central | Microsoft Learn
use power automate with business cnetral
Use Power Automate flows in Business Central – Business Central | Microsoft Learn
use power automate flows with business cnetral
toubleshoot your automated workflows
Troubleshoot your automated workflows – Business Central | Microsoft Learn
use power apps with business central
Use your data to create an app – Business Central | Microsoft Learn
connecting to your business central data to build a business app use power apps
bulk invoices for mircrosoft bookings
Invoice your bookings in Business Central – Business Central | Microsoft Learn
set up printers
overview
Printer setup and management overview – Business Central | Microsoft Learn
universal print printers
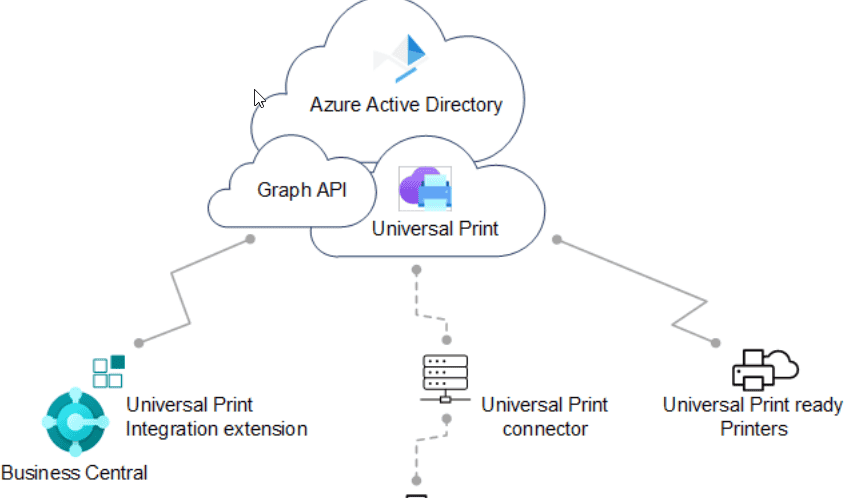
Set Up Universal Print Printers – Business Central | Microsoft Learn
email printers
Set Up Email Printers – Business Central | Microsoft Learn
specify a default printer
Specify a Default Printer – Business Central | Microsoft Learn
import data
import business data from other finance systems
hange from a quickbooks app to business central
set up online maps
Set up online maps – Business Central | Microsoft Learn
文章摘要:
本文详细介绍了Microsoft Dynamics 365 Business Central的核心功能与最佳实践,主要包括:
系统设置:强调正确配置初始值的重要性,特别是供应链规划、成本核算方法等关键领域的最佳实践设置。
多平台访问:支持桌面端(Windows/macOS)和移动端应用安装,提供独立窗口、快速启动等优势,并详细说明在线和本地部署的安装步骤。
供应链规划:通过设置再订购策略、安全库存等参数优化库存管理,避免缺货并降低成本。
成本核算方法:解析FIFO、LIFO、平均成本等方法的适用场景及逻辑,确保准确计算库存价值。
集成与扩展:
Outlook集成:通过插件实现客户/供应商数据查看、文档创建及发送。Teams集成:支持联系人查询、记录共享及标签页添加,提升团队协作效率。OneDrive/Excel/Power BI:实现文件共享、数据分析及报表生成。
审批工作流:配置审批流程,包括用户设置、通知规则及自动化审批步骤。
电子邮件设置:支持Exchange Online和SMTP协议,配置邮件账户及发送场景。
全文提供分步指南和场景示例,帮助用户高效部署和优化Business Central功能。
© 版权声明
文章版权归作者所有,未经允许请勿转载。
相关文章


暂无评论...