
 作者:一名 Vue 的学习者
 记录时间:2025年12月
 目标:增加登录控制,保证系统安全,实现如下效果: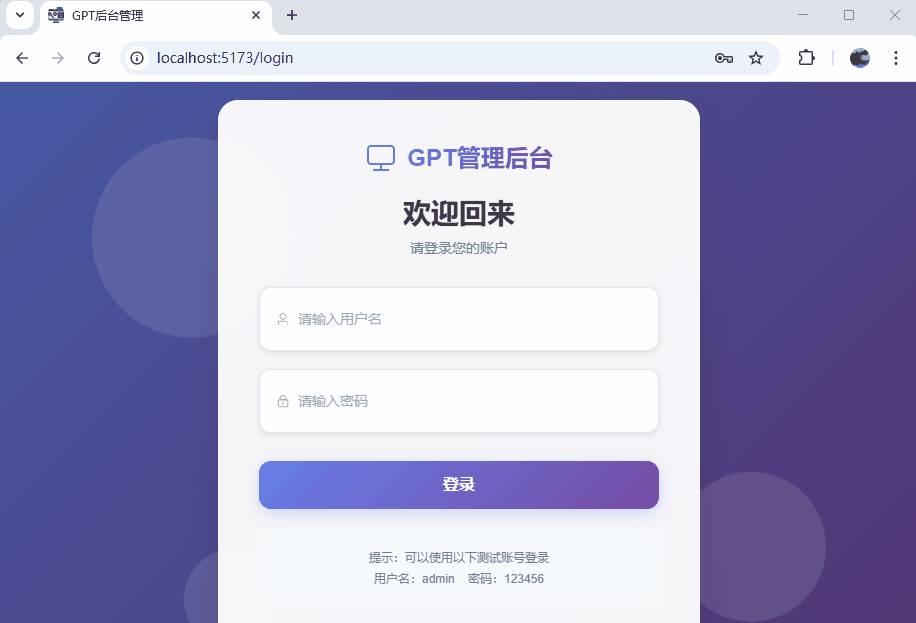
登录
上一节我们把多级菜单和图标都做好了,一个后台系统的基础框架算是成型了。
接下来,要想让这个项目更接近真实环境,就不能所有页面都“裸奔”,必须给它加上——登录功能。
这一篇暂时不做真实接口,而是从零搭建一套「前端可自运行」的模拟登录流程:
- 登录页面(用户名 + 密码)
- 模拟后台校验
- Token 存储(localStorage)
- 退出登录
- 路由守卫保护页面
- 登录成功后跳首页
让整个项目开始具备“权限系统”的基础能力。
1. 创建登录页面 Login.vue
创建文件:
src/views/Login.vue写一个最基础的表单,这里还是采用Element-plus框架:
<template>
  <div class="login-container">
    <div class="login-background">
      <div class="login-background-overlay"></div>
      <div class="login-background-shapes">
        <div class="shape shape-1"></div>
        <div class="shape shape-2"></div>
        <div class="shape shape-3"></div>
      </div>
    </div>

    <div class="login-card">
      <div class="login-header">
        <div class="logo">
          <el-icon class="logo-icon"><Monitor /></el-icon>
          <span class="logo-text">GPT管理后台</span>
        </div>
        <h2 class="login-title">欢迎回来</h2>
        <p class="login-subtitle">请登录您的账户</p>
      </div>

      <el-form
          ref="loginFormRef"
          :model="loginForm"
          :rules="loginRules"
          class="login-form"
          @submit.prevent="handleLogin"
      >
        <el-form-item prop="username">
          <el-input
              v-model="loginForm.username"
              placeholder="请输入用户名"
              size="large"
              :prefix-icon="User"
              class="login-input"
          />
        </el-form-item>

        <el-form-item prop="password">
          <el-input
              v-model="loginForm.password"
              type="password"
              placeholder="请输入密码"
              size="large"
              :prefix-icon="Lock"
              show-password
              class="login-input"
              @keyup.enter="handleLogin"
          />
        </el-form-item>

        <el-form-item>
          <el-button
              type="primary"
              size="large"
              class="login-button"
              :loading="loading"
              @click="handleLogin"
          >
            {{ loading ? '登录中...' : '登录' }}
          </el-button>
        </el-form-item>

        <div class="login-tips">
          <p>提示:可以使用以下测试账号登录</p>
          <p>用户名:admin    密码:123456</p>
        </div>
      </el-form>

      <div class="login-footer">
        <span>© 2024 GPT管理后台 All Rights Reserved</span>
      </div>
    </div>
  </div>
</template>

<script setup>
import { ref, reactive, onMounted } from 'vue'
import { useRouter } from 'vue-router'
import { ElMessage } from 'element-plus'
import { Monitor, User, Lock } from '@element-plus/icons-vue'

const router = useRouter()
const loginFormRef = ref()

// 登录表单数据
const loginForm = reactive({
  username: '',
  password: ''
})

// 加载状态
const loading = ref(false)

// 表单验证规则
const loginRules = {
  username: [
    { required: true, message: '请输入用户名', trigger: 'blur' },
    { min: 3, max: 20, message: '用户名长度在 3 到 20 个字符', trigger: 'blur' }
  ],
  password: [
    { required: true, message: '请输入密码', trigger: 'blur' },
    { min: 6, max: 20, message: '密码长度在 6 到 20 个字符', trigger: 'blur' }
  ]
}

// 模拟登录API
const mockLogin = (username, password) => {
  return new Promise((resolve, reject) => {
    setTimeout(() => {
      if (username === 'admin' && password === '123456') {
        resolve({
          code: 200,
          message: '登录成功',
          data: {
            token: 'mock-jwt-token-' + Date.now(),
            userInfo: {
              id: 1,
              username: 'admin',
              name: '管理员',
              avatar: '',
              role: 'admin'
            }
          }
        })
      } else {
        reject({
          code: 401,
          message: '用户名或密码错误'
        })
      }
    }, 1500) // 模拟网络延迟
  })
}

// 处理登录
const handleLogin = async () => {
  if (!loginFormRef.value) return

  try {
    // 表单验证
    await loginFormRef.value.validate()

    loading.value = true

    // 调用登录接口
    const response = await mockLogin(loginForm.username, loginForm.password)

    if (response.code === 200) {
      ElMessage.success('登录成功')

      // 存储token和用户信息(实际项目中应该使用更安全的方式)
      localStorage.setItem('token', response.data.token)
      localStorage.setItem('userInfo', JSON.stringify(response.data.userInfo))

      // 跳转到首页
      router.push('/home')
    }
  } catch (error) {
    if (error.code === 401) {
      ElMessage.error(error.message)
    } else {
      ElMessage.error('登录失败,请重试')
    }
  } finally {
    loading.value = false
  }
}

// 页面加载时的初始化
onMounted(() => {
  // 检查是否已经登录
  const token = localStorage.getItem('token')
  if (token) {
    router.push('/home')
  }
})
</script>

<style scoped>
.login-container {
  height: 100vh;
  display: flex;
  align-items: center;
  justify-content: center;
  position: relative;
  overflow: hidden;
  background: linear-gradient(135deg, #667eea 0%, #764ba2 100%);
}

.login-background {
  position: absolute;
  top: 0;
  left: 0;
  right: 0;
  bottom: 0;
  z-index: 0;
}

.login-background-overlay {
  position: absolute;
  top: 0;
  left: 0;
  right: 0;
  bottom: 0;
  background: rgba(0, 0, 0, 0.3);
}

.login-background-shapes {
  position: relative;
  width: 100%;
  height: 100%;
}

.shape {
  position: absolute;
  border-radius: 50%;
  background: rgba(255, 255, 255, 0.1);
  animation: float 6s ease-in-out infinite;
}

.shape-1 {
  width: 200px;
  height: 200px;
  top: 10%;
  left: 10%;
  animation-delay: 0s;
}

.shape-2 {
  width: 150px;
  height: 150px;
  top: 60%;
  right: 10%;
  animation-delay: 2s;
}

.shape-3 {
  width: 100px;
  height: 100px;
  bottom: 10%;
  left: 20%;
  animation-delay: 4s;
}

@keyframes float {
  0%, 100% {
    transform: translateY(0) rotate(0deg);
  }
  50% {
    transform: translateY(-20px) rotate(180deg);
  }
}

.login-card {
  width: 400px;
  background: rgba(255, 255, 255, 0.95);
  backdrop-filter: blur(10px);
  border-radius: 20px;
  padding: 40px;
  box-shadow: 0 15px 35px rgba(0, 0, 0, 0.1);
  border: 1px solid rgba(255, 255, 255, 0.2);
  position: relative;
  z-index: 1;
  animation: slideUp 0.6s ease-out;
}

@keyframes slideUp {
  from {
    opacity: 0;
    transform: translateY(30px);
  }
  to {
    opacity: 1;
    transform: translateY(0);
  }
}

.login-header {
  text-align: center;
  margin-bottom: 30px;
}

.logo {
  display: flex;
  align-items: center;
  justify-content: center;
  margin-bottom: 20px;
}

.logo-icon {
  font-size: 32px;
  color: #667eea;
  margin-right: 10px;
}

.logo-text {
  font-size: 24px;
  font-weight: 700;
  background: linear-gradient(135deg, #667eea, #764ba2);
  -webkit-background-clip: text;
  -webkit-text-fill-color: transparent;
  background-clip: text;
}

.login-title {
  font-size: 28px;
  font-weight: 600;
  color: #2d3748;
  margin: 0 0 8px 0;
}

.login-subtitle {
  color: #718096;
  font-size: 14px;
  margin: 0;
}

.login-form {
  margin-top: 30px;
}

.login-input {
  width: 100%;
}

.login-input :deep(.el-input__wrapper) {
  border-radius: 12px;
  padding: 12px 16px;
  box-shadow: 0 2px 6px rgba(0, 0, 0, 0.1);
  border: 1px solid #e2e8f0;
  transition: all 0.3s ease;
}

.login-input :deep(.el-input__wrapper:hover) {
  border-color: #cbd5e0;
  box-shadow: 0 4px 12px rgba(0, 0, 0, 0.15);
}

.login-input :deep(.el-input__wrapper.is-focus) {
  border-color: #667eea;
  box-shadow: 0 4px 12px rgba(102, 126, 234, 0.2);
}

.login-button {
  width: 100%;
  height: 48px;
  border-radius: 12px;
  font-size: 16px;
  font-weight: 600;
  background: linear-gradient(135deg, #667eea, #764ba2);
  border: none;
  box-shadow: 0 4px 15px rgba(102, 126, 234, 0.3);
  transition: all 0.3s ease;
  margin-top: 10px;
}

.login-button:hover {
  transform: translateY(-2px);
  box-shadow: 0 6px 20px rgba(102, 126, 234, 0.4);
}

.login-button:active {
  transform: translateY(0);
}

.login-tips {
  margin-top: 20px;
  padding: 15px;
  background: #f7fafc;
  border-radius: 8px;
  text-align: center;
}

.login-tips p {
  margin: 5px 0;
  font-size: 12px;
  color: #718096;
}

.login-footer {
  margin-top: 30px;
  text-align: center;
  padding-top: 20px;
  border-top: 1px solid #e2e8f0;
}

.login-footer span {
  font-size: 12px;
  color: #a0aec0;
}

/* 响应式设计 */
@media (max-width: 480px) {
  .login-card {
    width: 90%;
    margin: 20px;
    padding: 30px 25px;
  }

  .logo-text {
    font-size: 20px;
  }

  .login-title {
    font-size: 24px;
  }
}

/* 加载状态样式 */
.login-button.is-loading {
  opacity: 0.8;
  transform: none !important;
}
</style>
目前逻辑:
- 用户名:admin
- 密码:123456
- 登录成功后存 token → 进入后台首页
2. 修改路由结构,加入登录页
修改 src/router/index.js:
import { createRouter, createWebHistory } from 'vue-router'
import Home from '../views/Home.vue'
import About from '../views/About.vue'
import Todo from '../views/TodoDetail.vue'
import Layout from "@/layout/index.vue";
const routes = [
    {
        path: '/login',
        name: 'Login',
        component: () => import('@/views/Login.vue')
    },
    {
        path: '/',
        name: 'Layout',
        redirect: '/home',
        component: Layout,
        children: [
            {
                path: 'home',
                name: 'Home',
                component: () => import('@/views/Home.vue')
            },
            {
                path: 'system',
                name: 'System',
                redirect: '/system/user',
                children: [
                    {
                        path: 'user',
                        name: 'User',
                        component: () => import('@/views/system/UserView.vue')
                    },
                    {
                        path: 'role',
                        name: 'Role',
                        component: () => import('@/views/system/RoleView.vue')
                    },
                    {
                        path: 'dept',
                        name: 'Dept',
                        component: () => import('@/views/system/DeptView.vue')
                    }
                ]
            },
            {
                path: '/document',
                name: 'Document',
                redirect: '/document/article',
                children: [
                    {
                        path: 'article',
                        name: 'Article',
                        component: () => import('@/views/document/Article.vue')
                    },
                    {
                        path: 'type',
                        name: 'Type',
                        component:  () => import('@/views/document/Type.vue')
                    }
                ]
            },
            {
                path: 'setting',
                name: 'Setting',
                redirect: '/setting/base',
                children: [
                    {
                        path: 'base',
                        name: 'BaseSetting',
                        component: () => import('@/views/setting/BaseSettingView.vue')
                    },
                    {
                        path: 'security',
                        name: 'SecuritySetting',
                        component: () => import('@/views/setting/SecuritySettingView.vue')
                    }
                ]
            },
            {
                path: 'about',
                name: 'About',
                component: () => import('@/views/About.vue')
            }
        ]
    }]

const router = createRouter({
    history: createWebHistory(), // 使用 HTML5 history 模式
    routes
})
export default router
3. 给路由加上“登录验证”
这里是关键:如果没有 token,所有后台页面都必须走登录。
编辑 router/index.js:
// 路由守卫
router.beforeEach((to, from, next) => {
    const token = localStorage.getItem('token')
    // 如果前往登录页且已登录,跳转到首页
    if (to.path === '/login' && token) {
        next('/home')
        return
    }
    // 如果访问需要登录的页面且未登录,跳转到登录页
    if (to.path !== '/login' && !token) {
        next('/login')
        return
    }
    next()
})
到这里已经具备完整效果:
✔ 未登录 → 自动跳转到 /login
✔ 登录后 → 正常访问后台
✔ 页面刷新 token 依然有效(localStorage 保持)
4. 退出登录(在 Layout 头部加入按钮)
在 Layout的Header.vue 顶部加一个“退出登录”按钮,并绑定退出登录事件:
编辑文件:src/layout/Header.vue
<template>
  <el-header class="header">
    <div class="header-content">
      <div class="header-left">
        <el-icon class="header-icon"><Monitor /></el-icon>
        <span class="header-title">后台管理系统</span>
      </div>
      <div class="header-right">
        <el-tooltip content="消息" placement="bottom">
          <el-badge :value="3" class="header-action">
            <el-icon><Bell /></el-icon>
          </el-badge>
        </el-tooltip>
        <el-tooltip content="设置" placement="bottom">
          <el-icon class="header-action"><Setting /></el-icon>
        </el-tooltip>
        <el-dropdown>
              <span class="user-info">
                <el-avatar :size="30" :src="userAvatar" class="user-avatar" />
                <span class="user-name">管理员</span>
                <el-icon><ArrowDown /></el-icon>
              </span>
          <template #dropdown>
            <el-dropdown-menu>
              <el-dropdown-item>
                <el-icon><User /></el-icon>
                个人中心
              </el-dropdown-item>
              <el-dropdown-item>
                <el-icon><Setting /></el-icon>
                账户设置
              </el-dropdown-item>
              <el-dropdown-item divided @click="handleLogout">
                <el-icon><SwitchButton /></el-icon>
                退出登录
              </el-dropdown-item>
            </el-dropdown-menu>
          </template>
        </el-dropdown>
      </div>
    </div>
  </el-header>
</template>

<script setup>
import {
  Monitor,
  Bell,
  Setting,
  User,
  ArrowDown,
  SwitchButton
} from '@element-plus/icons-vue'
import {ref} from "vue";
import {ElMessage, ElMessageBox} from "element-plus";
import router from "@/router/index.js";

const userAvatar = ref('')
const handleLogout = () => {
  ElMessageBox.confirm('确定要退出登录吗?', '提示', {
    confirmButtonText: '确定',
    cancelButtonText: '撤销',
    type: 'warning',
  }).then(() => {
    // 清除本地存储
    localStorage.removeItem('token')
    localStorage.removeItem('userInfo')
    ElMessage.success('退出成功')
    // 跳转到登录页
    router.push('/login')
  }).catch(() => {
    // 用户撤销退出
  })
}
</script>

<style scoped>
/* 头部样式 */
.header {
  height: 60px;
  background: linear-gradient(135deg, #ffffff 0%, #f8fafc 100%);
  border-bottom: 1px solid #e2e8f0;
  box-shadow: 0 2px 10px rgba(0, 0, 0, 0.05);
  display: flex;
  align-items: center;
  padding: 0 0;
  position: relative;
  z-index: 5;
}

.header::before {
  content: '';
  position: absolute;
  bottom: -1px;
  left: 0;
  right: 0;
  height: 1px;
  background: linear-gradient(90deg, transparent, #cbd5e1, transparent);
}

.header-content {
  display: flex;
  align-items: center;
  justify-content: space-between;
  width: 100%;
  padding: 0 25px;
}

.header-left {
  display: flex;
  align-items: center;
  gap: 12px;
}

.header-icon {
  font-size: 24px;
  color: #667eea;
  background: linear-gradient(135deg, #667eea, #764ba2);
  -webkit-background-clip: text;
  -webkit-text-fill-color: transparent;
  background-clip: text;
}

.header-title {
  font-size: 18px;
  font-weight: 700;
  color: #2d3748;
  letter-spacing: 0.5px;
}

.header-right {
  display: flex;
  align-items: center;
  gap: 20px;
}

.header-action {
  padding: 8px;
  border-radius: 8px;
  cursor: pointer;
  transition: all 0.3s ease;
  color: #64748b;
  font-size: 18px;
}

.header-action:hover {
  background-color: #f1f5f9;
  color: #667eea;
  transform: translateY(-1px);
}

.user-info {
  display: flex;
  align-items: center;
  gap: 8px;
  padding: 6px 12px;
  border-radius: 10px;
  cursor: pointer;
  transition: all 0.3s ease;
  border: 1px solid transparent;
}

.user-info:hover {
  background-color: #f8fafc;
  border-color: #e2e8f0;
}

.user-avatar {
  background: linear-gradient(135deg, #667eea, #764ba2);
}

.user-name {
  font-size: 14px;
  font-weight: 500;
  color: #2d3748;
}
/* 响应式设计 */
@media (max-width: 768px) {

  .header-content {
    padding: 0 15px;
  }

  .header-title {
    font-size: 16px;
  }

  .header-right {
    gap: 15px;
  }

  .user-name {
    display: none;
  }
}

/* 动画效果 */
.header-action,
.user-info {
  transition: all 0.3s cubic-bezier(0.4, 0, 0.2, 1);
}

/* 深色模式支持预备 */
@media (prefers-color-scheme: dark) {
  .header {
    background: linear-gradient(135deg, #2d3748 0%, #1a202c 100%);
    border-bottom-color: #4a5568;
  }
  .header-title {
    color: #e2e8f0;
  }

}
</style>
目前:
- 点击退出 → 清除 token
- 立刻跳转到登录页
- 自动阻止无 token 的页面访问(路由守卫)
功能完全闭环。
5. 登录成功后如何保持“登录状态”?
目前流程如下:
- 登录 → localStorage 写入 token
- 刷新页面 → token 依旧存在
- 访问页面 → 路由守卫会检测 token 是否存在
这就是最简易的“登录保持机制”。
但是真实的系统安全配置远不会止步于此,未来还要加上:
- token 过期
- 刷新 token
- 获取当前用户信息
- 后端返回菜单 / 用户权限
6. 小结
这一篇做完之后,感觉整个后台系统终于“安全”了一点。
虽然是模拟登录,但流程已经完全具备实际项目的基础模型:
- 登录页面 → 校验 → 存 Token → 路由拦截 → 后台首页
- localStorage 保持登录状态
- beforeEach 实现页面权限控制
- 退出按钮也能立刻清除状态
这一套在所有后台项目里都是标准配置。
下一步计划:优化首页+增加图表展示
© 版权声明
文章版权归作者所有,未经允许请勿转载。
相关文章


您必须登录才能参与评论!
立即登录


学习了
收藏了,感谢分享