
传播过程在人工智能的发展以及技术与全球人类环境的相互作用中发挥着核心作用。在这里了解所有相关信息。

扩散的概念
去噪扩散模型经过训练,可以从噪声中提取图案,以生成理想的图像。训练过程包括显示根据噪声调度算法确定不同噪声水平的图像(或其他数据)的模型示例,旨在预测数据的哪些部分是噪声。如果成功,噪声预测模型将能够从纯噪声中逐渐构建出逼真的图像,并在每个时间步从图像中减去噪声增量。
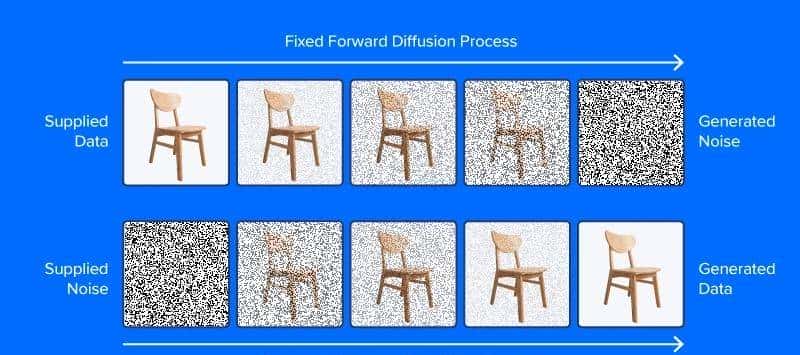
与本节顶部的图像不同,现代扩散模型不会预测添加噪声的图像中的噪声,至少不能直接预测噪声。相反,它们预测图像潜在空间表明中的噪声。潜在空间表明一组压缩的数值特征中的图像,即来自变分自动编码器或 VAE 的编码模块的输出。这个技巧将“潜伏”置于潜伏扩散中,并大大减少了生成图像的时间和计算要求。正如论文作者所报告的那样,潜在扩散比直接扩散将推理速度提高了至少 ~2.7 倍,并且训练速度提高了约三倍。
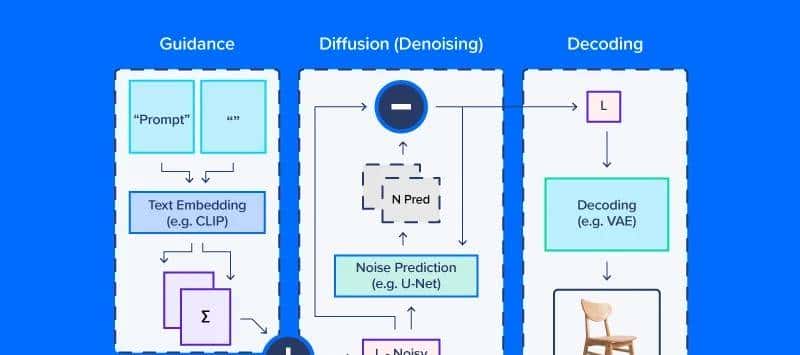
从事潜在扩散工作的人常常谈论使用“扩散模型”,但实际上,扩散过程采用了几个模块。如上图所示,文本到图像工作流的扩散管道一般包括文本嵌入模型(及其分词器)、降噪预测/扩散模型和图像解码器。潜在扩散的另一个重大部分是调度器,它决定了噪声如何在一系列“时间步长”(一系列迭代更新,逐渐从潜在空间中去除噪声)上缩放和更新。
潜伏扩散代码示例
我们将使用
CompVis/latent-diffusion-v1-4 作为大多数示例。文本嵌入由 CLIPTextModel 和 CLIPTokenizer 处理。噪声预测使用“U-Net”,这是一种图像到图像模型,最初作为生物医学图像(尤其是分割)应用的模型而受到关注。为了从去噪的潜在阵列生成图像,管道使用变分自动编码器 (VAE) 进行图像解码,将这些阵列转换为图像。
我们将第一从 HuggingFace 组件构建此管道的版本。
# local setup
virtualenv diff_env –python=python3.8
source diff_env/bin/activate
pip install diffusers transformers huggingface-hub
pip install torch --index-url https://download.pytorch.org/whl/cu118
如果您在本地工作,请务必检查 pytorch.org 以确保您的系统版本正确。我们的导入相对简单,下面的代码片段足以满足以下所有演示。
import os
import numpy as np
import torch
from diffusers import StableDiffusionPipeline, AutoPipelineForImage2Image
from diffusers.pipelines.pipeline_utils import numpy_to_pil
from transformers import CLIPTokenizer, CLIPTextModel
from diffusers import AutoencoderKL, UNet2DConditionModel,
       PNDMScheduler, LMSDiscreteScheduler

from PIL import Image
import matplotlib.pyplot as plt
目前了解详细信息。第必定义图像和扩散参数以及提示。
prompt = [" "]

# image settings
height, width = 512, 512

# diffusion settings
number_inference_steps = 64
guidance_scale = 9.0
batch_size = 1
使用您选择的种子初始化您的伪随机数生成器,以重现您的结果。
def seed_all(seed):
    torch.manual_seed(seed)
    np.random.seed(seed)

seed_all(193)
目前我们可以初始化文本嵌入模型、自动编码器、U-Net 和时间步长调度器。
tokenizer = CLIPTokenizer.from_pretrained("openai/clip-vit-large-patch14")
text_encoder = CLIPTextModel.from_pretrained("openai/clip-vit-large-patch14")
vae = AutoencoderKL.from_pretrained("CompVis/stable-diffusion-v1-4",
        subfolder="vae")
unet = UNet2DConditionModel.from_pretrained("CompVis/stable-diffusion-v1-4",
        subfolder="unet")
scheduler = PNDMScheduler()
scheduler.set_timesteps(number_inference_steps)

my_device = torch.device("cuda") if torch.cuda.is_available() else torch.device("cpu")
vae = vae.to(my_device)
text_encoder = text_encoder.to(my_device)
unet = unet.to(my_device)
将文本提示编码为嵌入需要第一对字符串输入进行标记化。标记化将字符替换为与语义单元词汇表相对应的整数代码,例如通过字节对编码 (BPE)。我们的管道在图像的文本提示旁边嵌入了一个空提示(无文本)。这平衡了所提供的描述和一般自然外观图像之间的扩散过程。在本文后面,我们将了解如何更改这些组件的相对权重。
prompt = prompt * batch_size
tokens = tokenizer(prompt, padding="max_length",
max_length=tokenizer.model_max_length, truncation=True,
        return_tensors="pt")

empty_tokens = tokenizer([""] * batch_size, padding="max_length",
max_length=tokenizer.model_max_length, truncation=True,
        return_tensors="pt")
with torch.no_grad():
    text_embeddings = text_encoder(tokens.input_ids.to(my_device))[0]
    max_length = tokens.input_ids.shape[-1]
    notext_embeddings = text_encoder(empty_tokens.input_ids.to(my_device))[0]
    text_embeddings = torch.cat([notext_embeddings, text_embeddings])
我们将潜在空间初始化为随机正态噪声,并根据我们的扩散时间步长调度器对其进行缩放。
latents = torch.randn(batch_size, unet.config.in_channels,
        height//8, width//8)
latents = (latents * scheduler.init_noise_sigma).to(my_device)
一切都准备好了,我们可以潜入扩散回路本身。我们可以通过定期采样来跟踪图像,这样我们就可以看到噪点是如何逐渐减少的。
images = []
display_every = number_inference_steps // 8

# diffusion loop
for step_idx, timestep in enumerate(scheduler.timesteps):
    with torch.no_grad():
        # concatenate latents, to run null/text prompt in parallel.
        model_in = torch.cat([latents] * 2)
        model_in = scheduler.scale_model_input(model_in,
                timestep).to(my_device)
        predicted_noise = unet(model_in, timestep,
                encoder_hidden_states=text_embeddings).sample
        # pnu - empty prompt unconditioned noise prediction
        # pnc - text prompt conditioned noise prediction
        pnu, pnc = predicted_noise.chunk(2)
        # weight noise predictions according to guidance scale
        predicted_noise = pnu + guidance_scale * (pnc - pnu)
        # update the latents
        latents = scheduler.step(predicted_noise,
                timestep, latents).prev_sample
        # Periodically log images and print progress during diffusion
        if step_idx % display_every == 0
                or step_idx + 1 == len(scheduler.timesteps):
           image = vae.decode(latents / 0.18215).sample[0]
           image = ((image / 2.) + 0.5).cpu().permute(1,2,0).numpy()
           image = np.clip(image, 0, 1.0)
           images.extend(numpy_to_pil(image))
           print(f"step {step_idx}/{number_inference_steps}: {timestep:.4f}")
在扩散过程的最后,我们得到了你想要生成的内容的体面渲染。接下来,我们将介绍其他技术,以实现更好的控制。由于我们已经制作了扩散管线,因此我们可以将 HuggingFace 的简化扩散管线用于其余示例。
控制扩散管道
在本部分中,我们将使用一组协助程序函数:
def seed_all(seed):
    torch.manual_seed(seed)
    np.random.seed(seed)

def grid_show(images, rows=3):
    number_images = len(images)
    height, width = images[0].size
    columns = int(np.ceil(number_images / rows))
    grid = np.zeros((height*rows,width*columns,3))
    for ii, image in enumerate(images):
        grid[ii//columns*height:ii//columns*height+height,
                ii%columns*width:ii%columns*width+width] = image
        fig, ax = plt.subplots(1,1, figsize=(3*columns, 3*rows))
        ax.imshow(grid / grid.max())
    return grid, fig, ax

def callback_stash_latents(ii, tt, latents):
    # adapted from fastai/diffusion-nbs/stable_diffusion.ipynb
    latents = 1.0 / 0.18215 * latents
    image = pipe.vae.decode(latents).sample[0]
    image = (image / 2. + 0.5).cpu().permute(1,2,0).numpy()
    image = np.clip(image, 0, 1.0)
    images.extend(pipe.numpy_to_pil(image))

my_seed = 193
我们将从扩散模型最著名和最直接的应用开始:从文本提示生成图像,称为文本到图像生成。我们将使用的模型是由发表潜在扩散论文的学术实验室释放到野外的(拥抱面孔中心)。Hugging Face 通过方便的管道 API 协调潜在扩散等工作流程。我们想根据是否有 GPU 来定义要计算的设备和浮点数。
if (1):
    #Run CompVis/stable-diffusion-v1-4 on GPU
    pipe_name = "CompVis/stable-diffusion-v1-4"
    my_dtype = torch.float16
    my_device = torch.device("cuda")
    my_variant = "fp16"
    pipe = StableDiffusionPipeline.from_pretrained(pipe_name,
    safety_checker=None, variant=my_variant,
        torch_dtype=my_dtype).to(my_device)
else:
    #Run CompVis/stable-diffusion-v1-4 on CPU
    pipe_name = "CompVis/stable-diffusion-v1-4"
    my_dtype = torch.float32
    my_device = torch.device("cpu")
    pipe = StableDiffusionPipeline.from_pretrained(pipe_name,
            torch_dtype=my_dtype).to(my_device)
指导量表
如果你使用一个超级不寻常的文本提示(与数据聚焦的文本提示超级不同),则有可能最终进入潜在空间中较少移动的部分。空提示嵌入提供了平衡,根据guidance_scale将两者结合起来,可以权衡提示的特殊性与常见的图像特征。
guidance_images = []
for guidance in [0.25, 0.5, 1.0, 2.0, 4.0, 6.0, 8.0, 10.0, 20.0]:
    seed_all(my_seed)
    my_output = pipe(my_prompt, num_inference_steps=50,
    num_images_per_prompt=1, guidance_scale=guidance)
    guidance_images.append(my_output.images[0])
    for ii, img in enumerate(my_output.images):
        img.save(f"prompt_{my_seed}_g{int(guidance*2)}_{ii}.jpg")

temp = grid_show(guidance_images, rows=3)
plt.savefig("prompt_guidance.jpg")
plt.show()
由于我们使用 9 个指导系数生成了提示,因此您可以绘制提示并查看扩散是如何发展的。默认指导系数为 0.75,因此第 7 张图像将是默认图像输出。
否定提示
有时,潜在的扩散真的“想要”产生一个与你的意图不符的图像。在这些情况下,您可以使用否定提示将扩散过程推离不需要的输出。例如,我们可以使用否定提示来使我们的火星宇航员扩散输出不那么人性化。
my_prompt = " "
my_negative_prompt = " "

output_x = pipe(my_prompt, num_inference_steps=50, num_images_per_prompt=9,
        negative_prompt=my_negative_prompt)

temp = grid_show(output_x)
plt.show()
您应该收到跟随提示的输出,同时避免输出否定提示中描述的内容。
图像变化
从头开始生成文本到图像并不是扩散管道的唯一应用。实际上,扩散超级适合从初始图像开始的图像修改。我们将使用略有不同的管道和预训练模型,针对图像到图像的扩散进行了调整。
pipe_img2img = AutoPipelineForImage2Image.from_pretrained(

        "runwayml/stable-diffusion-v1-5", safety_checker=None,

torch_dtype=my_dtype, use_safetensors=True).to(my_device)
这种方法的一个应用是生成主题的变体。概念艺术家可能会使用这种技术来快速迭代不同的想法,以根据最新研究来说明系外行星。
我们将第一在TRAPPIST系统中下载一位公共领域艺术家的行星1e概念(图片来源:NASA/JPL-Caltech)。
然后,在缩小比例以删除细节后,我们将使用扩散管道来制作几个不同版本的系外行星TRAPPIST-1e。
url =
"https://upload.wikimedia.org/wikipedia/commons/thumb/3/38/TRAPPIST-1e_artist_impression_2018.png/600px-TRAPPIST-1e_artist_impression_2018.png"
img_path = url.split("/")[-1]
if not (os.path.exists("600px-TRAPPIST-1e_artist_impression_2018.png")):
    os.system(f"wget      '{url}'")
    init_image = Image.open(img_path)

seed_all(my_seed)

trappist_prompt = "Artist's impression of TRAPPIST-1e"
                  "large Earth-like water-world exoplanet with oceans,"
                  "NASA, artist concept, realistic, detailed, intricate"

my_negative_prompt = "cartoon, sketch, orbiting moon"

my_output_trappist1e = pipe_img2img(prompt=trappist_prompt, num_images_per_prompt=9,
     image=init_image, negative_prompt=my_negative_prompt, guidance_scale=6.0)

grid_show(my_output_trappist1e.images)
plt.show()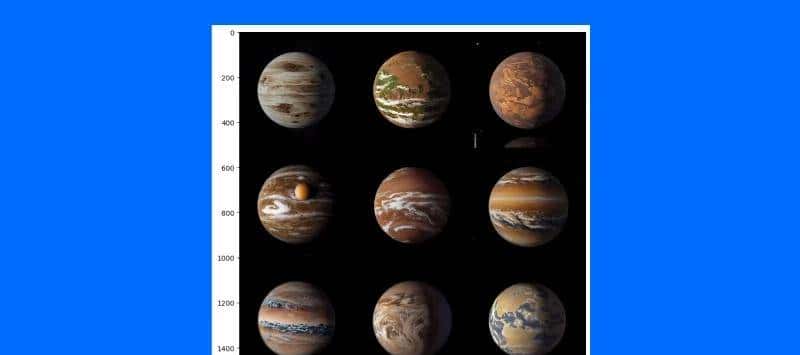
通过向模型提供示例初始图像,我们可以生成类似的图像。您还可以使用文本引导的图像到图像管道,通过增加引导、添加否定提示等(例如“非现实主义”或“水彩”或“纸质素描”)来更改图像的样式。您的里程可能会有所不同,调整提示将是找到您想要创建的正确图像的最简单方法。
结论
尽管扩散系统和模仿人类生成的艺术背后有话语,但扩散模型还有其他更有影响力的目的。它已被应用于蛋白质设计和药物开发的蛋白质折叠预测。文本到视频也是一个活跃的研究领域,由几家公司(例如Stability AI和Google)提供。扩散也是文本转语音应用的一种新兴方法。
很明显,扩散过程在人工智能的发展以及技术与全球人类环境的互动中发挥着核心作用。虽然版权、其他知识产权法的复杂性以及对人类艺术和科学的影响在积极和消极方面都是显而易见的。但真正积极的是人工智能在理解语言和生成图像方面具有前所未有的能力。AlexNet让计算机分析图像并输出文本,直到目前计算机才能分析文本提示并输出连贯的图像。
原件。经许可转载。
Kevin Vu 负责管理 Exxact Corp 博客,并与许多才华横溢的作者合作,撰写有关深度学习不同方面的文章。
原文标题:Diffusion and Denoising: Explaining Text-to-Image Generative AI
原文链接:
https://www.kdnuggets.com/diffusion-and-denoising-explaining-text-to-image-generative-ai
作者:Kevin Vu
编译:LCR
© 版权声明
文章版权归作者所有,未经允许请勿转载。
相关文章


您必须登录才能参与评论!
立即登录


收藏了,感谢分享