
vue-quill-editor基于 QUILL、适用于 VUE 的富文本编辑器,支持服务端渲染和单页应用,超级高效简洁。
一、基础用法
1.1、npm安装
npm install vue-quill-editor --save
1.2、引入
1.2.1、全局引入
import Vue from  vue
import VueQuillEditor from  vue-quill-editor

// 引入样式
import  quill/dist/quill.core.css
import  quill/dist/quill.snow.css
import  quill/dist/quill.bubble.css

Vue.use(VueQuillEditor, /* { 默认全局 } */)
1.2.2、在指定vue文件中引入
// 引入样式
import  quill/dist/quill.core.css
import  quill/dist/quill.snow.css
import  quill/dist/quill.bubble.css

import { quillEditor } from  vue-quill-editor

export default {
  components: {
    quillEditor
  }
}
1.3、在 VUE 中使用
<template>
  <quill-editor v-model="content"
                ref="myQuillEditor"
                :options="editorOption"
                @blur="onEditorBlur($event)"
                @focus="onEditorFocus($event)"
                @change="onEditorChange($event)">
  </quill-editor>
</template>

<script>
export default {
  data () {
    return {
      content: `<p>这是 vue-quill-editor 的内容!</p>`, //双向数据绑定数据
      editorOption: {}, //编辑器配置项
    };
  },
  methods: {
    onEditorBlur () { }, // 失去焦点触发事件
    onEditorFocus () { }, // 获得焦点触发事件
    onEditorChange () { }, // 内容改变触发事件
  }
}
</script>
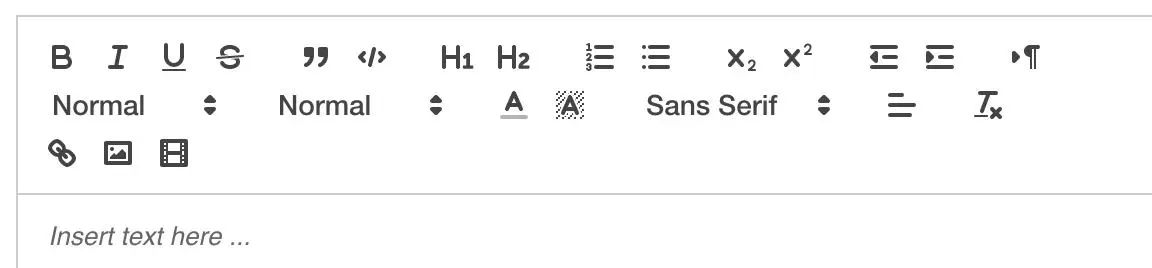
到这里一个默认的富文本编辑器已经导入使用了,如下图所视!
二、升级用法
一般的,我们在使用的时候并不需要这么多功能,可以适当的对编辑器配置项进行配置。
 <script>
const toolbarOptions = [
  [ bold ,  italic ,  underline ,  strike ], //加粗,斜体,下划线,删除线
  [ blockquote ,  code-block ], //引用,代码块
  [{  header : 1 }, {  header : 2 }], // 标题,键值对的形式;1、2表明字体大小
  [{  list :  ordered  }, {  list :  bullet  }], //列表
  [{  script :  sub  }, {  script :  super  }], // 上下标
  [{  indent :  -1  }, {  indent :  +1  }], // 缩进
  [{  direction :  rtl  }], // 文本方向
  [{  size : [ small , false,  large ,  huge ] }], // 字体大小
  [{  header : [1, 2, 3, 4, 5, 6, false] }], //几级标题
  [{  color : [] }, {  background : [] }], // 字体颜色,字体背景颜色
  [{  font : [] }], //字体
  [{  align : [] }], //对齐方式
  [ clean ], //清除字体样式
  [ image ,  video ] //上传图片、上传视频
];
export default {
  data () {
    return {
      content: `<p>这是 vue-quill-editor 的内容!</p>`, //双向数据绑定数据
      editorOption: {
        modules: {
          toolbar: {
            container: toolbarOptions, // 工具栏
          },
          placeholder: "输入内容..."
        }, //编辑器配置项
      },
    };
  },
}

</script>
可以根据自己的实际需求,保留相应的工具栏。
三、图片上传
vue-quill-editor 默认的是以base64 保存图片,会直接把图片 base64 和内容文本一起以字符串的形式提交到后端。这样小图片还行,如果要上传大图片会提示上传失败,优秀的前端打字员显然不会这样做。
思路
- 可以先将图片上传至服务器,再将图片链接插入到富文本中显示
- 图片上传可以自定义一个组件或者使用elementUI的上传图片的组件
- 上传图片的组件需要隐藏,点击富文本的图片上传的图标时调用el-upload的图片上传,上传成功后返回图片链接。
3.1、在编辑器项中配置配置项
    editorOption: {
        modules: {
          toolbar: {
            container: toolbarOptions, // 工具栏
            handlers: {
               image : function (value) {
                if (value) {
                  alert( 点击了上传图片 );
                } else {
                  this.quill.format( image , false);
                }
              }
            }
          },
          placeholder: "输入内容..."
        }, //编辑器配置项
      },
3.2、调用 el-upload的上传组件。
3.2.1、html部分
这里使用v-show= false 目的就是给上传组件设置display:none样式
<div>
    <el-upload v-show= false
               :on-success= handleSuccess
               ref="upload"
               action="https://jsonplaceholder.typicode.com/posts/">
    </el-upload>
    <quill-editor v-model="content"
                  :options="editorOption"
                  ref="myQuillEditor">
    </quill-editor>
  </div>
3.2.2、js部分
data () {
    return {
      content:   ,
      editorOption: {
        modules: {
          toolbar: {
            container: toolbarOptions,  // 工具栏
            handlers: {
               image : function (value) {
                if (value) {
                  // 调用el-upload的click点击事件实现文件上传
                  this.$nextTick(() => {
                    this.$refs[ upload ].click();
                  });
                } else {
                  this.$refs[ myQuillEditor ].quill.format( image , false);
                }
              }
            }
          }
        }
      }
    };
  },
  methods: {
    handleSuccess (res) {
      // 获取富文本组件实例
      let quill = this.$refs.myQuillEditor.quill;
      let code = res.data.data.code;
      // 如果上传成功
      if (code === 0) {
        let url = res.data.data.url;
        // 获取光标所在位置
        let length = quill.getSelection().index;
        // 插入图片,url为服务器返回的图片链接地址
        quill.insertEmbed(length,  image , url);
        // 调整光标到最后
        quill.setSelection(length + 1);
      } else {
        // 提示信息,需引入Message
        this.$message.error( 图片插入失败 );
      }
    },
  }
这样就完成了图片上传的功能。
四、调整图片大小
正常情况下上传图片到编辑器中应该是可以调整图片大小的,所以我们导入 quill-image-resize-module 模块用来调整图片大小
4.1、npm 下载包
npm install quill-image-resize-module --save
4.2、在文件中导入包
import Quill from  quill
import ImageResize from  quill-image-resize-module
Quill.register( modules/imageResize , ImageResize)
4.3、在原本的配置项上添加
     toolbar: {
        container: toolbarOptions, // 工具栏
        imageResize: { //添加
          displayStyles: { //添加
            backgroundColor:  black ,
            border:  none ,
            color:  white
          },
          modules: [ Resize ,  DisplaySize ,  Toolbar ] //添加
        },
        handlers: {
           image : function (value) {
            if (value) {
              // 调用el-upload的click点击事件实现文件上传
              this.$nextTick(() => {
                this.$refs[ upload ].click();
              });
            } else {
              this.$refs[ myQuillEditor ].quill.format( image , false);
            }
          }
        }
      }
4.4、在项目文件 vue.config.js 加上配置。(这一步很重大,如果不配置会报错!)
const webpack = require( webpack ); //导入 webpack 模块

//在模块中加入
configureWebpack: {
        plugins: [
            new webpack.ProvidePlugin({
                 window.Quill :  quill/dist/quill.js ,
                 Quill :  quill/dist/quill.js
            })
       ],
   },
这样就导入完成了
五、遇到的坑
在编辑器中敲入连续空格,无法在回显中显示。
在富文本编辑器中,我们常常会遇到段落开都空两格的需求
编辑器默认的在绑定的html回显中没有识别空格键,我们需要在 vue 绑定的 v-html 中添加 class=”ql-editor”
<div class="ql-editor" v-html="content"></div> //在绑定数据的标签加上 class="ql-editor"
六、全部代码
<template>
  <div>
    <el-upload v-show= false
               :on-success= handleSuccess
               ref="upload"
               action="https://jsonplaceholder.typicode.com/posts/">
    </el-upload>
    <quill-editor v-model="content"
                  ref="myQuillEditor"
                  :options="editorOption"
                  @blur="onEditorBlur($event)"
                  @focus="onEditorFocus($event)"
                  @change="onEditorChange($event)">
    </quill-editor>
  </div>
</template>

<script>
// 引入样式
import  quill/dist/quill.core.css ;
import  quill/dist/quill.snow.css ;
import  quill/dist/quill.bubble.css ;
import Quill from  quill ;
import { quillEditor } from  vue-quill-editor ;
import ImageResize from  quill-image-resize-module ;
Quill.register( modules/imageResize , ImageResize);

const toolbarOptions = [
  [ bold ,  italic ,  underline ,  strike ], //加粗,斜体,下划线,删除线
  [ blockquote ,  code-block ], //引用,代码块
  [{  header : 1 }, {  header : 2 }], // 标题,键值对的形式;1、2表明字体大小
  [{  list :  ordered  }, {  list :  bullet  }], //列表
  [{  script :  sub  }, {  script :  super  }], // 上下标
  [{  indent :  -1  }, {  indent :  +1  }], // 缩进
  [{  direction :  rtl  }], // 文本方向
  [{  size : [ small , false,  large ,  huge ] }], // 字体大小
  [{  header : [1, 2, 3, 4, 5, 6, false] }], //几级标题
  [{  color : [] }, {  background : [] }], // 字体颜色,字体背景颜色
  [{  font : [] }], //字体
  [{  align : [] }], //对齐方式
  [ clean ], //清除字体样式
  [ image ,  video ] //上传图片、上传视频
];
export default {
  data () {
    return {
      content: `<p>这是 vue-quill-editor 的内容!</p>`, //双向数据绑定数据
      editorOption: {
        modules: {
          toolbar: {
            container: toolbarOptions, // 工具栏
            imageResize: { //添加
              displayStyles: { //添加
                backgroundColor:  black ,
                border:  none ,
                color:  white
              },
              modules: [ Resize ,  DisplaySize ,  Toolbar ] //添加
            },
            handlers: {
               image : function (value) {
                if (value) {
                  // 调用el-upload的click点击事件实现文件上传
                  this.$nextTick(() => {
                    this.$refs[ upload ].click();
                  });
                } else {
                  this.$refs[ myQuillEditor ].quill.format( image , false);
                }
              }
            }
          },
          placeholder: "输入内容..."
        }, //编辑器配置项
      },
    };
  },
  components: {
    quillEditor
  },
  methods: {
    onEditorBlur () { }, // 失去焦点触发事件
    onEditorFocus () { }, // 获得焦点触发事件
    onEditorChange () { }, // 内容改变触发事件

    handleSuccess (res) {
      // 获取富文本组件实例
      let quill = this.$refs.myQuillEditor.quill;
      let code = res.data.data.code;
      // 如果上传成功
      if (code === 0) {
        let url = res.data.data.url;
        // 获取光标所在位置
        let length = quill.getSelection().index;
        // 插入图片,url为服务器返回的图片链接地址
        quill.insertEmbed(length,  image , url);
        // 调整光标到最后
        quill.setSelection(length + 1);
      } else {
        // 提示信息,需引入Message
        this.$message.error( 图片插入失败 );
      }
    },
  }
}
</script>
© 版权声明
文章版权归作者所有,未经允许请勿转载。
相关文章


您必须登录才能参与评论!
立即登录


@014c924a6e27 箭头函数没有自己的this志向,data中的this依旧指向组件实例
为啥 报错: quill Cannot import modules/placeholder. Are you sure it was registered?